Followers

Showing posts with label mem dex cards. Show all posts

Tuesday, August 20, 2024

New Acrylic Christmas Mem-Dex Dividers

Good Morning everyone, 

Today's project is so awesome a little messy but it is super fun using these new Acrylic Christmas Mem-Dex Dividers from Clear Scraps. I hope you like these as much as I did, so many ways you can decorate these. I have all the links down below for you. 

Holiday Mem-Dex Dividers

To start off I place the acrylic mitten in an embossing folder and emboss.


Next I painted the mitten red, set aside to dry. 

After drying I place some white flower soft on the end of the mitten. 


Next I used white gesso to paint on my snowflake. You can also use white paint. I placed a few coats on it and set aside to dry. 


Once dried I came back with some faux snow I made using instant snow I had in my stash. I place the glue all around the snowflake and then started adding the faux snow on top. 


This was a nit messy as you will see. I wanted to try to add some acrylic paint to the acrylic tree. So I added a few drops of green and red dots around the tree. 


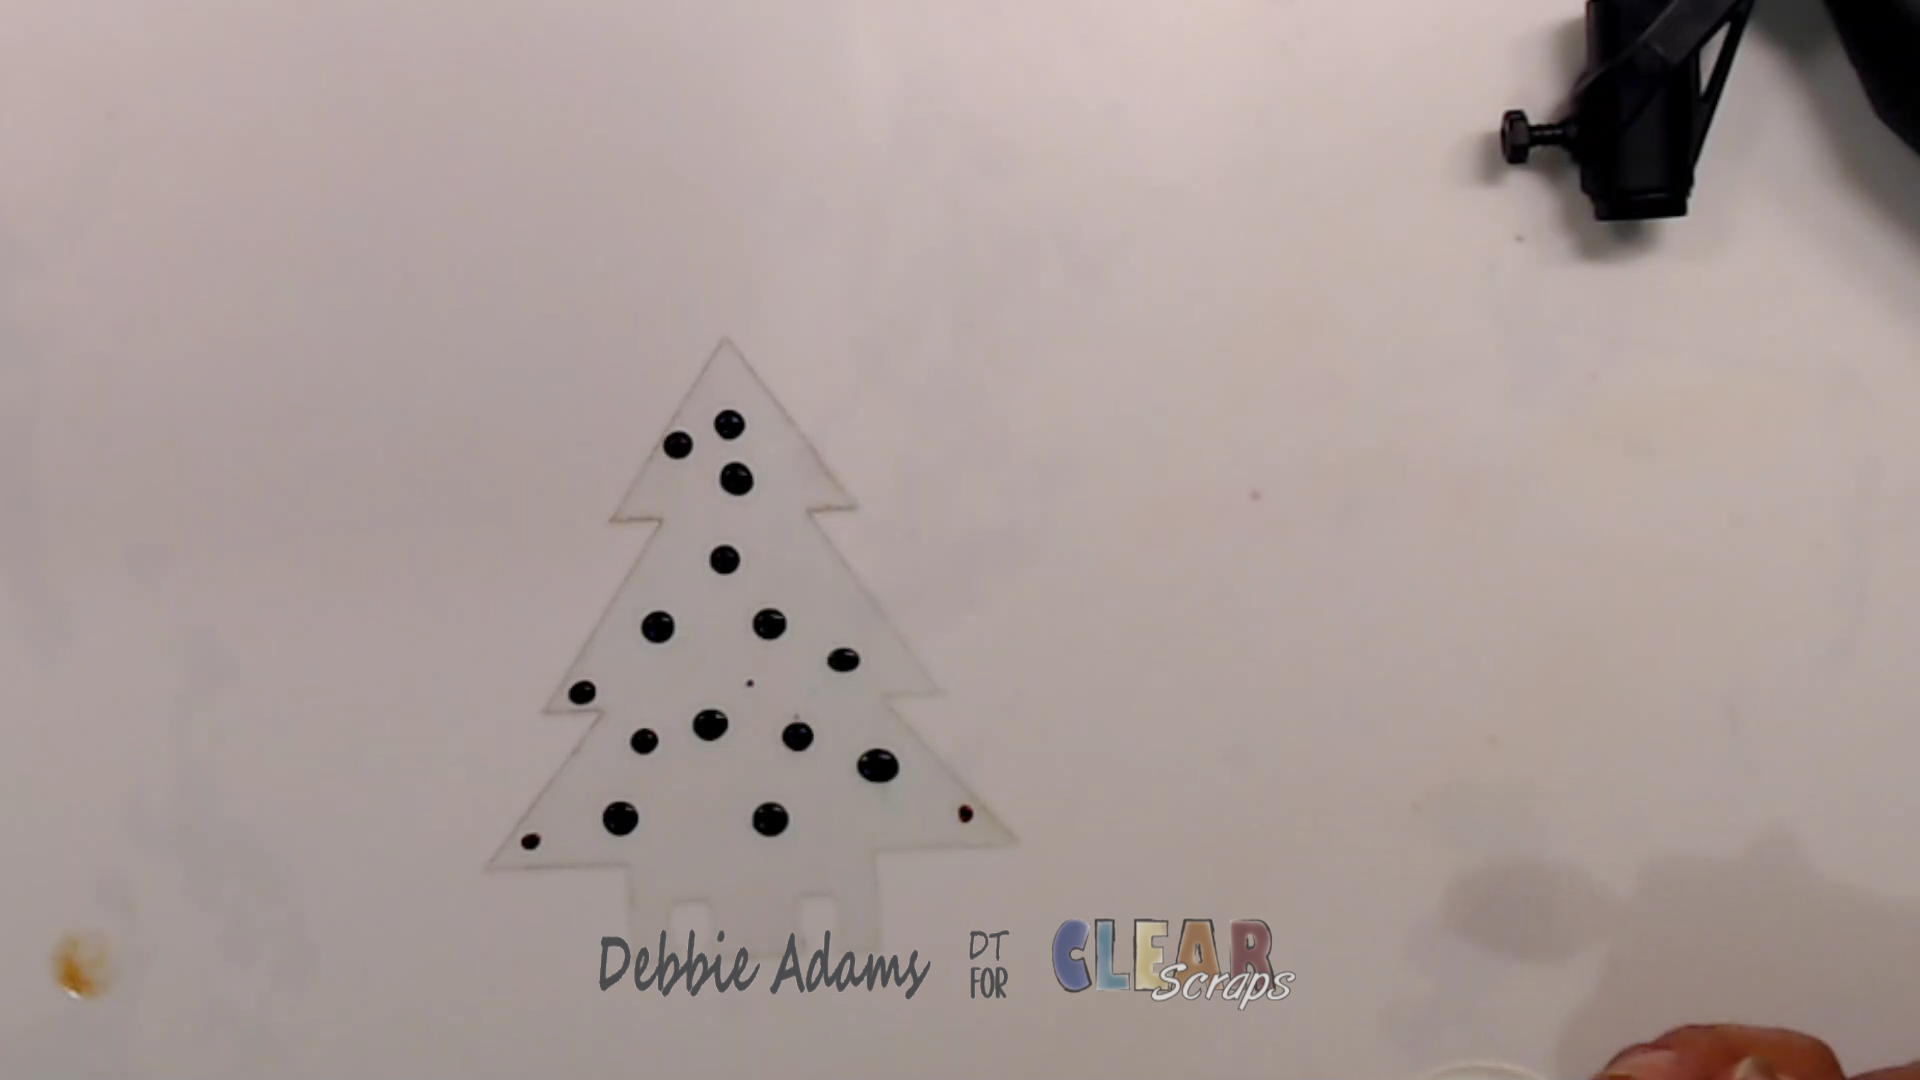
I added a bit of rubbing alcohol around and used my little hand held blower to move the paint around. 
I just kept adding some paint on and spreading around and added some gold in there as well to give a little bit of lighter color. Once I got the look I wanted I set aside to let dry. 


Here are finished Acrylic Mem-Dex Cards all decorated. I just love how they turned out. Really festive and perfect to fit inside one of the New Mem Dex Card Holders you can get from the Clear Scraps Store. 


I  hope you enjoyed today's step by step tutorial sharing this amazing New Wooden House memry-dex box along with the New Harvest mem-dex dividers. I had so much fun decorating both of these items and definitely would love to try out other themes using this House Memry-Dex Box.
To check out these New products and more just click on the name of each product and it takes you directly to the item in the Clear Scraps Shop. 
Thanks for joining me today.

Happy Crafting my Friends, 

Join us one facebook and instagram for more inspiration. 

https://www.facebook.com/ClearScraps

https://www.instagram.com/clearscraps/


Monday, July 22, 2024

Fall Chipboard Embellishments MemDex Cards

 Hi everyone, 

I am so excited to bring to you some New Fall Chipboard Embellishments from Clear Scraps. These are New Fall Chipboard Embellishments are so fantastic, they're perfect for Mem Dex Cards, Fall Cards, Scrapbook Layouts and more. I have all the links for the items I used throughout the post. 


To start off you want to punch out all of the chipboard embellishments. 

Next I covered the front and back of the Regular Chipboard Dividers/Mem Dex cards with Fall pattern paper. 

For this chipboard divider I painted 2 coats of yellow paint on the chipboard word pumpkin. I let dry and then rubbed on some orange gelato over the bottom portion. Next I used Orange Embellishment Mousse and covered the pumpkins. I adhered down to the chipboard divider with adhesive. 


For this next divider piece I painted the "Hello Fall" a mustard yellow and green. Once dried I placed some glossy accents over the top of the words. For the acorn I painted the chipboard piece a copper brown and for the top of the acorn I flocked in brown. 


This divider is so pretty. I painted the truck a dark orange color and embellished with stickers from the paper Fall paper collection. 


Here are all three of the Chipboard Dividers using the New Fall Chipboard Embellishments. I think they turned out so great. 

I hope you enjoyed today's step by step tutorial showing how you can use these fun New Fall Chipboard Embellishments to embellish your mem-dex cards, cards, scrapbook layouts and other projects.  To check our these New items just click on the name of each product and it takes you directly to the item in the Clear Scraps Shop. 

Thanks for joining me today.

Happy Crafting my Friends, 


Saturday, June 15, 2024

Fun Summer Purses Mem Dex Cards

 Hi everyone,

Hope you all are doing well today. Today I am bringing you some fun Memory Dex Cards (MDC) for summer. I have a few techniques you can use to create a stunning and fun mem-dex card for your craft swaps with your crafty friends or maybe something decorative for your rolodex. 


Here are the items I used from Clear Scraps. I am loving this 5x9 flower stencil. 

Purses Chipboard Dividers 3 pk.                             5x9 Flowers Layering Stencil


MDC 1 - 

For the first one trace just the purse portion of the mem dex divider and then adhere to the chipboard purse divider. 

Next I used some gold embossing powder to emboss the handle of the purse. I next placed some stickers from my stash to decorate the Mem Dex Card Divider. I used these cute stickers a Summer dress, sunglasses with some cute shoes and perfume are perfect for a cute summer look, and I added some beautiful flowers to finish it off.


MDC 2 - 

MDC 2 -

For the little clasp purse I placed gesso on top first. I used some clear gesso and let dry for few hours or you can dry with a heat tool.

For this one I painted with a lovely turquoise blue. Once this was dried I placed my stencil on and used a sponge applicator to apply versa mark on for embossing. 


I embossed with gold embossing powder and also embossed the two little round clasps. 


Here is the finished "So Chic" Mem dex divider. I just love how this one turned out. I really like the flowers stencil so versatile and fun to use. 
 

MDC 3 - 

For the last mem dex card divider I traced onto embossed paper, cut and adhered on to the chipboard purse. I did emboss the handle with gold first and then went over it in black embossing powder. 


Here is the 3rd chipboard mem dex purse finished. I used some chipboard flower pieces from my stash. 


Here are all three mem dex dividers finished. I just love how each one turned out.

I hope you enjoyed today's step by step tutorial sharing how to use some fun stencils to create these beautiful and fun Purses Chipboard Dividers using some of Clear Scraps products. I just had so much fun creating these. 
As always Thank You for joining me today. 
Happy Crafting my Friends, 


Tuesday, May 21, 2024

Grow with Love & Hearts MemDex Cards

 Hello everyone, 

Today I have the beautiful chipboard Heart Chip Dividers that come in a 3 pack. These are so cute and so versatile you can use them for any them not just Valentine's Day. I created mine to go with spring as that is one of the themes we are working with this month for Clear Scraps. Let's get started decorating these fun memdex card dividers. Down below I have the photo and link for your convenience so you check these out at the shop. 

Heart Chip Dividers 3 Pack                                                  5x9 flowering layering stencil


For the first mem-dex card I painted it yellow. I did add 2 coats of paint, let dry thoroughly before decorating. 


 Next I took the 5x9 flower stencil and added some white flowers. Set aside to dry. 


Once dried I adhered paper to the back of the mem-dex card and edged each flower with nuvo drops in different colors. 


 After the nuvo drops dried I placed on some the embellishments from the Graphic 45 paper collection I used. I think this turned out so cute. 

Next on to the #2 mem-dex card. 
I traced the mem-dex with the three hearts on top of it. I just traced the bottom of the mem-dex card not the hearts. Cut out once done tracing. 
 

Adhere the paper on to the front and once cover on to the back of your card. 


Next I painted the heart on top white and added my sentiments from the paper collection.


Here is the finished mem-dex card. I went around the hearts with purple stickels. I went ahead and used some foam tape to pop up flowers. This mem-dex card turned out so pretty. 


#3 mem dex card
This next one is so easy to decorate. Trace the heart on to a pattern paper and cut out, adhere the cover you just tranced on to the front and cut out another heart to adhere on the back. 
Once you are done adhering the covers decorate as you wish. I used Graphic 45 Grow with Love paper. 

Here are all three together. I think these all turned out so pretty. I just love that you can either keep these for a future swap or send on to a crafty friend. 
These little mem-dex card are so adorable. I like that at the shop you have various shapes and sizes to choose from when creating a crafting project. d
Thanks so much for joining me I have the links to both of the items I used in today's step by step tutorial above and throughout the page. 
I hope you have a wonderful day and Happy Crafting


Thursday, May 2, 2024

Bee Happy In Pink

Good Morning everyone,

Today I have two fun projects using the May 2024 Card, Tag and More Kit. I share how to use the Flower Metal Dies and we use the honey comb chipboard along with the stamp set and papers you receive in your kit. I hope you enjoy today's step by step tutorial along with further details from the video tutorial (down below). I also hope these projects give you some inspiration on how to use all the fun items in the Kit.


     Card, Tag and More Kit


MemDex Card -
I used a metal die from my stash to cut chipboard for the memdex card. Next I cut out two pieces of the pattern paper from the Card Kit and adhered one on the front and one on the back.

For the honey comb I decided to used a sparkly pink glitter to cover the honey comb. 
I used glue all over the top of the honey comb sprinkled glitter and let dry. 


Here are the flowers I made using that cute flower builder metal die that comes in the Card Making Kit. I just love these little flower, they are so dainty and pretty. Down below you can see I added the small little buds to the ends of the tiny green leaf ones and how I added the small scalloped piece to the center/top of the flower that petals are downwards. The other flowers I layered on top of one another. Next I just adhered the back of each green stem to the back of the flowers and let dry. 


Next I adhered the honey comb to the top right side of the memdex card and started adding my leaves and flowers. For a 3D look I added foam tape to the back of the my flowers. 


Here is the finished Bee Pink MemDex Card. 

Small Easel Card -

For this small easel card I cut my light green paper 3 7/8 x 8 inches.


Fold in half and then fold the top flap in half this is the start of the easel card. 


Next I cut all my layers. The dark pink is the base, the cream (which is actually a lt. yellow glitter paper) is adhered on top of the dark pink paper and bottom pattern paper is adhered to the light cream colored paper that is 3 5/8 x 3 5/8 inches. 
You will need 3 of the 1 7/8 x 3 3/4 inch pieces two that are for the inside and one for the 1/2 fold on the back of the front base.


Adhere the square pieces together. 


Place glue on the bottom half of the folded front. 


Adhere the square base down. 


Next cut the pieces to cover in the inside of the card. 


Next I used the stamp set that is in the Card Kit. Stamped "Thank you" on the die cut banner from my stash. 


Here is the card finished along with placing the flowers from the flower builder die set. 

 I hope you enjoyed today's step by step tutorial. For more details you can always view the video tutorial process, which is at the top of the page. 
Thanks again for joining me, I have all the links listed for you throughout the post so just click on the words and you will be taken directly to the store. 

Wishing you all a great day and Happy Crafting. 


May Scrapbook kit - https://tresjoliekits.com/collections/scrapbook-kits/products/scrapbook-kits-2024 Card Making Kit - https://tresjoliekits.com/collections/card-kit/products/cards-tags-and-more-kit?variant=43490491039930 Mixed Media Kit - https://tresjoliekits.com/collections/mixed-media/products/mixed-media-kit-2024?variant=43490486812858