Followers

Showing posts with label Really Reasonable Ribbon. Show all posts

Sunday, January 17, 2021

That Winter Feeling

 Hi everyone,

I hope you all are staying safe, warm and healthy no matter where you are.  : D

I have another Wintery type of card for you and it's created with Stamperia Blue Land. I couldn't help it, lol, this paper is just so pretty.  I love the images of the little stickers I used for the card and they match the paper so well. The white deer on the tag so pretty, as it walks through the woods on a snowy day. The 3 circles are so full of wintery bliss with the night sky in one as the white horse runs through the snowy night sky, the second has glistening snowflakes falling and the last one has such a wonderful sparkle to catch the eye. 

Over at International Art & Soul we have a new challenge up and it's "Winter",  This is our Challenge 100 Winter theme. I hope you can join us. 

Most of everything to create this card I had in my stash. Supplies I used -

Stamperia paper collection - Blue Land

Recollection - silver glitter paper

Really Reasonable Ribbons - white ribbon (I don't remember the name)

InLoveArtShop - Merry Christmas Stickers pack 46 - https://bit.ly/3lZGm6e


Challenges entered:

Monday, August 21, 2017

Growing In Unity Guest Designer Week

Good Monday Morning!

So this week I am so excited to be a Guest Designer for Unity Stamps! Yep, All week long I will be sharing some of my creations using their wonderful stamps that I was given by an awesome crafty friend Jennifer Scull. Thank you so much Jennifer. You can go to Unity's Facebook page and join the fun as well.
**Don't Miss Out**
Be sure to comment every day this week as I will pick two winners from the comments at the end of the week to receive a bundle of stamps from Unity! How Awesome it that!!! :D  

My 1st creations I am sharing a birthday card I created for my daughter's 17th Birthday. Yep, how time flies she is the youngest of 4 girls and Wow!! She only has 2 yrs left and then it will be off to college. So this birthday card I wanted something bright as she loves bright happy colors.


I used Unity Stamp - Party Hat Wishes. This stamps set is so fun. I like that you can color in the sentiment and the party hat.This stamp set comes with a few sentiments, 2 banners, and the party hat, it's a great stamp set. I stamped the party hat with memento ink rich cocoa, colored in the hat with Bic markers. Fussy cut and popped up with a 3D foam dot. 


Supplies:
Paper - My Minds Eye - Hottenanny, white card stock
Inks - memento ink rich cocoa; Bic colored markers
Accessories - pink polka dot ribbon from Really Reasonable Ribbons; Stickles - gold

Entering Challenges:
Really Reasonable Ribbons - Challenge #170 AG


You can also see Unity on the following:

Thank you for stopping by today and don't forget to leave a comment for a chance to win some stamps from Unity. 
Hugs, 
Deborah xxxx

Sunday, July 23, 2017

Wedding Wishes

Hi Y'all!!

Well I am back!! I have not posted in a long while due to work and other obligations. I hope you all are doing well. I sure have missed you all and missed crafting. I've had a lot going on since my last post in October. I have a new little granddaughter Ravyn that was born July 12th and I have quit a job to take on another position where I am able to stay at home now. :D  So with that being said I have created a new card for my niece who is getting married in August, she also had a baby last year. She's so precious, too. The card I created is for the International Art & Soul Dies Challenge.

So here is my card,

Very simple yet elegant card. As I said I just started creating again after many months of taking off from card making and doing many other crafting. It was like starting all over again. lol
I have to say I really enjoyed getting a chance to play again, I really needed it.
This card is made with several layers. I have the card base using cream vanilla cardstock and a carol cardstock using the Spellbinders Majestic Labels Twenty-Five, and of course some beautiful flowers. I also used an old stamp set from Stampin Up - Wedding Elegance, I am so glad I have kept this one definitely comes in handy. (links are posted below where I got some of my supplies)

**To make this card I layered the carol base on top of the cream card base, then layered the first die cut on top of the carol base, the second carol die cut has 3D pop dots on the back to give a raised look and the last die cut I lightly stamped the wedding bells and embossed the "Wedding Wishes" on top of the bells, placed 3D pop dots again on the back and placed down. I added the multi flowers I had from my stash, which were the same colors that were on her wedding invite. I hope she likes it.

Here is the inside of the card - For the inside of the card I added a photo from the
"Save the Date Invite" I thought it was so sweet and definitely added a lovely
personal touch to the inside of the card. 


Supplies:
CardStock: Carol cardstock from Create and Craft; Cream/Vanilla cardstock is from CountryCraftCreations
Stamp: Stampin Up - Wedding Elegance
Accessories: Spellbinders Die - Majestic Labels Twenty-Five; Mulberry Flowers are all from Really Reasonable Ribbons. 

So I want to invite you all over to part-take in our Die Challenge over at International Art & Soul where we just create to have fun. Don't forget to use your Dies. 
Thank you all for stopping by and I will be posting more in the next week. 
Hugs, 
Debbie 😊

Saturday, October 29, 2016

Christmas Hair Accessories

Hi all,

Today is my last post for Really Reasonable Ribbons. I am so sad to be leaving such a wonderful team. I feel so honored to have been a part of Bonnie's team and to have worked with her for the past 6 months.I have learned so much from Bonnie and the team. I truly have loved every minute of it and loved working with such beautiful ribbons from her store. Thank you Bonnie for having me on your team, I've had so much fun!

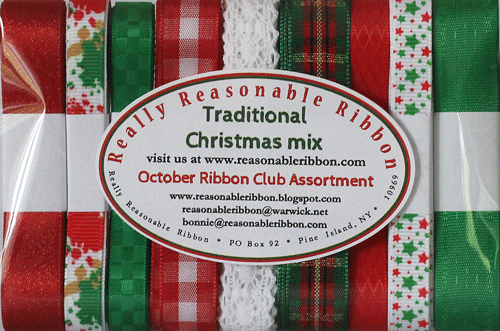
For my last post I made a few items with the beautiful ribbons from this months Ribbon Club Assortment - Traditional Christmas Mix. I seriously had a hard time deciding on what to make. lol
I made several different hair accessories with this beautiful assortment. I used Bonnie's tutorial again to make the hairband and I made a baby hair clip and a regular hair clip. Of course I am giving a couple to my granddaughter and one to my great neice Sophia, who was just born.

Here are the items I used to make all my Hair Accessories, you can find all these at
Headband, Rectangular clips, and Round Head Snap Clips

Here is a photo showing all the items using the 

 For this headband I used Bonnie's tutorial showing you how to use Really Reasonable Ribbons
to create these awesome headbands. I added a bow on top of the headband
with a little red flower embellishment. 

Here is a close up of the little red flower embellishment. 
These are new in the store and they are so so cute. I totally love these
little embellishment. They are 10mm Resin Flower with Rhinestone Flatback
Cabochons. I have the multi colored pack that comes with red, white and other colors.

Here is a photo of the two hair clips I created using October ribbon club assortment -
Traditional Christmas Mix. These ribbons are truly beautiful bright green and reds for
Christmas, they are just gorgeous. I coldn't help but add the cute little flowers in the middle. 
These little flowers are just cute. Great addition to any project. 

Here is the back of the first hairclip using the 2 3/8 inch round head snap clip.
I only glued the ribbon on the top of the clip and at the ends of the bottom of the clip, as I didn't 
want it to have an affect on the opening and closing of the clip. I created a triple layered bow with my Bow it All, bow maker. I then double layered my bows, last I glued the little acrylic flower on top of the bow.  

A close up of the side of the 2nd hair clip, showing how I glued the ribbon onto the Rectangular clip with teeth.  These little hair clips are just perfect to make baby hair clips. 


Supplies:

Thank you all so much for stopping by today I so appreciate it. I hope you are inspired to use some of these items. I just love using the ribbons from Really Reasonable Ribbons they are just gorgeous, and the flowers are just beautiful. Check out the items I used plus other wonderful items at the Really Reasonable Ribbon Store.  As I sign off for the last time with Really Reasonable Ribbons I would like say again, Thank you Bonnie for inviting me on your team and all your support. 
Stay tuned as I have a wonderful announcement coming up Next Week. Plus a giveaway. :D 

Hugs and wishing you all a great crafty day, 
Deborah xxx

Wednesday, October 19, 2016

A Little Trinket Box

Hi all,

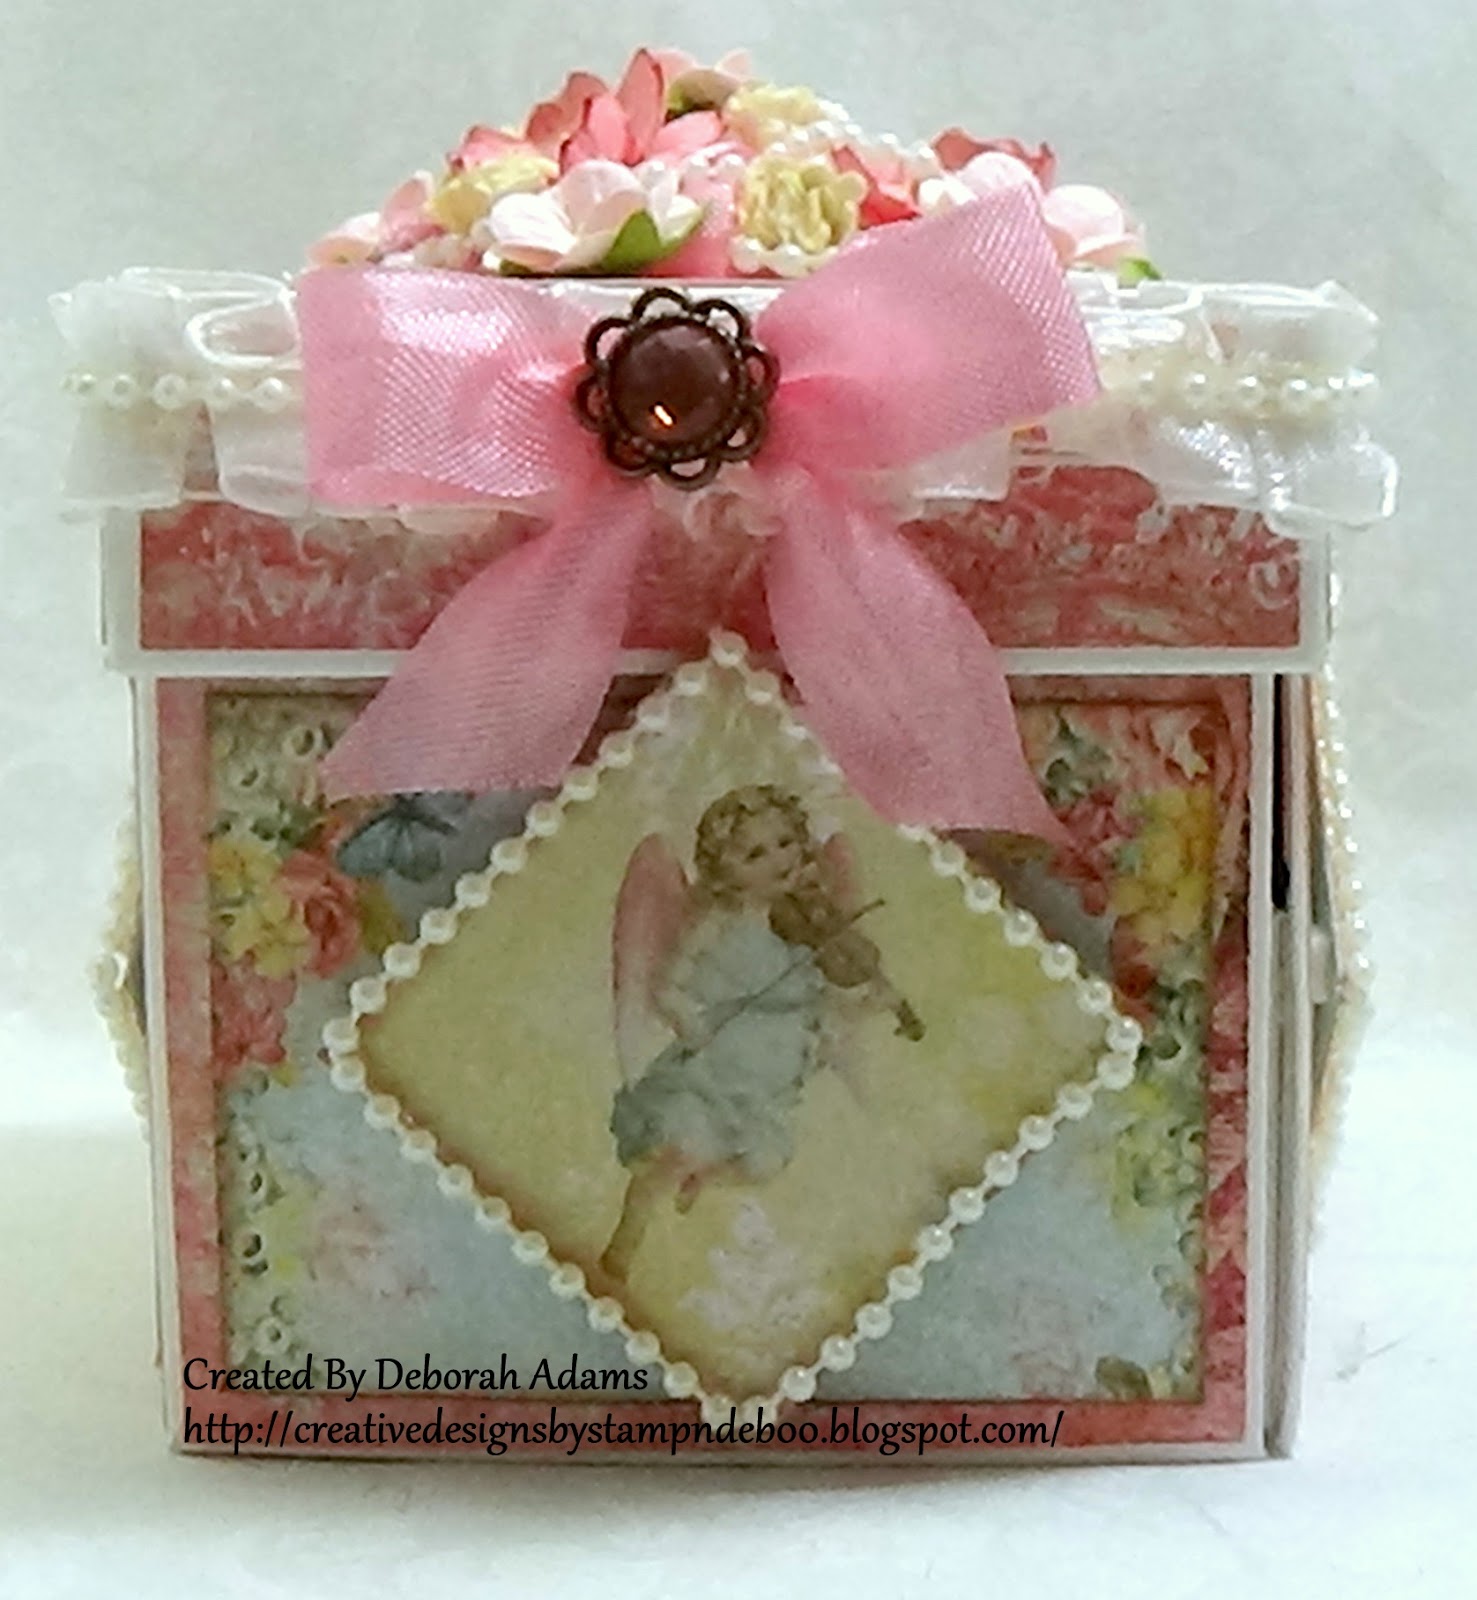
I have a Design Team project I created for Really Ribbon Ribbons today. A little trinket box I created using some great ribbons, beautiful wild orchid flowers and some fun little trinkets that are new at the Really Reasonable Ribbon Store.

I do have an announcement before I get started, this is my second to last post I will be doing for the Really Reasonable Ribbon Design Team. I am really sad that I am leaving the team they are such a great team to work with and Bonnie Garby is just amazing. I just want to say Thank You to Bonnie for having me on your team it has been a pleasure and I've had a great time using your beautiful ribbons and wild orchid flowers. Thank you Bonnie.

Here is my project -
So here is my new Trinket Box. Yep, I made myself something for once. lol
I am so excited I just love it, I used the beautiful Blue Fern paper collection - Blush. 
 I am putting my charms and little trinkets inside. 
So I used some Wild Orchid Flowers for the top used with the beautiful 
Acrylic Rhinestone embellishments, these are so beautiful! You gotta check these out. 


Here is a great shot of two sides of my box showing the vivid pink seam binding and 
I also used the Bow It All V3.0 to create my bow.


 Here is a great shot of the sheer box pleats white ribbon I used around my edge of my lid. 
I used some tiny strands of white pearls I had in my stash, I bought from JoAnns a while back. 


 Here are a couple of photos showing the top of my box. I actually placed the seam binding bow down first and then laid my flowers around it, added my tiny pearl 
strands around the flowers. Then I added more flowers around the top. 
I just love these little flowers they are just darling. 

Just so you know I have used this Sheer Box Pleated ribbon a few times and I just love it.
I have to say it's probably one of my favorite ribbons from the store as it's so versatile. 


Supplies: Really Reasonable Ribbons - 
Thank you all so much for stopping by today I so appreciate it. I hope you are inspired to use some of these items. I just love using the ribbons from Really Reasonable Ribbons they are just gorgeous, and the flowers are just beautiful. Check out the items I used plus other wonderful items at the Really Reasonable Ribbon Store. Please leave me a comment as I love reading them. 

Hugs and wishing you all a great crafty day, 
Deborah xxx

Thursday, October 13, 2016

Christmas Time

Hi Everyone!!
Please join us today for the Really Reasonable Blog Hop!!

Time To Celebrate!!
IT"S BLOG HOP DAY!!


If you are here you just came on over from Kathy's Blog and are on the right track. If not, why not head back to the RRR Blog and start from the beginning so you don't miss any of the terrific projects from my teamies.
Really Reasonable Ribbon we are kicking of this months Blog Hop showing you October Ribbon Club Assortment - Traditional Christmas Mix. 
Aren't these ribbons just beautiful for Christmas!! Although I am not ready for Christmas yet, these beautiful ribbons sure do get you in the mood for making your Christmas cards.

Monthly Ribbon Club, Domestic


For my project I used the beautiful 3/8 Checkerboard Satin and 5/8 crochet lace.
Just beautiful ribbons that go with this wonderful paper collection from Graphic 45.
Here is a close up of the crochet lace sitting on top of the Checkerboard satin ribbon, isn't that
green just amazing?! I love it!!

For my card I used Graphic 45 Twas The Night Before Christmas. I used fussy cut the holly leaves, santa with the toy sack, the little stamp image showing the child sleeping and the Merry Christmas sentiment. I used stickels around my holly leaves and Santa's toy sack and on top of the Santa looking over and used 3D adhesive to pop up my images.


Thank you all for stopping by today. If you would like to purchase these Traditional Christmas Ribbon please head to  Really Reasonable Ribbon store.
Also join us for our fun Halloween Challenge that is going on right now.
Next you will want to head over to Cherry's Blog to see her wonderful project.
Have a great time 
and
Hugs, 
Deborah xxx

Sunday, October 9, 2016

Halloween In Pink

 Hi Ya!!!

How's your weekend going? Mine is going pretty good. It was so lovely today in Texas just beautiful. I hope you all are okay where ever you are and to all my crafty friends in Florida I am praying for you all.  
Today I am up at Really Reasonable Ribbon, yep, I created another Halloween card but in different colors. I thought this would be a fun and challenging creation.  Especially when I saw a few challenges that wanted a pink Halloween card or project. I had to take on the challenge. :D 
For my card I used one of the pink diamond satin ribbons from the Pretty Pink Diamond Satin Assortment and the spider web black satin ribbon


For this card I used spiderweb embossing folder. I embossed the Witch Hat from Graphic 45 stamp Happy Haunting in pink and embossed the the little stars in the sky. I fussy cut the little bats that are from another stamp in my stash and placed them around the Pink Witch Hat image. I created a beautiful pink bow using the pink diamond satin ribbon with the Bow it All V3.0 Tool. I also used the rest of my Spider web ribbon it's behind the my image. I also used an edge punch for the bottom layer of my card. 

Supplies:
Reasonable Ribbons - spider web black satin ribbon and  Pretty Pink Diamond Satin Assortment
Stamps - Graphic 45 stamp - Happy Haunting
Paper - Recollections - Midnight Magic
Inks - Distress inks picked raspberry; black memento ink; distress inks - faded jeans & chipped sapphire; copics
Accessories - Spider embossing folder, Fleur De Lis edge punch; embossing powerder clear and pink; crystal stickles; 

Challenges entered:
Simon Says: Halloween Inspiration; Wednesday Challenge Blog
Crafty Ribbons Challenge: Challenge #170 Halloween Colours
Sisterhood of Snarky Stampers: SOSS #69 - P is for Pink Halloween
Crafty Gals Corner: Challenge #92 - Punches/Die Cuts
Crafty Creations Challenge: #325 Halloween
Crafty By Designs: October Anything Goes
Mojo Mondays - The blog mojo mondays #469 Contest

Thank you so much for stopping by today I really appreciate you all. I would like to invite you over to Really Reasonable ribbons to get more inspiration from my teamies and to join our fun Halloween Challenge follow the link -  Really Reasonable Ribbons Challenge Halloween. 


Have a great weekend
Hugs
Deborah xxx

Friday, October 7, 2016

Happy Halloween


Hi Ya!!!

I hope you all had a wonderful week. Today is a new challenge over at Really Reasonable Ribbons our theme - Halloween!! Yep, so you get to share all your spooky ghoulish creations with us, How FUN IS THAT!! :D

So of course I used the Too Cute To Spook ribbon assortment for the Halloween Tag I created. I just couldn't help it. I used the spider web black satin ribbon with the beautiful double faced satin tangerine.   If you haven't got these awesome ribbons yet, you gotta get them. They are just beautiful and so great to use for your Halloween projects. I also used a TH Stamp and numbers along with Recollections Halloween paper and some die cuts.

 Such a fun tag for Halloween. I stapled the spider web ribbon on small stamped tag.
I embossed the stamped image with black embossing poweder and used
 TH inks around my image. I wanted to give it like a sunset type of look. 
And with spider webs on the stamp I had to use the spider web ribbon. Right??? 
I fussy cut the little sentiment on the top popped it up with 3D adhesives and I fussy 
cut the scary pumpkin on the bottom. The fence is a cut from my cricut. For my 
background I used Anna Griffith die spider web die cut and a spider from 
the collection. I added black stickles to the spider. 
I love how it all came together. 

Supplies:
Reasonable Ribbons - spider web black satin ribbon and double faced satin tangerine
Stamps - TH stamper Anonymous - x-ray collage  Halloween
Paper - TH paper ;Recollections Halloween paper; Ranger Manila tag; TH distress watercolor cardstock
Inks - Distress inks dried marigold, mustard seed
Accessories - Anna Griffith Dies - spider web and spider; Cricut image - fence w/crow; TH Ideaology - alpha-parts Ransom; black embossing powder and black stickels

Challenges entered:
Simon Says: Halloween Inspiration; Wednesday Challenge Blog
Crafty Ribbons Challenge: Challenge #170 Halloween Colours
Crafting With An Attitude: Challenge 20
Crafty Gals Corner: Challenge #92 - Punches/Die Cuts
Crafty Creations Challenge: #325 Halloween
Crafty By Designs: October Anything Goes

Thank you so much for stopping by today I really appreciate you all. Head on over to Really Reasonable Ribbons Challenge Halloween to join us for the Fun Halloween Challenge. You can also see what fun creations my teamies have for you.

Have a great weekend
Hugs
Deborah xxx

Sunday, October 2, 2016

Thinking In Colors

Hi all,

I hope you all are having a wonderful weekend. Guess what today is??
Yep, it's a new start of a great challenge at One Stitch At A Time Ch. 272 Anything Goes with Monochromatic. I don't know about you but these cards are always so hard for me.

For this image I used my gelatos and did watercoloring on this inside of this gorgeous butterfly I did a pink to purple coloring on the top and then I used blues on the bottom. I just love this butterfly designed by Coosty Creations - Love Is To Be Free, just click on the name this will take you directly to the link. I used my copics to color the flowers and the leaves then added star dust stickles over the flowers to make them sparkle. I was going for a simple look on this card, I wanted the butterfly to be the main focus. So I enlarged the butterfly, cut my card at 5x5 and placed the butterfly right on top with 3D adhesive squares. I added a lovely lavendar satin sheer organza with satin center bow to the top of the card.


Our Sponsor

The Prize


Supplies:
Stamp - Stitchybear Digi Outlet Store - Love Is To Be Free
Paper - BoBunny paper collection
Inks - Copics, Gelatos

Challenges entered:


Thank you all for stopping by today and Thank you for all the wonderful comments I really appreciate it. Please head over to the   One Stitch At A Time Ch. 272 Anything Goes with Monochromatic.we'd love to have you. Also you will find some great inspiration from my teamies. 
Thank you again,
Hugs, 
Deborah xxx

Thursday, September 29, 2016

Cute & Spooky


Hi all,

It's my turn to be up on Really Reasonable Ribbon Blog today. I am sharing the wonderful "Too Cute to Spoke Mix" from the Reasonable Ribbon shop. 
I made a cute little card with some Halloween paper I had in my stash from years ago. I am so glad I found this paper it's so cute I used a cut apart sheet and cut out the coffin. I just like the cute Wonky Squares on White Satin Ribbon looks great with this card. I also used the Bakers Twine Green in the black button. I also used the cute little Halloween Too Cute to Spook print on black grosgrain ribbon is adhered in the middle of the card.


Here is the inside of the card. So cute I thought this little card was perfect for this inside.
I used the 5/8" Gauze Print Satin Ribbon on the top of the cut apart card
and then used a black button with the Bakers Twine Green

Here is a close up of the bow I created using the 


Supplies:
Really Reasonable Ribbon - "Too Cute to Spoke Mix" from the Reasonable Ribbon shop.Bakers Twine Green
Paper - EchoPark - GhostTown; Little Yellow Bicycle - trick or treat; Imaginisce paper (no name)
Ink - TH Distress ink - Hickory Smoke
Accessories - Black buttons

Challenges Entered:
Monday Greeting Challenge - Anything Goes GCC092616
Classic Design Team Open Challenge Blog: 1st September 2916 Classic Design Team #06
Crafty Creations Challenges: #325 - Halloween
Creative Moments: Challenge 103 Anything Goes/2 Pattern Papers
Word Art Wednesday:Anything Goes - Challenge Weeks #250-251
The Crafty Addicts: Challenge #25 - Anything Goes/ Use Pattern Paper

Thank you for joining me today. I hope you were inspired to make a Halloween Card and stop by Really Reasonable Blog check out our Challenges. We still have one going and you have some time to join before the new one starts next week. And if you want any of these scrumptious ribbons head over to the Reasonable Ribbon Store.

Wish you all a great rest of your week and Thanks for stopping by.
Hugs, 
Deborah xxx

Tuesday, September 20, 2016

Too Cute To Spook Headband

Hello all,

I have something to share with you all today. I tried something new with ribbons from Really Reasonable Ribbons. I have been wanting make a headband for many many months but just a little nervous to do it. You know Bonnie, who is the owner of Reasonable Ribbons, she makes headbands all the time and they are just beautiful. Well I followed one of her videos and she makes so easy to create one of these fun headbands I had so much fun. Of course I need a little more practice but I thought for my first one it was pretty good. I made this headband for my granddaughter Reminie, she's been talking none stop about Halloween, being 2 years old this will be a fun time. I think she'll like the headband. :D

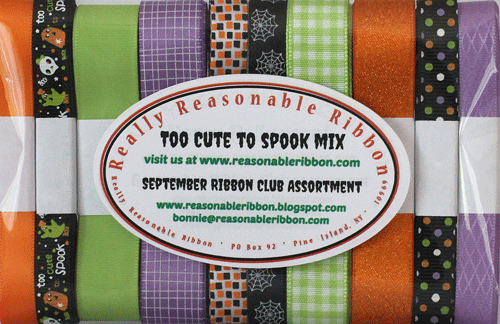
I used the wonderful Too Cute To Spook Mix it's the September Club of the Month Assortment.
So super fun!!
Monthly Ribbon Club, Domestic

 For the hairband I used three ribbons 

 Here is a front view of the headband. 
I just thought these ribbons looked good together 
and I really like the little black ribbon 
To cute to spook print is just the cutest Halloween ribbon ever!! :D 

 Here is the back of the headband it looks so cool. 
I am really please with how it turned out. 

A lovely sideview, you can see the little green spooky guy, 
there is a skull and the word Boo. 

 A topview of the headband showing the bow I created using the Bow It All V3.0 found at 
Reasonable Ribbon Store. You can also get the headbands at the Store too. 
Here is the link to Bonnie's Youtube video showing you how to make these fun headbands.

Supplies:
Accessories: Really Reasonable Ribbons - Too Cute To Spook Mix and the plastic headband 1/2 inch.

Challenges entered:

Thank you all for joining me today. I appreciate you taking the time to stop by and visit. Hope you all head over to the Really Reasonable Ribbons and check out the store and this months ribbon of the month  Too Cute To Spook Mix. Also don't forget we have a fun new challenge up so join in the fun. 

As Always Take Care 
Hugs, 
Deborah xxx

Tuesday, September 13, 2016

Purr-fect Ribbons for Halloween

Hi Everyone!!
Please join us today for the Really Reasonable Blog Hop!!

Whoot, Whoot!!
IT"S BLOG HOP DAY!!


If you are here you just came on over from Kathy's Blog and are on the right track. If not, why not head back to the RRR Blog and start from the beginning so you don't miss any of the terrific projects from my teamies.
Really Reasonable Ribbon we are kicking of this months Blog Hop and showing you September's Ribbon Club Assortment Too Cute To Spook Mix. This collection is just perfect for Halloween.
I am so excited to used this up for Halloween. I hope you get a chance to grab this assortment for your Halloween decorating. :D
Just look at these wonderfully fun colors the orange, purples,greens and the 3/8 inch grosgrain and satin ribbons are just lovely.

Monthly Ribbon Club, Domestic

I couldn't help myself when I saw this ribbon assortment I had to make a Halloween Wreath. 
For center of my wreath I used an old Halloween window decoration
I had for years. It like a sun catcher, you put it in the windows and it 
shines pretty like stained glass. But this is made from plastic. I glued it 
down in the middle of the wreath. 

Here is a close up of the the wreath. 
I added lights to back of it. 
To make the wreath I wrapped Black Satin w/grosgrain edging around the
wreath first then I wrapped the Gauze Print on Grape Satin Ribbon. I then tied
all the ribbons around on top of the black and purple ribbons. I did double
up some of the ribbons.  Aren't these ribbons so adorable and beautiful? 
They are just perfect for Halloween. 


Supplies I usedSeptember's Ribbon Club Assortment Too Cute To Spook Mix.; 5/8 Satin with Grosgrain Edge Black
From My Stash - Grapevine Wreath, plastic Halloween window decor and lights.

Hope you all are having a great time hopping along to all the Blogs. 
Thank you all for stopping by today. You can find these wonderful Halloween ribbons at  Really Reasonable Ribbon store. And join us for a our next fun challenge coming up this week.
Next you will want to head over to Cherry's Blog to see her wonderful project.
Have a great time 
and
Hugs, 


Deborah xxx

Friday, September 9, 2016

Christmas Cheers

Hi all,

Hope you all are doing well. I have been busy I have some wonderful things to share with you all this coming week. Hope you all stay tuned.
I am here sharing a Christmas card I created using some wonderful ribbons from Reasonable Ribbon Store.
For this Christmas card I used the some beautiful Swiss Dots Grosgrain ribbons 
along with the 1.5 inch Jute Ribbon Red
The paper stack is DCWV Home for the Holidays Collection.  

Here is a close up of the ribbons I used and the beautiful 
I really like how the Swiss dot red and green ribbons are just so vivid, 
really pretty against the mixture of reds,white and green in the paper. 
I thought the Jute added a nice touch against the kraft paper. 


Supplies:

Challenges entered:
Word Art Wednesday - Anything Goes - Challenge weeks 246-247
The Sisterhood of Crafters - Pretty Pretty Ribbons
Inspiration Destination Challenge Blog - Anything Goes Challenge No. 102
Crafting By Designs - Ribbons
DCWV card sketch challenge


If you are looking for some beautiful holiday ribbons to use on your cards or craft creations you really need to check out the Reasonable Ribbon Store, there a lot of beautiful ribbons and don't forget to look at the flowers too.
Thank you all for joining me today and don't forget we have our Challenge you can join using Autumn Colors is the theme. Also we have a fabulous Blog Hop coming up on September 13th you won't want to miss it.
Have a Great Day, 
Deborah xxx