Today we are going to be using the Tres Jolie 2026 May Mixed Media Kit and May Card Kit. Whether you're an experienced crafter or looking for a weekend DIY project, this step-by-step tutorial will help you create a unique and charming bee-themed display you'll love to hang in your home. I have the video tutorial for you as well as the links to the both Kits down below.
2026 May Mixed Media Kit 2026 May Card, Tag and More Kit
To start our printer's tray from the May Mixed Media Kit place some glue on the base of the printer's tray. Only adhere the paper halfway, attach pattern paper from the May Card Kit or from your stash. Lay the paper down and burnish, then add remaining glue down to the lower half of the base and burnish down the remaining pattern paper. ******View Video Tutorial for more details********
Once you have adhered your pattern paper down use a stencil to create a pattern honeycomb look if you'd like.
******View Video Tutorial for more details********
Next take the chipboard honeycombs from the 2026May Card Kit and spray lightly with the Stamperia Mixed Media Color Leather.
While the chipboard honeycomb dries, take the lid off of the Aquamarine Spray and tap the stick with a pencil to create splatters on the paper. Tap very lightly.
Next I inked the printer's tray frame with Walnut Stain Distressed Ink.
For one of the decorations I took the metal spoons and poured some glue inside of the spoon and then added some small dried flowers inside. I then took of the film from the clear lid from the front and back and placed the clear seal on top. ******View Video Tutorial for more details********
Here is what the spoon looks like after I finished added the clear seal on top.
Here is the finished Printer's Tray. Here I decorated each of the window panes using some of the items from the 2026 May Card Kit from Tres Jolie.
Here is a close up of the chipboard honeycomb we sprayed using the Stamperia Mixed Media Aqua Color. Below is the brass spoon I placed some dried flowers inside with glue. The little bee, is a clay bee I created from my stash. The above window I fussy cut a little honey bottle from the paper.
Here is another little honey bottle I fussy cut out from the paper collection and using the 49 and Market laser cuts. The window below I adhered down a large flower and then I adhered down the metal clock and adhered a small flower on top of the clock. I used the pretty yellow leaves around the flower.
Here are a few window panes that are decorated.
Below I have a butterfly with a little tea cup and flower. I also had adhered down a little caterpillar to the edge of the windows.
Here is the spoon below I also placed the glue inside with dried flowers and sealed. I also added a little butterfly in the next pane sitting on a leaf.
The next few window panes I used some foam tape to lift up flowers and butterflies to create a 3D effect.
I hope you found some inspiration from today's project. With this 2026 May Mixed Media Kit for we transformed a simple Printer's Tray with multi-compartments into a stunning dimensional piece of wall art perfect for any cottage-core or rustic themed room.
Thank you so much for stopping by and crafting along with me today.
Until next time, keep curating those beautiful memories. ~Deb
I invite you to check out the 2026 May Tres Jolie Kits.
These kits are amazing and will get your creativity flowing.
Thanks for joining me and Happy Crafting!
I invite you to please stop by ourFacebookpage to see what new items our design team has created using our monthly kits.
You can always post your projects on Tres Jolie FB page - Tres Jolie Club Cafe.
Don't forget to post your project on our Facebook Group Page, link is down below.
We would love to see what you create.
For more details you can always view the video tutorial process, which is at the top of the page.
Thanks again for joining me, I have all the links listed for you throughout the post so just click on the words and you will be taken directly to the store.
Enjoy and Happy Crafting.
Don’t forget to follow us on all our social media:
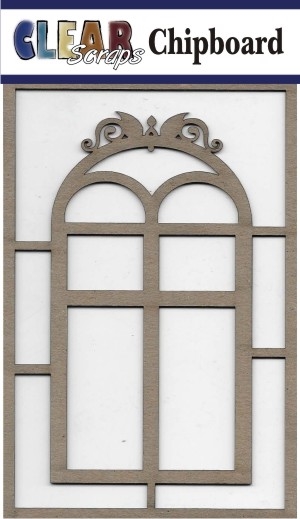
Are you ready for Spring yet? I am so ready for Spring. I love everything about Spring, especially seeing the flowers blooming and butterflies fluttering around. Today I have two beautiful projects that you can create using the Clear Scraps Fancy Window Chipboard Embellishment and the Fancy Butterflies Chipboard Embellishment.
Here are the chipboard pieces we will be using. I did use some paper flowers from my stash, ribbons and design papers.
Next I used a sponge and a gray ink pad to add a little bit of ink streaking it downward to give a whitewashed worn look.
Next I added some foam tape to the back edges of the window.
I decided to create a slimline card so I cut my case card and the mats.
Base is 8cx 8 3/4 inches scored at 4 inches. The mats are all cut at 3 3/4 x 8 1/2 inches. I did use my scalloped edge slimline die for the top mat of my card.
Next I added a scene to the back of the window and adhered down on top of the card.
I started adding my flowers around the window.
Here is finished Spring Window card. I added a sentiment and fussy cut out a butterfly.
I just love how this card came out. it's so full of Spring goodness with the window scenery.
Next I pulled out my gelatos and colored them. I used yellow, pink, lavender, blue and some other colors to coordinate with the colors of my pattern paper.
In order to get a smooth and blended look on the chipboard butterflies simply take a sponge or a paper towel and smooth out in small circles and you can blend the colors together.
Next I cut out my tag and did some fussy cutting. Adhered on the sentiment with some foam tape behind it, as well as the flowers and paper butterfly.
I adhered my chipboard butterflies and added some ribbon on the top of the tag. I also added a few little flat back pearls to around the tag.
Thank you all for joining me today. I hope this gave you some spring inspiration and how you can use these Fancy Butterflies chipboard pieces along with the Fancy Window Chipboard piece on your upcoming projects. I have the links throughout this blog post for you, simply click on the product name and you will be taken right over to the store.
Today I am sharing my Design Team Project using this super cute idea you make in one day. Do you get the kits from Country Craft Creations?? Well if you do, you can use those cute little chipboard mason jars you got in July's Kit and the BoBunny Secret Garden paper collection to make this little mini album.
In my last video about 2 weeks ago I showed you how to use the BoBunny Gesso as a paste with your stencil to make a pattern on the front of your chipboard then you can add the BoBunny pearlescents on top of the stenciled pattern to create a really lovely mixed media cover. You can also use the pearlescents to create a unique look to your metal embellishments and resins.
Hope you are inspired to give this a try.
Check out the CountryCraftCreations Store for everything you see here.
I used
an embossing folder and glitter to achieve my glittery paper look.
First I started with my embossing
folder - Rub vera mark on the flat side of the emboss design, then run through
your embossing machine, spread a heat 'n stick powder on top of the versa mark,
heat the heat 'n stick powder til it is melted on the card, last add your
glitter and then heat til melted into the card.
I stamped my image onto white cardstock,
used the same embossing folder with my image then I cut out the middle part to fit
in the middle of my embossed glitter cardstock (so used the embossing folder
twice, one on the colored cardstock and the other on the white cardstock with
my image); using pop dots on the back of the image to raise it a little. You
can achieve this technique with any type of embossing folders.
The image I used isRosie Spring Flowers, its just such a lovely image for
Spring and Easter.