Followers

Showing posts with label WaterColoring. Show all posts

Friday, August 7, 2026

Enchanted Garden Greeting Cards for Tres Jolie using 2026 August Card Kit

 Welcome Back Crafty Friends!

Set your eyes on these beautiful handmade greeting cards using the 2026 August Card, Tag and More Kit from Tres Jolie. These card designs are a vintage-inspired aesthetic featuring soft pastel hues of lavender, pinks, sage green and warm cream colors with rich texture and dimension in each card. Come craft with me and follow my fun tutorial sharing how to layer and accent each card to fit your style. Let's keep Curating Memories together! Enjoy ~Deb


Card #1

To begin we are going to use the cards that come inside the Card Kit. I went ahead and fussy cut out some of the elements I will be using on the cards. I also cut out the light blue mat and pattern paper mat for the front of the card. 
***********View Video for more details*************


This card comes together very easy as we layer our elements on top and add a beautiful large pink flower with a fairy that is fussy cut out of the paper pack from Ciao Bella "The Sound Of Spring".
***********View Video for more details*************


Here is the finished card using the sentiment from the Mixed Media Stickers we received inside the Card Kit. I really how the little fairy is tucked inside the flower. 
***********View Video for more details*************


Card #2

For card #2 I matted the front of my A2 card using purple cardstock. Then I cut a piece of pattern paper and tore it to place on the front of the card with another piece of pattern paper cut down to fit on top of the card. 
***********View Video for more details*************


Below is the pattern paper I cut and matted on the front of the card. 


Next I adhered down the torn piece after I inked it using distress ink.


Next I took one of the Chipboard Dragonflies placed some clear gesso on top let dry for a bit. Came back to add some watercolor on top of it. I just love the lavender look with a hint of pink shimmer on it. 
***********View Video for more details*************


Here is the card all finished. I used the lady silhouette and traced around her and my sentiment using a black felt tip sharpie, this is so they would stand out a bit more as they were blending in with the background. I also used the beautiful flowers from the Ciao Bella paper and adhered them around the card including the little rabbit.
***********View Video for more details*************


Card #3
For the last card cut one card in half, this will give you two card fronts. I also cut my mats for the front of the card using a yellow cardstock and then a pattern paper. 


You will need one piece of cardstock cut at 9x4 inches, scored at 3 and 6. 


Then fold the score lines as shown below. 
Next cover the back end of the card and also we create a pocket for a gift card. I cut a little notch in the one shown below but my card (green part) was showing so covered it up. You can measure the panels and cover with a pattern paper of your choice. 
***********View Video for more details*************


Below you see I cover the notch with a heart I cut out from the Mixed Media Sticker set inside the Card Kit. 


Here is the inside of the little gift holder all finished. I added one of the beautiful butterflies from the Butterfly Pack we received and place a sentiment in the front of the card. 


Here is the finished card front. I also adhered a small butterfly I fussy cut from the paper collection and adhered on top of the larger butterfly image on the paper. 

I hope you enjoyed today's tutorial, as we created beautiful handmade cards using the 2026 August Card, Tag and More Kit. We added in the dimensional die-cuts along with the heartwarming sentiments and added a look of Spring with the paper from Ciao Bella "Sounds of Spring". Thanks so much for joining me today.

 For more details on this and all project you can always view the video tutorial process, which is at the top of the page. 
Thanks again for joining me, I have all the links listed for you throughout the post so just click on the words and you will be taken directly to the store. 

Until next time, keep curating those beautiful memories. ~Deb


Please stop by our Facebook page to see what new items our design team has created using our monthly kits.
You can always post your projects on Tres Jolie FB page - Tres Jolie Club Cafe.  


Thursday, July 9, 2026

Mixed Media Magic: Creating Vintage Bookmarks & Card for Tres Jolie Kit Club

 Welcome Back Crafty Friends!

In today's tutorial, we are diving into a pinks & lavenders! I'll be showing you step-by-step how to create a stunning vintage card and matching layered bookmarks. We are playing with the fabulously fun 2026 July Mixed Media Kit from Tres Jolie. This tutorial is packed with fun tips on using the metallic watercolors, building layers, adding texture, and perfectly placing your embellishments. I have all the links down below for you. (I also added some ephemera from last months Scrapbook Kit). So join in the fun and grab your crafty supplies to make something fun today! Let's keep Curating Memories together. ~Deb


To begin fill the water brush with water and then spray a bit of water into the pan of water colors. As you dip your brush in the paint you can press water out into the watercolor you are using. Once you pick up the color onto the brush apply it down to the watercolor paper from the Mixed Media Kit. I cut this sheet into a A2 card (4 1/4 x 5 1/2 inches). I applied the paint down in a wave like pattern and continued down the front of the card with each color laying one color down and applying the next color a little bit on the very edge of that color so they would slightly mix.
****View Video Tutorial for more details****


Below is what the front of the card looks like when finished. I love these metallic watercolors, they are so shimmery.


To decorate this card I brought in some ephemera from the June 2026 Scrapbook Kit. I thought the beautiful lavender colors went perfectly with these metallic colors.


Next for our first book. I cut the remaining watercolor cardstock into pieces measuring around 2 1/2 x 5 inches.
I used a small stencil placed on top of the watercolor paper. for this fun technique.


Get a paint brush and dip it in the watercolor paint of your choice and apply it on top of the stencil. I did the gradient colors using dark purple first and then ended with the light pink on the bottom of this bookmark.
****View Video Tutorial for more details****


After you finish applying the watercolor leave the stencil on the paper and wait for a while for it to dry. Pull off the stencil and you have a fun patterned watercolor background.


Here is the finished bookmark decorated. I used the ephemera from the 2026 June Scrapbook kit.


For the 2nd bookmark I'm creating I used the same stencil but this time for this technique we are using the ink brushed to brush on the watercolor paint. Add very small dab of water to the watercolor paint place your bristled ink blending brush in the paint and then apply in a circular motion. I started with dark pink and then went to the lightest pink and added the lightest purples at the end. 
****View Video Tutorial for more details****


With this technique you don't have to wait for drying time. Simply pull off the stencil and you have your finished background. The one thing I like about this background is it's clean and no watercolor seeped through. 
****View Video Tutorial for more details****


For this bookmark I used the ephemera from the July 2026 Scrapbook Kit. I love the vintage feel of the ephemera pieces for this bookmark and adding the books are a fantastic touch.


For the 3rd bookmark I just added the watercolor paints all over not really following any type of guide, just added the paint where ever I wanted. You can either let it dry for a while or dry with a heat tool.


Next I laid down one of the stencil from my stash on top of the dried piece we just painted and applied the Chocolate Stencil Butter on top.


Here is the finished look of the bookmark after pulling off the stencil. I really like the brown on top of the metallic watercolors it really makes them pop.


The ephemera on this bookmark comes from July 2026 Scrapbook Kit. I couldn't resist using another of the vintage books, the pen and clock.


I hope you enjoyed today's tutorial, I had fun with using the metallic watercolors and sharing the new techniques you can use to create wonderful and fun backgrounds using the stencils you have in your stash or just applying the watercolor down to create your own background on cards, tags, bookmarks or canvases. Whether you want to make these as a gift set or add them to your junk journals, this tutorial is packed with tips for you to use again and again.

 For more details on this and all project you can always view the video tutorial process, which is at the top of the page. 
Thanks again for joining me, I have all the links listed for you throughout the post so just click on the words and you will be taken directly to the store. 

Until next time, keep curating those beautiful memories. ~Deb


Please stop by our Facebook page to see what new items our design team has created using our monthly kits.
You can always post your projects on Tres Jolie FB page - Tres Jolie Club Cafe.  


Sunday, April 26, 2015

Roll'n to your Birthday

Hi there,

Today is Quirky Crafts Challenge 9 - Let's go on a Quirky Journey (Traveling/Transportation)
I did a CAS (clean and simple) card. I know right??? I needed to do something quick and simple, so did this with maybe 20 minutes, I also made my own sentiment and cut it into a banner popped up with popup adhesives. I also did the background with water coloring doing streaks so it looks like he is riding his skateboard fast.
Using Distress markers on the whole image. I really like how it turned out.

Here is my card -
See the background I did with water color used 
TH Distress Marker - faded jeans


Our Sponsor is StitchyBear Digital Stamps
PRIZES:
1st prize - 3 images of choice from the StitchyBear Store
2nd prize - Any 3 images from DT's images
3rd prize - Any 2 images from DT's images

Supplies:
Ink - TH Distress Markers
Paper - Neenha cardstock 

Challenges entered:

Well that's my clean and simple card. Hope you were inspired to create your own background. 
I invite you to join us at Quirky Crafts Challenge #9, "Let's go on a Quirky Journey and please leave some love for the Design Team.

Wishing you a wonderful day! :D
Deborah xxx

Sunday, April 19, 2015

Vintage Sunset Silhouette

Good Day All,

I know it's been a while since I posted but if you have read pasts posts you all know I am in the middle of moving. What an ordeal this has been, it's been like a roller coaster. So we have about two weeks left till May 1st, and I finally found a house. YEAH!!!! So the move is on....packing up the house and of course cleaning things out. Getting rid of tons of stuff, I thought about having a garage sale but then I wouldn't have time here and would have to move the stuff over to the new house and what's the point. right? So I am taking it down to the Goodwill.

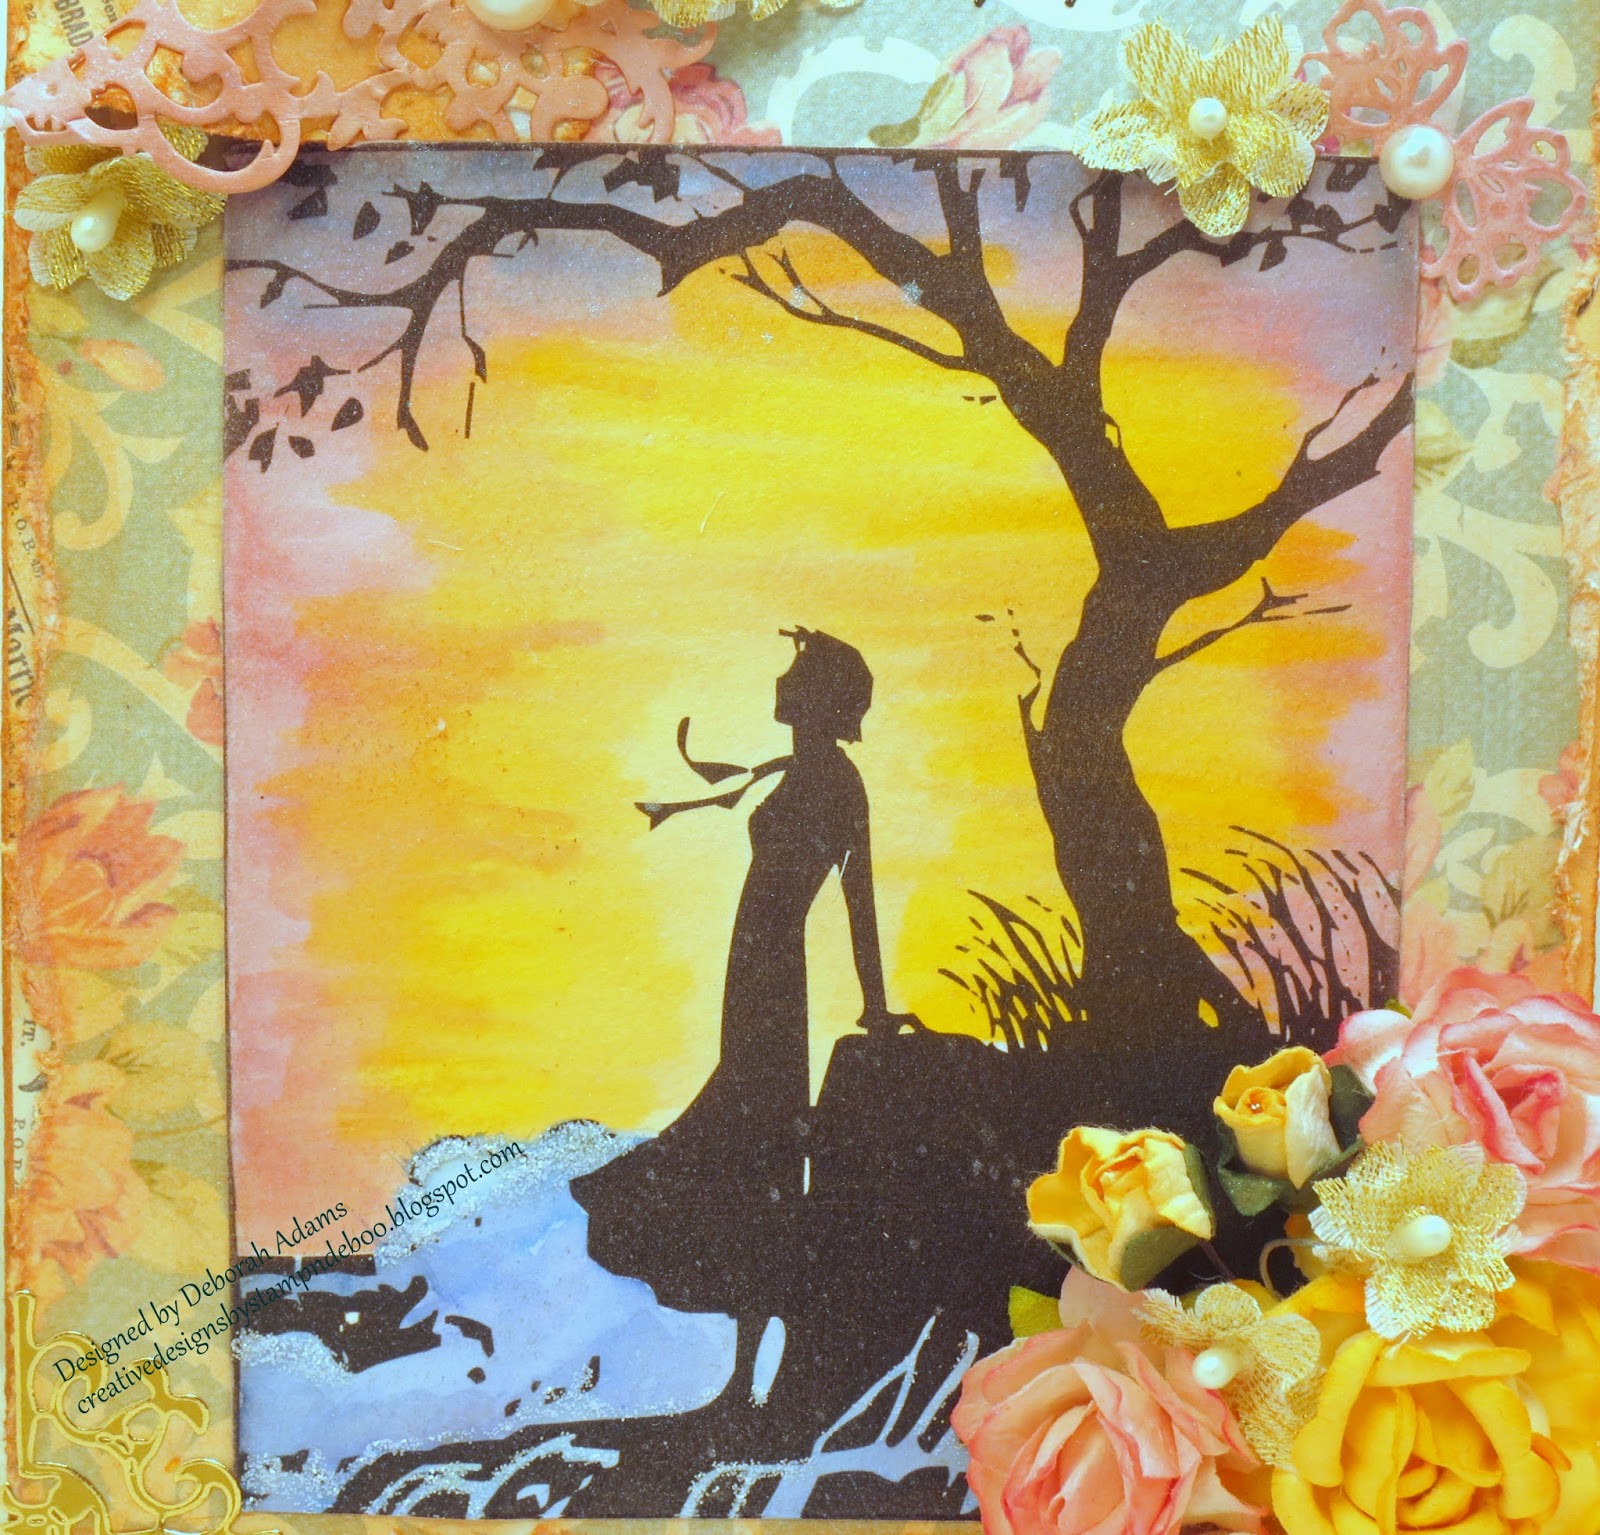
Today my Guest Designer card for Quirky Crafts Mid Post Challenge #8 Blooming Quirky has something I usually don't do. But I've been really wanting to try this since I was inspired by a bunch of different uses of water coloring videos I've been watching. I don't use many silhouette images so I hope you all like my card.

Here is my card:


 Used TH Distressed inks for watercoloring the background. 
I wanted to create a sunset type scene that I've seen in photos. 
It had pinks, blues and yellows, I love this type of sunset, it's so beautiful. 
Since this is my first time I used a variety of colors
to create the look. I thought for my first time it turned out okay. 

Supplies:
Stamp - Crackbox Palace - SeaBreeze Silhouette
Paper- DCWV - The Primrose Collection
Inks- TH Distressed inks - spun sugar, victorian velvet, faded jeans, stormy sky, scattered straw, mustard seed,
Accessories - Used stickles - frosted lace, corner dazzles, flowers from stash, pearls from stash. Spellbinders Die - Devine Floral

Challenges:
Challenge up your life: Challenge #13-Watercolor
Hiding in My Craft Room: HIMCR #196 - Freestyle
Simon Says Make Your Own Background/Simon Wednesday Challenge Blog:
Simply Papercraft: Challenge #2
{PIN}spirational Challenges: {PIN}spirational Challenge #138


Our sponsor is Crackerbox Palace you can some wonderful stamps from their store. Find out more details what prizes you can win. (here)

I invite you to stop by and take a look at the DT creations they are so inspirational. :D You'll love it.

Thanks for stopping by and have a great day!
Hugs,
Deborah xxxx


Tuesday, January 20, 2015

Let's Go Fishing

Good Day All,

I hope you all are having a good start to your week. Today at Crafty Sentiments Designs we are having a New Challenge - For A Man so this is a good time to start those early Father's Day cards or Happy Birthday Cards for the lovely men your your life. :D  

I chose Let's Fish stamp from Crafty Sentiments Store for my man card. It's the first time I think I've combined so many stamps in one card, plus got to use my NEW Cricut Explore. :D  This is such a cute stamp. I absolutely love it, reminds me of my hubby when we would go fishing he would be so excited if he caught one.

Here is my card -
I think it turned out cute. 
I did water coloring on my image with Tim Holtz Distress Markers. 
Water was water-colored with Gelato's and used Copics for my
water waves and splash I drew for the fish. 

I like how the his hat and clothing turned out
cause they look worn out. Something guys would wear for fishing. 

Close Up of Let's Fish Image. I used glossy accents on my fish. 


Fishing Pole and Fish Cut from Cricut Explore Outdoor Man & Home Organization Cartridges
and used black wire as my string & hook.

Supplies:
Stamps - Let's Fish stamp from Crafty Sentiments Store; Heartfelt Creations - Scenery Builders; Tree Stamp (from stash); Happy Birthday Stamp - Sweet'n Sassy Stamps - Gone Fish'in
Paper - Canson Mix Media Paper
Ink - TH Distress Markers - ripe persimmon, bundles sage, antique linen, mustard seed, peeled paint, mowed lawn; Copics - E000, E00, E21, E31, E57, E29, E35, E31, C1, C3, C5, B45, B93, B97; Used Gelato's for Water as a water color - blues.
Accessories - Cricut Explore  Cartridges - Outdoor Man & Home Organization;Used black wire as my string & hook for fish; Wooden Birds colored with copics. It's Your Day! adhesive ribbon; Cuddle bug metal die - tag for Happy Birthday. 

Challenges Entering - 
 Cardz 4 Guyz: Challenge 54 - Anything Goes
Crafts Galore Encore Challenge Blog: A New Year and A New Challenge! Anything Goes!
Perfectly Rustics Designs Challenge: No 39 - Animals
Scrapbook Stamp Society Challenge Blog:  Challenge #58 Anything Goes + Option Happy Birthday
My Craft Creations: New Challenge 19/1 - 31/1/2015
CardzTV: CardzTV Designers Challenge #1 - Anything Goes
Craft Your Passion: Challenge 245 - Always Anything Goes
Love To Scrap! Challenge Blog: LTSCB #46 - Anything Goes
Craftin Desert Diva's: Craft It Up & Link It Up Linky Party #47
Crafting Musketeers: Welcom to Challenge #21 Hats/Valentine (I chose Hats)
Scrappingeverydaymiracles: Welcome To 2015! Sketch Callenge - Card Sketch


Please join in the "For A Man Challenge" at Crafty Sentiment Designs. :D And please stop by to look at the fun and wonderful creations by my teamies.
Thank you for stopping by,
Deborah