I can't believe it's the end of August, and here comes Fall right around the corner. For my project share today I used the August Scrapbook Kit. I created an Easel card that sits on top of a box with a pull out drawer to hold a small journal, notebook, cards or whatever you would like to place inside. I have a video tutorial for you as well as the step by step down below. I hope you enjoy today's project.
August Scrapbook Kit
To start off you will need 2 pieces of 8 1/2 x 11 cardstock. Cut one down to 8 x 81/2. Next place adhesive on the right side end of the 8 x 8 1/2 lining up the 8 1/2 x 11 piece up to the edge of the adhesive and burnish down.
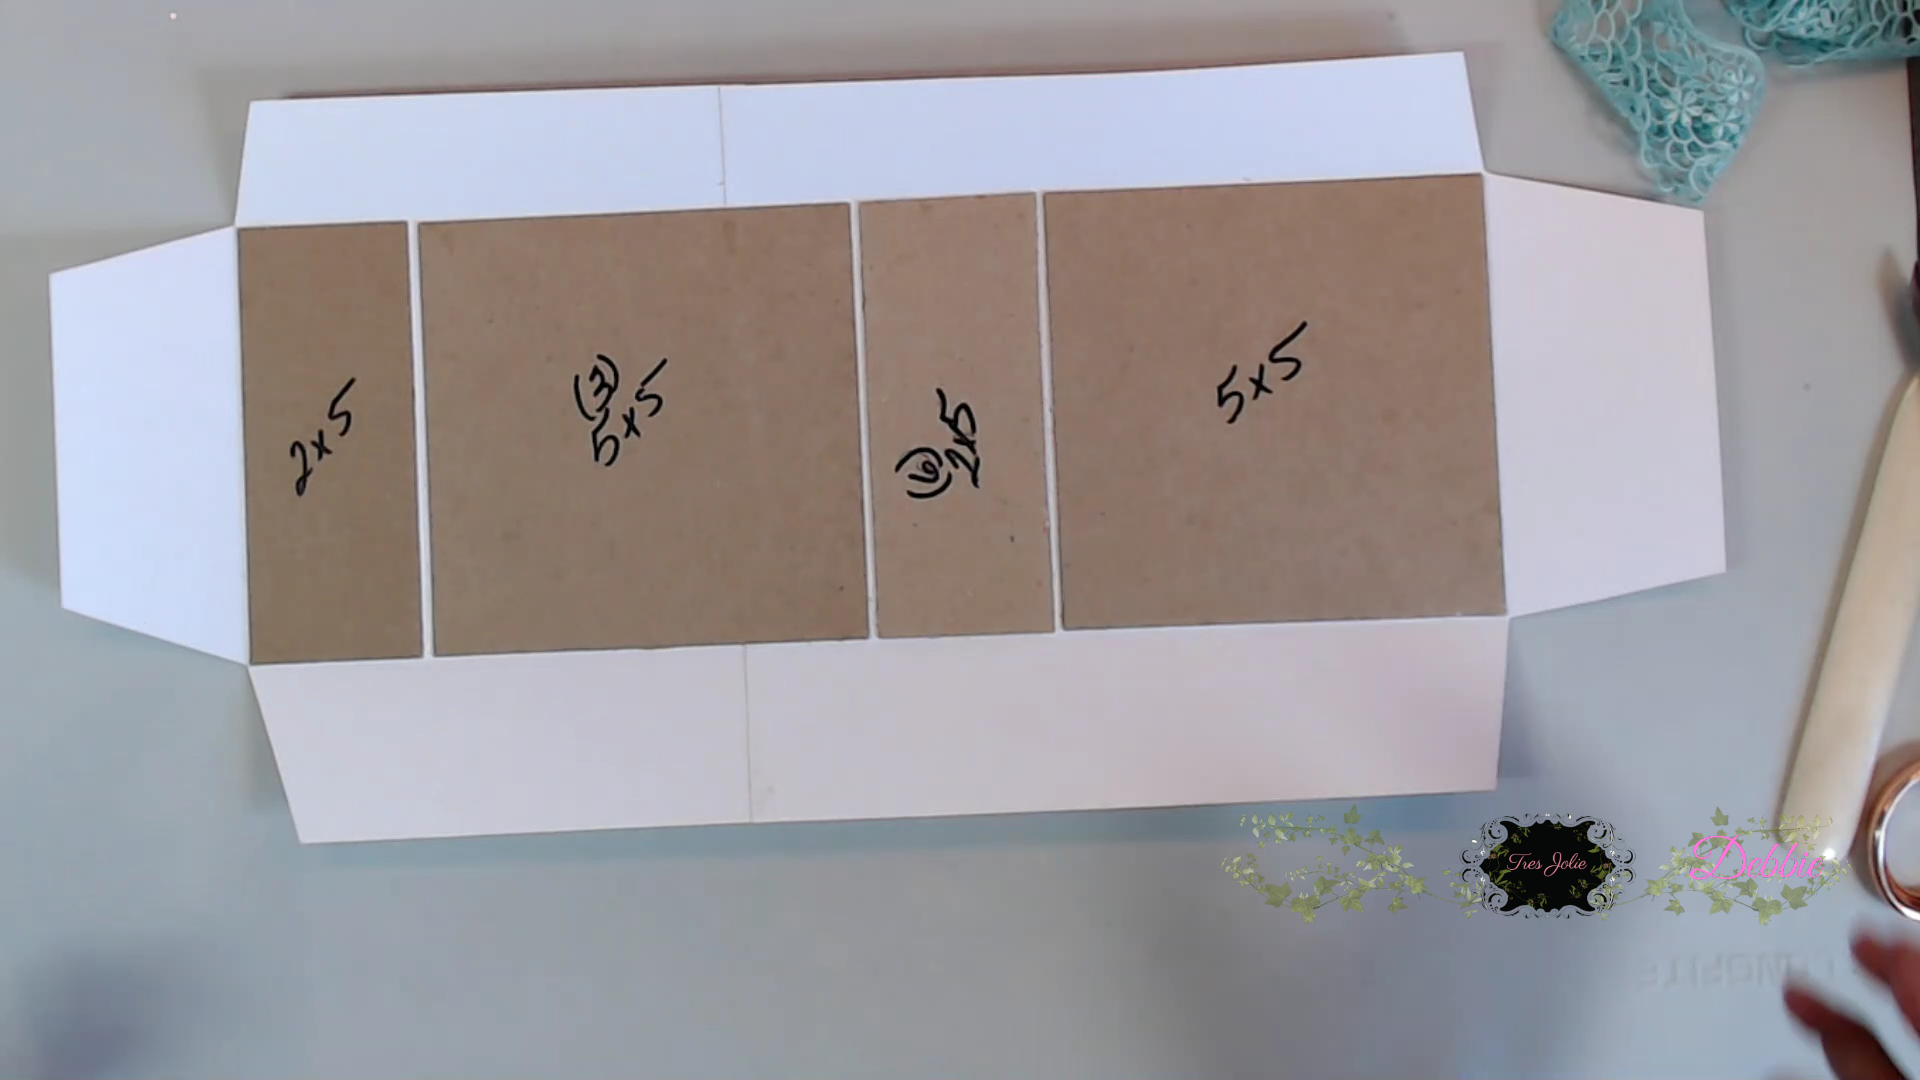
Next cut 2 pieces of chipboard 2x5 and 2 at 5x5 line them along the cardstock piece leaving a 1/8 inch between each piece (shown below). Next go around the chipboard with a bonefolder, as you would if you were creating a mini album, (see video for more details). Next cut the corners off and bevel the corners as shown below. Fold your flaps over to make sure the edges of the paper are flush against the chipboard pieces. Next cut out pieces of cardstock to line up and adhere down on top of the chipboard pieces to the inside is covered.
Next adhere down the top, bottom and right side flaps, then crease in between each chipboard piece with a bone folder. Do Not adhere the left flap down yet.
After you cover the inside fold the box in. Take the left flap and adhere down to the outside of the last chipboard piece to create a square.
Next we create the drawer just like the box. You will cut 2 pieces of cardstock 3 1/2 x 11 inches and adhere them down the same way attaching the ends together.
Cut 4 chipboard pieces at 1 7/8 x 4 7/8 inches and adhere them down leaving 1/8 inch spacing between each piece of chipboard. Again use the bonefolder to make creases around the chipboard. Fold the chipboard pieces in to create a score line and fold in the flaps so the paper is flush with the chipboard with folded over. You should have a line between each piece of chipboard as we folded the chipboard pieces in, cut on either side of that line to create a little arrow or beveled cut between each line as shown below, cut the corner as well. So you should have little flaps now. Place adhesive on the flaps, Do not adhere the Bottom Flaps or the Left Side Flap.
Once you have the top flaps adhered down and the left flap is adhered down to the last piece of chipboard you have the bottom flaps that will fold in as shown below.
Cut a piece of 4 3/4 x 4 3/4 inch chipboard piece, if it doesn't fit cut it down to fit inside your small box, this is the bottom of the drawer. Adhere this square piece to flaps on the bottom inside of the box.
Now slide your drawer inside the box.
For the easel card cut one piece of cardstock at 4 1/2 x 4 1/2 inches and another cardstock at 4 1/2 x 9. Fold the 4 1/2 x 9 in half and then fold the top of piece of the 4 1/2 x 9 in half again
This is what you should have once your fold in the top piece of the card. Next adhere the 4 1/2 x 4 1/2 to the bottom half that is folded. This creates your easel card.
Here is a photo of how the easel should be adhered to bottom half of the card. I have already placed my pattern on the backside of the card.
After you decorate your easel card and the box, place adhesive on the back of the easel card and adhere to the top of your box. Inside the easel card you want to be sure to mount a little sentiment of something with foam tape on the bottom so the top of the card can rest on that pop up piece with foam tape. (As shown below) I added a sentiment with some flowers and my card will rest on the flower to be sure it stays standing up.
Here is the finished picture of what the Easel Card and Box look like. I covered a small notepad with the paper collection, using the beautiful crystal embellishments, and fussy cut out some flower images from the paper collection. I also added a small pencil to the pad and placed that inside.
I hope you enjoyed today's step by step tutorial, remember I have the video tutorial for your convenience. I had a great time using this months August Scrapbook Kit, you really get a ton of fun crafty stuff inside. I am really pleased on how this easel card and journal box turned out. I hope you felt inspired to create this Easel Card and Journal Box using this month August Scrapbook Kit.
Don't forget to post your project on our Facebook Group Page, link is down below.
For more details you can always view the video tutorial process, which is at the top of the page.
Thanks again for joining me, I have all the links listed for you throughout the post so just click on the words and you will be taken directly to the store.
Wishing you all a great day and Happy Crafting.
Don’t forget to follow us on all our social media:
Hi everyone,
Today's tutorial is a bit different as I'm sharing a gift bag and a unique interactive birthday card I created for my daughters birthday. My granddaughter had asked me to create a card she had seen on a video and so we worked on this card together. I hope you enjoy todays video. The music that goes to this is by Meghan Trainor named Mom. It is a super cute song. You can check my video tutorial for more details.
To get started on the gift bag, I just took a bag I had in my stash and now we are going to alter it with the items from the Scrapbooking kit. The bag is from shopping at Parks Coffee, if you've not tried their coffee it's really good. lol Cut you paper down to the size of the bag you have unless you would like a border, I left a 1/8 inch border. I distressed the edges of my pattern paper and then adhered on top of the bag. And now you can decorate.
Here is how I decorated the front of my bag. I fussy cut out the words and birthday banner from the paper collection. I adhered some faux flowers from my stash and the butterflies. I added more items later.
Now for the Birthday Card.
For the card base you will cut one piece at 6 inches (not 6 1/2) by 8 1/2 inches, score 1/2 inch on left side of the 6 inch across the scoreboard. Fold one piece of 8 1/2 x 11 inch cardstock in half.
Next adhere the 6 x 8 1/2 inch piece inside the card. Placing adhesive to the 1/2 inch scored piece.
Next I used oxide inks on the flower pattern paper, as shown below, inking the paper with colors that coordinated with the paper.
I then added the flowers I fussy cut from the paper collection and added the birthday sentiment, along with some other items from my stash.
Here is the front of the card decorated.
Now for the inside portion of this card. The words are lyrics to a song by Meghan Trainor named Mom. It is a cute song. My granddaughter saw a video and asked me if I would help her create the card she saw in the video. So I typed out a few of the lyrics and printed them out and then cut them.
On the right hand page we created a little bomb that opens up and pulls back together, and the hand page has a heart that lifts upwards. You can see more details on the video on how I created these pages.
On the next page we had to create a slider. So I cut a piece of paper of that is 3 1/2 x 5 inches and in the middle I traced a 1x 4 1/4 inch area to cut out as this will be a window.
After cutting out the window place foam tap on the back
Next cut out a strip that is 1 1/4 x 5 1/4 inches to slide in and out of the window. Next add some foam tape to end of the strip on the left side and add a flower or an image this will be the stopper when you slide it over. You can view more details on my video tutorial.
Next I arranged the remailing words and added some ephemera from the card kit and adhered down my words above the slider.
The last page we added a little flap with the remaining words and adhered a photo of my granddaughter with my daughter underneath.
Here is what both finished items look like. I really like this paper collection as the paper has some beautiful colors and perfect for backgrounds for this card or any card. Both of these just turned out nice and my daughter just loved her card and the gift bag.
I hope you enjoyed today's step by step tutorial, remember I have the video tutorial for your convenience. I had a great time using this months August Scrapbook Kit, you really get a ton of fun crafty stuff inside. I am really pleased on how the card turned out and the beautiful gift bag brings a smile to anyone's face when receiving a gift from you. I hope you felt inspired to create an altered gift bag or birthday card using this month August Scrapbook Kit.
Don't forget to post your project on our Facebook Group Page, link is down below.
For more details you can always view the video tutorial process, which is at the top of the page.
Thanks again for joining me, I have all the links listed for you throughout the post so just click on the words and you will be taken directly to the store.
Wishing you all a great day and Happy Crafting.
Don’t forget to follow us on all our social media:
Hope you had a fabulous weekend. Today I
am sharing an ATC that is a shabby chic look over at the Crafty Card Gallery. Hope you all like it as our them
this Month is "Flowers", which is perfectly fitting with spring in
the air, right?
ATC's are Artist Trading Cards which
measure 2 1/2 by 3 1/2. I making these little cards as they do not take a lot
of time and there is not a lot of room. So they are something quick and easy to
create when you want to craft but don't have a lot of time.
Here is what I did to accomplish this ATC
-
I used Blue Fern paper collection - Blush
cut my base down to 2 1/2 by 3 1/2, fussy cut the teacup, bird & flower and
heart with the little message inside the teacup. I added glossy accents to the
heart and teacup. Crystal stickles to the fussy cut rose. Liquid pearls white
to to the metal key and Say it with Pearls by Want 2 Scrap - white pearls in
the corner and left side. I adhered lace in the middle of the card and placed
the Prima Rose along with the gold heart button and fussy cut heart, teachp and
other items ontop of the Lace from Reneabouquets, and the glitter glass is
adhered on the background and placed my Reneabouquet butterfly to finish it
off. I did distress the edges of the paper and used TH distress inks broken
china & spun sugar around the card.
Here is a close up of the little letter.
You can read what it says, it's so sweet.
"A feast of flowers here behold
A thing of joy to see,
But ah! to me 'tis/'lis sweeter far
To feast mine eyes on thee!"
here I added liquid pearls to the center of the key.
Thank you all for stopping by and hope you
were inspired by my project today. Please leave some love here and visit some
of my teamies posts over at the Crafty Card Gallery and leave some love for them too. They are all so
talented.
Today I am sharing a layout I completed of my granddaughter. I usually don't get a chance to do very detailed layouts but with the whether so rainy it was a good day to sit back and create. :D
I used a kit I got from Scrap of Elegance - Tracey's Country Kitchen Kit. Love all the papers, flowers, and other elements you get with these kits. They go a long way. http://www.scrapsofdarkness.com/kit-subscriptions/
For this layout I used a prima stencil that is behind the photo and then used TH scattered straw for color then added crystal stickles ontop. I used the burlap sunflowers from then kit, added tea dye, scattered straw and stormy sky to the middle of the flowers. I also sponged these colors around the page. Added a few things from my stash - the white glittered filigree, lace and a couple of prima flowers and the quote is from Quick Quotes I had for a while. Also used Prima Mica Flakes-frosted and frantage pink w/gold glitter.
Well I hope you all like it and get some inspiration from this layout. Also if you get a chance check out the kits at Scrap of Darkness and Scrap of Elegance.
I hope you all are having a nice day so far. It's been a good weekend here, I don't know if some of you know my daughter is getting married next year. With that being said we have been looking at wedding venues and wedding dresses every weekend for the last three weekends. And today well she found her dress, she says, "this is it"! and then she cancelled all other fitting appointments. lol Now we just gotta concentrate on where to have the wedding, find the bridesmaids dresses. Concentrating on one thing at a time. Right?
I invite you to come over to join us in this fun challenge. Right now would be a great time to make something that has to do with "Nature" such as birds, bunnies, chickens, ducks (hint Easter) or a nature scenery, It's "Anything that Goes with Nature". :D Plus don't forget our FaceBook Challenge which is monthly. You have a chance to win the prize pack in each challenge. How fun is that!?
Today I am sharing with you a box card I made with some silk flowers. I just love box cards can't believe I don't make more of these, they are so fun to make. If you would like to know how please let me know I will give instructions.
Here is my Creation using the New Stamp - Isobel Flower Fairy. Such a cutie!! :D
Supplies:
Stamp: Crafty Sentiments New Release Stamp - Isobel Flower Fairy
Ink/Chalks: Chalks for Dress & Flower- SU - Pretty in Pink; Yoyo Yellow; Only Orange; Powder Puff Chalk Inks - Coral; Copics: E000, E00, E51, E53;Colored pencils for hair.
So I am sharing with you a Valentine's Day Card. I know it's a bit early but thought I would get an early start on my Valentine Cards. Plus I am so happy that I am learning how to use my New Cricut Explore. The card cut out I used is from a Cricut Cartridge and has a heart cut out in the middle of it but it's kind of covered with my heart I cut out and my die cut. You can see a little bit behind my image. I think this is becoming my new favorite toy. : D
I chose You've Got My Heart from the Romance Collection 2014. Just click on the names and you will be directed straight to the Crafty Sentiments Store or stamp.
Here is my card -
***I used two different Cricut Cartridges and a Heartfelt Creations Die
with an embossing folder
***CloseUp of my image - Added Glossy Accents to the red hearts and
made the girl image pink colored tights. Fussy cut the image and
placed on the inside of the top portion of the heart embossed card.
Supplies: There are 2 pieces to the card Main base card measurements - 5.75 in. x 5.5 in. / Top portion - 5.5 in. x 5.25 in. Stamps - Crafty Sentiments Designs Stamp - You've Got My Heart Inks - Copics - E000, E00, E21, E15, E29, E35, C2, C3, C5, Black, Y08,Y11, YG63, YG67, G05, R27, R29, RV29, RV13, RV21, RV23,R11, R20, B45, B93, B97 and TH Distress ink - barndoor; TH Distress Markers - bundled sage & antique linen Paper - Recollections - Red; Core-dinations - Gemstones, Rose Quartz (card base - pink) Accessories - Cricut Explore - Life's a Party Heart Card and Folk Art Festival-Folk Art Heart; Heartfelt Design Die - Decorative Butterfly Corner; Embossing Folder - Sizzix - Flower Vine From Stash - Wooden Love banner, pearls, Pink Butterfly, paper roses, pink ribbon
Hope you are inspired to start your Valentine's Cards. Don't forget to join our Crafty Sentiments Designs Challenge - For A Man. Which is a perfect opportunity to make a Valentine Card for a Dad, Husband, Son, Brother or Grandfather. :D
Thank you for stopping by and don't forget to visit our Inspirational Blog for Inspiration.




.png)


.png)
.png)


