I am back this month with a nice fun little canvas you can create using the both the May 2025 Mixed Media Kit along with the May 2025 Card, Tag and More Kit. This canvas is so fun to create and I like that you are utilizing both kits to create a beautiful canvas that canvas to hang on a wall. I have a step by step down below and a video tutorial with more details. I also have the links down below for you to check out both of these fabulous kits.
To start out you will need to paint a color on top of the 5x7 inch canvas. I chose to use Buttercream acrylic paint. Let this dry for about 15 minutes.
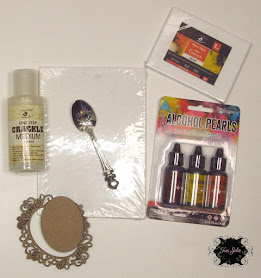
After the paint dries, apply the Crackle Medium on top and let the Crackle dry for about 10 minutes just to make sure its dried thoroughly.
Next grab your small canvas from the mixed media kit, flip it over and we will use this as a frame. Use the Alcohol Pearl Intense to stain the wood around the outside and inside of the canvas. Cut a small piece of design paper and adhere down inside the canvas.
***You can view the video tutorial for more details**********
Next I used the pretty Double Door ephemera image from the Card Kit. You will score only next to the pillars on the side of each door. This way your doors will open up once we cut the top and midsection.
Next use an xacto knife to cut around the arches only to the top of the pillars where you scored down. And cut down the middle of the doors.
This is how is should look once your done scoring and cutting.
Next I grabbed some flower moss and adhered down inside the frame.
*******You can view the video tutorial for more details**********
To cover the back side of the doors slide the door over the design paper and trace and cut out.
Cut out 4 of these covers for the door. This will make the sturdy.
Adhere once set of the cut out covers to the doors, next add brads to top of the door to look like door knobs and then adhere the 2nd set of covers over the backside of the brads. Adhere on the door ephemera piece to the frame. Decorate the inside with mushrooms and flowers and feathers from the card kit. *******You can view the video tutorial for more details**********
Now the canvas should be dried and I mixed my buttercream paint with the Intense Alcohol Pearl and it made this really pretty mauve color. Take your paint brush and dab the paint on.
*******You can view the video tutorial for more details**********
Let dry for a little bit. Adhere the frame on top of the canvas. Get creative and just let your mind wonder to how you want to create this beautiful canvas. There are ton of ephemera pieces and don't forget the alphabet cards and the playing cards you can cut out from the paper pad.
Here is my finished canvas. I cut out the bunny, cogs and flower from the large hat that the bunny was sitting in. I also cut two of the playing cards from the paper pad. You can see where I added the brads to the front of the doors. To finish it off I did splatter some of the sparks acrylic paint over the canvas.
I hope you enjoyed today's step by step tutorial. I enjoyed created this wonderful canvas for you all. I really like how this turned out and it's just brings a smile to my face. I can't wait to see what you design using both of these kits together to see what you can come with. You can always post your projects on Tres Jolie FB page - Tres Jolie Club Cafe.
Don't forget to post your project on our Facebook Group Page, link is down below. We would love to see what you create.
For more details you can always view the video tutorial process, which is at the top of the page.
Thanks again for joining me, I have all the links listed for you throughout the post so just click on the words and you will be taken directly to the store.
Enjoy and Happy Crafting.
Don’t forget to follow us on all our social media:
Today I am sharing my first project using the February 2025 Scrapbook Kit. If you haven't seen the new February Kits you need to check them out they have lots of fun goodies inside. And with that being said, I have a couple of beautiful chipboard tags I created using the Feb. Scrapbook and Mixed Media kit. I have the step by step down below with photos but I also have the video tutorial that shares more details. I have links throughout the post for everything I used.
Feb. 2025 Scrapbook Kit Feb. 2025 Mixed Media Kit
Tag #1
To start off cover your tag with a piece of pattern paper. I usually place glue on my chipboard tag and then lay the chipboard on top of the pattern paper, burnish down really well and cut out.
Below I decorated the Love with Key chipboard piece using the rose gold Gilding Flakes from the Mixed Media Kit along with the pink gold Pearl Ex.
For the gilding flakes you want to use either your glue or you can use 3D gloss gel to adhere the gilding flakes to the chipboard, like I did below on the key portion of the chipboard.
For the "love" portion I took my modeling paste and mixed in a little of the pearl ex. But first I brushed on textured paste to the "love" portion first. Once that dried I brushed on the pink pearl ex with modeling paste and let dry. Because I wanted it a little more pink I did my versa mark and patted it down on the "love" poured some pearl ex on top of it just a little bit and then heated it to set it.
Next I adhered on the flowers and the small grapevine heart with my glue gun. I used my glue to adhere the chipboard "love" piece. Next I added some gilding flakes around the tag to give a little bit more interest to the tag and adhered some flat back pearls.
Here is the finished tag. One thing I did to the pink flowers is I used a little gesso with water mixed, and brushed the mixture on lightly on each flower to lighten them up a bit. I then went over the flowers with stickles.
Tag #2
For tag #2 cover the front just like we did the for the first tag.
Next cut a piece of 4x4 pattern paper. On my scoreboard I have black line down from the 6 inch I use this as a marker when I need to score something like this or in the middle of something. So line up your corners on the black line or your 6 inch line and score at the 5 inch on all four sides turning your square around.
Next fold at the score lines and you will cut at the intersected parts of the square. This will give you a small envelope. (as shown below) Also you can view the video tutorial for more details.
Here are some of the pieces I fussy cut out from the cut apart sheets in the Scrapbook Kit. Once you have your envelope folded up and flaps adhered glue it down on the tag.
I glued on the small envelope fill it with the hearts. I did use foam tape on the hearts and the rest of the embellishments. I used a piece of seambinding from my stash for the bow. I added in flat back pearls, glued on the paper flowers and used glossy accents to add the shine to the hearts.
I hope you enjoyed today's step by step tutorial. For more details you can view the video tutorial.
Don't forget to post your project on our Facebook Group Page, link is down below.
For more details you can always view the video tutorial process, which is at the top of the page.
Thanks again for joining me, I have all the links listed for you throughout the post so just click on the words and you will be taken directly to the store.
Wishing you all a great day and Happy Crafting.
Don’t forget to follow us on all our social media:



.jpg)
.jpg)


.jpg)


