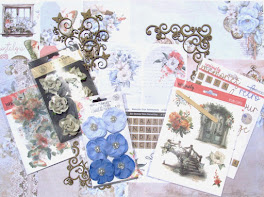
In today’s tutorial, we are diving into the world of shabby chic using the 2026 February Mixed Media kit along with the 2026 February Card Kit to create these dimensional blue floral tags. These are perfect for junk journals, gift wrapping, or as a standalone piece of art. Down below I have the step by step tutorial and the video process tutorial that includes more details and techniques I share with you.
2026 February Mixed Media Kit 2026 February Card Kit
TAG #1
For each tag choose a pattern paper from the February Card Kit and adhere it down on the tag. Burnish down and cut around the chipboard.
For the first tag I distressed the edges.
Next I used Stormy Sky Distress Ink to ink around the edges.
For all the tags take your xacto knife and cut out the center of the circle.
Next use one of the paper doilies and adhere on.
Save the other portion as we will use this on another tag.
Below the tag is all finished.
I tied the the lace from Card Kit around the tag and then adhered some of the pretty blue flowers around the tag. Next I used a sentiment from January's Card Kit on the tag. The butterfly I used Stormy Sky Distressed Ink brushed on the butterfly to add some color to the center. The ribbons and lace are all from my stash.
Tag #2
After you adhere your pattern paper, I took one of the rice papers from the February Mixed Media Kit and adhered it down. Then spray small amount of water around the edges to tear off the excess. The video tutorial shows more detail.
After tearing of the excess rice paper, I adhered the flowers and the die cuts. I also used the gold border from the February Scrapbook Kit. I then adhere the die cuts around the tag.
TAG #3
For the last tag again you will follow the same steps we did one Tag #1 & 2.
With remaining piece of doily I inked it with Black Soot Distress Ink and used Stormy Sky Distress Ink in the middle section of the doily. Then I adhered it onto the Tag. I also Inked around the edges of the tag using Black Soot.
Next I took the remaining die cuts and adhered them to the tag. I inked the middle section of the butterfly with Black Soot. I adhered Black and White flowers to the tag and metal hearts from the Mixed Media Kit.
Here is the finished Tag. I used silver liquid pearl around black die cuts and a white gel pen on the leaves. There is also a bit of Crystal Stickles placed around the flowers.
I hope you found some inspiration from today's project. These tags are definitely a one of a kind. The different layers and textures definitely add to the depth and interest of each with the satin ribbons, 3D paper flowers, die cuts and metal hearts. I invite you to check out the 2026 February Kits over at Tres Jolie Kit Club. These kits are amazing and will get your creativity flowing.
Thanks for joining me and Happy Crafting!
I invite you to please stop by ourFacebookpage to see what new items our design team has created using our monthly kits.
You can always post your projects on Tres Jolie FB page - Tres Jolie Club Cafe.
Don't forget to post your project on our Facebook Group Page, link is down below.
We would love to see what you create.
For more details you can always view the video tutorial process, which is at the top of the page.
Thanks again for joining me, I have all the links listed for you throughout the post so just click on the words and you will be taken directly to the store.
Enjoy and Happy Crafting.
Don’t forget to follow us on all our social media:
Today I am sharing my version of the Square Flip Book found in August 2025 Card Kit. I am super excited to share with you a different version you can create. I hope you enjoy the video tutorial. Check out the links below to get your Card, Tag, and More Kit. I also have a link to the cute chipboard stamps down below for you.
August 2025 Card, Tag and More KitChipboard Tickets
To start out place magnets inside the inner flap to the top and bottom.
****View video tutorial for details*****
Next cover the oval portion of the frame and then glue the oval back inside the frame.
After the frame dries adhere only the top portion of the frame to the bottom of the flap. (as seen below)
****View video tutorial for details*****
Next I added ephemera to the cover that comes in the kit. I also used some chipboard tickets (link above) from the Tres Jolie Shop on top of the paper tickets. I really like how this turned out.
When you get your Flip Book in the Card Kit, there is an accordion piece. I decided to cut this in half and adhere hinges on the back of each piece.
To add a hinge take a 1 inch piece of white cardstock, score at 1/2 inch. Then adhere the folded portion to the fold of the card piece (as shown below) cut off excess. Now do the same to other half of the accordion we cut.
Now you should have a 1/2 inch flap, as shown below. Adhesive to outside of this flap.
Adhere on in the middle portion of the flip book. Now do this with the other card part by adhering the 1/2inch hinge to the fold. ****View video tutorial for details*****
Now you should have a double flaps as shown below. You can add photos on these or use then for journaling. For more details you can view the video tutorial if needed.
Now you can decorate, measure your book pages and cut out your pattern papers. I a few photos below to help with inspiration. You can always watch my video tutorial.
Below is the first opening of the book.
This portion is the middle part of the book with the side flaps opened.
Here is the inside middle part with the two flaps we created hinges for on either side.
Here is a photo of the book opened. The middle page is the pocket I recreated using the instruction from the booklet in that comes with the Flip Book. The left and right side are photo mats along with the flower ephemera and sentiments. The bottom page I used a little ephemera flower as a tuck spot.
Here is the cover all decorated using the chipboard frame along with the chipboard tickets.
I hope you enjoyed today's step by step tutorial. I had a great time created this Square Flip Book and sharing another way you can create this book to hold your special photos.
I invite you to please stop by our Facebook page to see what new items our design team has created using our monthly kits.
You can always post your projects on Tres Jolie FB page - Tres Jolie Club Cafe.
Don't forget to post your project on our Facebook Group Page, link is down below.
We would love to see what you create.
For more details you can always view the video tutorial process, which is at the top of the page.
Thanks again for joining me, I have all the links listed for you throughout the post so just click on the words and you will be taken directly to the store.
Enjoy and Happy Crafting.
Don’t forget to follow us on all our social media:
Today I'm sharing the June 2025 Mixed Media Kit and what I created using this kit along with the June 2025 Card Kit. I hope you enjoy the projects below and get some inspiration. I have links down below for you and a step by step tutorial, along with the video tutorial as well which contains more details.
June 2025 Mixed Media Kit June 2025 Card, Tag and More Kit
To get started Cover the circle canvas with the vintage rose paper. Then cut off the excess.
Next I used a chipboard frame from Tres Jolie shop and adhered it over the little cherub on the other vintage decoupage paper.
Next cut around the frame and cut the excess off from the backside of the frame.
Next I added paint around the edges of the canvas and the top. I also dabbed some paint on top of the frame and dabbed a bit of Nuvo Sparkle Spray on the frame sporadically. I added a lace to go under the frame and across the right side of the canvas. I cut some roses from the bouquet that is in the kit and adhered them down next to the chipboard frame.
Next I took the Swirl butterfly chipboard and cut them in apart. I painted the butterflies pink and sprinkled some crystal glitter on top and for the swirl I used the root beer reactive ink painted on. For the cloud word "love" I painted that with the pink paint from the Mixed Media Kit.
I also added glossy accents to the top of the little cherub image and the cloud word "love". I then added some words, little fairy girl and the deer from the card kit placed the on top of the canvas.
Shabby Chic Tag
Next I tore part of the scrap from the rose paper we used from the canvas and I adhered it to the chipboard tag.
Next I used the paint and stencil from the kit and dabbed the paint on top of the tag.
After the paint on the chipboard dried, I placed a drop of the reactive ink in a small cut and added water and painted the mixture on top of the chipboard.
Next I painted these diamond chipboard pieces with the stamperia paint from the Mixed Media Kit. I added some Nuvo sparkle spray on top of the tag and I dabbed a little bit on top of the diamond chipboard piece. I also sprayed the remaining swirl butterfly chipboard with the Nuvo sparkle spray and adhered them to the tag and then placed flowers down.
I painted the other circle word "laugh" and placed down in between the flowers.
Here are some close ups of the canvas and tag.
I hope you enjoyed today's step by step tutorial and are inspired to use the June 2025 Mixed Media Kit along with the June 2025 Card, Tags and More Kit to create something wonderful. Thanks for joining me today.
You can always post your projects on Tres Jolie FB page - Tres Jolie Club Cafe.
Don't forget to post your project on our Facebook Group Page, link is down below. We would love to see what you create.
For more details you can always view the video tutorial process, which is at the top of the page.
Thanks again for joining me, I have all the links listed for you throughout the post so just click on the words and you will be taken directly to the store.
Enjoy and Happy Crafting.
Don’t forget to follow us on all our social media:
I hope you all are having a nice day today. Are you excited for these new kits for June 2024 I absolutely am loving the Mixed Media Kit and pairing it with the Scrapbook and Card Kit.
I have a great fun project for us today using all three of the June Kits together, of course you can always swap out items you have to create this fun project. Down below I have the video tutorial for your convenience and the step by step instruction as well.
Here are the kits I used for my altered paintbrush.
To begin apply gesso to the front and back of your paintbrush from the top to the bottom of the bristles. You can use white, black or clear gesso. What ever type of look you are going for, let dry for a few minutes.
Next mix the textured powder with the liquid acrylic violet from the Mixed Media Kit together and a bit of water until you get the desired texture you want.
Next apply the acrylic texture to the chipboard butterfly swirl from the Scrapbook KitScrapbook Kit or to any chipboard embellishment you have in your stash.
Once your done set aside to dry.
Next place the stencil from the mixed media kit down on top of the paint brush and apply a coat of the modeling paste on top. Apply all the throughout the handle. Set aside to dry. You can use a heat tool but be careful as the heat will melt the modeling paste.
Once your paintbrush is dry you can start adding your paint to the brush. I just added a few droplets from the Ochre and Violet liquid acrylic to the bush, spritzed some water down and let the paint run down to the bristles. You can add as much as you'd like. I also used a napkin to dab some of the paint off here and there as I didn't want a very dark paint brush.
Here is where I am adding more violet to the paint brush and spritzing some water on and letting it run down the handle.
After your are done with adding the paint let dry for a bit. I but the chipboard butterfly swirls in half and adhered down with my adhesive. (art glitter glue) I cut up some small pieces of black chipboard from my stash adhered them in the middle of the handle right above the bottom chipboard butterfly. This so I can build up my window I fussy cut out from the pattern paper.
I fussy cut out this window from the Card, Tag and More Kit and placing it on top of the black chipboard pieces. This will raise the window to give it some lift and dimension.
Here are few photos of the finished altered paintbrush. I did use the purple flowers from the and the fussy cut the window from the Card Kit and the Chipboard Butterfly Swirls are from the Scrapbook KitScrapbook Kit. I also used some Glitzy Magical Gleaming Gold from a past Mixed Media Kit to make the chipboard a little light and not be so dark and plain.
I hope you enjoyed today's step by step tutorial. I had a great time using all three kits June 2024 Mixed Media Kit , June 2024 Card, Tag, and More Kit and June 2024 Scrapbooking Kit to create this lovely and fun Altered Paintbrush for you all. For more details you can always view the video tutorial process, which is at the top of the page.
Thanks again for joining me, I have all the links listed for you throughout the post so just click on the words and you will be taken directly to the store.
Wishing you all a great day and Happy Crafting.
Don’t forget to follow us on all our social media:


.jpg)

.jpg)


.jpg)


.jpg)
.jpg)
.jpg)
.jpg)
.jpg)


.jpg)
.png)