Followers

Showing posts with label metal dies. Show all posts

Thursday, July 11, 2024

Easy Card Box Holder for Tres Jolie

 Hi everyone, 

It's Deb here sharing a really easy project using the Tres Jolie July Card Tag and More Kit. I also brought a a few items from the Scrapbooking Kit. I hope you enjoy today's project. I have the step by step tutorial down below as well the video tutorial for you. I have the links and photos below for you to check out both kits, just click the link and it take you directly to the Tres Jolie Shop. 


              Card, Tag and More Kit                                    Scrapbooking Kit


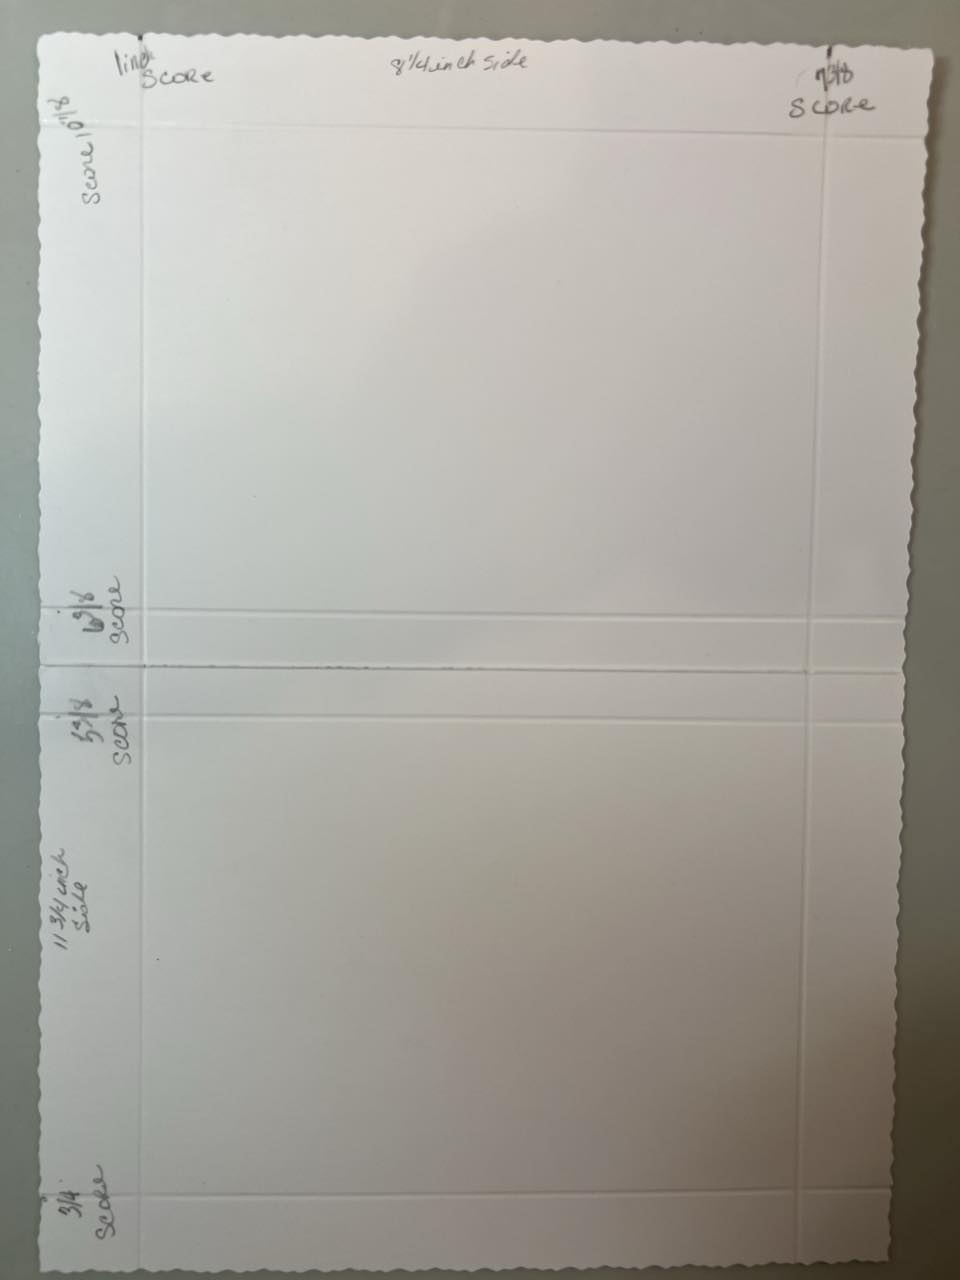
To start out you will use the largest card in the card kit. With the 11 3/4 inch card across the scoreboard Score at 3/4, 5 3/8, 6 3/8 and 10 7/8 inches. 


Turn to the 8 1/4 inch side across the scoreboard, score at 1 and 7 3/8 inches. 


Next fold the 5 3/8 inch score line and fold it back towards the flap, do this for all 4 areas.


See below as the folded part folds on to the same side towards the same scored line. 


You should have a little fold as shown below.

Down below is how all 4 areas should look. You can see video tutorial to follow along.


Next adhere down the flaps. Only the middle section, do not place adhesive past the first score line on the right or left side as this closure area and it will not close if adhered.


Next punch one of the top flaps with rounded corners. Only one side as that side will fit into the rectangular flap. 

For the chipboard leaf vines I used a lt. green and dark green gelato to color them and inked a bit of the grape fruit around them. I added glossy accents to them, set aside to dry. 

I did use the Bee Honey comb wreath using my gelatos to color around it and added glossy accents to them, set aside to dry. 

Here I wanted share with you how the metal dies work. These are so neat as you can place a card that tucks underneath the border. 

I adhered the pretty polka dot pattern paper with an area for my sentiment inside the card. 


Look how wonderful these all turned out. I just love the card box holder. I like that this paper gives you space to stamp a sentiment on it. And I like how everything coordinates well together. One think I would like to say is to not add a lot of bulk to your cards as you will not be able to get many inside and the box may not close very tight. 
I hope you enjoyed today's step by step tutorial, remember I have the video tutorial for your convenience. I had a great time using the Card, Tag and More Kit along with the Chipboard Bee Honey Comb Wreath and a few of the white flowers from the Scrapbook Kit. 
 For more details you can always view the video tutorial process, which is at the top of the page. 
Thanks again for joining me, I have all the links listed for you throughout the post so just click on the words and you will be taken directly to the store. 

Wishing you all a great day and Happy Crafting. 


Thursday, May 2, 2024

Bee Happy In Pink

Good Morning everyone,

Today I have two fun projects using the May 2024 Card, Tag and More Kit. I share how to use the Flower Metal Dies and we use the honey comb chipboard along with the stamp set and papers you receive in your kit. I hope you enjoy today's step by step tutorial along with further details from the video tutorial (down below). I also hope these projects give you some inspiration on how to use all the fun items in the Kit.


     Card, Tag and More Kit


MemDex Card -
I used a metal die from my stash to cut chipboard for the memdex card. Next I cut out two pieces of the pattern paper from the Card Kit and adhered one on the front and one on the back.

For the honey comb I decided to used a sparkly pink glitter to cover the honey comb. 
I used glue all over the top of the honey comb sprinkled glitter and let dry. 


Here are the flowers I made using that cute flower builder metal die that comes in the Card Making Kit. I just love these little flower, they are so dainty and pretty. Down below you can see I added the small little buds to the ends of the tiny green leaf ones and how I added the small scalloped piece to the center/top of the flower that petals are downwards. The other flowers I layered on top of one another. Next I just adhered the back of each green stem to the back of the flowers and let dry. 


Next I adhered the honey comb to the top right side of the memdex card and started adding my leaves and flowers. For a 3D look I added foam tape to the back of the my flowers. 


Here is the finished Bee Pink MemDex Card. 

Small Easel Card -

For this small easel card I cut my light green paper 3 7/8 x 8 inches.


Fold in half and then fold the top flap in half this is the start of the easel card. 


Next I cut all my layers. The dark pink is the base, the cream (which is actually a lt. yellow glitter paper) is adhered on top of the dark pink paper and bottom pattern paper is adhered to the light cream colored paper that is 3 5/8 x 3 5/8 inches. 
You will need 3 of the 1 7/8 x 3 3/4 inch pieces two that are for the inside and one for the 1/2 fold on the back of the front base.


Adhere the square pieces together. 


Place glue on the bottom half of the folded front. 


Adhere the square base down. 


Next cut the pieces to cover in the inside of the card. 


Next I used the stamp set that is in the Card Kit. Stamped "Thank you" on the die cut banner from my stash. 


Here is the card finished along with placing the flowers from the flower builder die set. 

 I hope you enjoyed today's step by step tutorial. For more details you can always view the video tutorial process, which is at the top of the page. 
Thanks again for joining me, I have all the links listed for you throughout the post so just click on the words and you will be taken directly to the store. 

Wishing you all a great day and Happy Crafting. 


May Scrapbook kit - https://tresjoliekits.com/collections/scrapbook-kits/products/scrapbook-kits-2024 Card Making Kit - https://tresjoliekits.com/collections/card-kit/products/cards-tags-and-more-kit?variant=43490491039930 Mixed Media Kit - https://tresjoliekits.com/collections/mixed-media/products/mixed-media-kit-2024?variant=43490486812858

Monday, March 15, 2021

Bunny Card for Inaas Ch. #104

 Hi everyone,

Can you believe March is almost over? I am amazed how fast time is going by, before we know it summer will be here. I know some of you are still getting snow, but here in N. Texas its sunny and in the 70's. Yay! However, I know rain will be upon us soon, and I am okay with that. lol

Well today over at International Art and Soul we have a new Challenge, it's the Bunny Ch. #104. I created a cute little bunny card using the Stamp Of Life Bunny Fold It Die. I just thought this was so cute and perfect for this challenge. 

I plan on creating a video on my youtube channel to share I made this little card. I would like to send this to my great niece Sophia, I think she would get a kick out of it. lol 

Here is a little bit of information on how I created this card, is I cut out the base and then cut out the bunny die several times using different color glitter papers and paper pieced them together.  Then I added the little bouquet of flowers for him to hold in his hands but the flowers are covering them up. lol  

Once I finish up the video I will post the link here for you in case you are interested. here is what die look like 


And here is my little bunny card.  I just love how it turned out. I like how the glitter paper sparkles and really adds a nice layered look to the cracked egg. lol  For the ears & his little tail I used pink felt paper I had in my stash .

Challenges I joined:

Festive Fridays Challenge 5th - 18th March


I hope you swing by the International Art & Soul and take a peek at what my teamies created lots of great inspiration for you and please join us for this challenge, click here inaas ch. Bunny #104

Wishing you all a great day 
Happy Crafting!
Debbie 💗

Sunday, January 3, 2021

Winter Landscrap card

Hi everyone

I hope you had a great Holiday Season. 
Here at the Adams household all was busy and time went by so fast it seems its a blur. lol
Of course, Christmas with the grandkids was fun and so crazy, opening presents oohing and awwwing over everything. Now holidays have past it's time to get back to a schedule and start the new year off. I hope you all had a wonderful New Year Celebration and I wish you all the best a Happy and Healthy New Year. 

To start of the new year we at International Art & Soul have a new challenge #99 - Landscapes. Come join us for this fun challenge and see what the other team member created. 

For my card I created a wintery scene using some papers from Stamperia, Blue Land. This paper is just beautiful and with the silver glitter paper it really added a lovely touch. I used TH idea-ology white cotton flowers and then added a bit of blue chalk on some them. I really like how they turned out. The wreath die I used is from InLoveArtShop, it's absolutely beautiful. 

Supplies I used:

TH Idea-ology - bouquet (white cotton flower)

Recollections- Silver glitter paper

Stamperia - Blue Land paper collection

InLoveArtRound Leaf Branches Wreath Dies

Challenges entered:

A Bit More Time To Craft Challenge #131 - AG

Cut It Up: Challenge 216 - Winter

Gem of A Craft Challenge: Wk 1 AG card making & crafts

Crafter's Castle: January 2021 Challenge #37 AG

Thank you for joining me today. I hope you join us, you definitely will find some fun and fantastic inspiration from the teamies. 

Have a great day and Happy New Years. 

~Deb


Tuesday, October 13, 2020

Happy Halloween with Retro Bows

 Hi all,

Sorry I am a little late posting my project for the new challenge at International Art & Soul

I was on a mini vacation with hubby and planned to have this post done before we returned but had to cut it short due to my father in-law not doing very well. So right now we are with family and will be here for a while. 

Our new challenge theme is - Halloween, so please join us and show us your fun and creative Halloween projects. 

For my project I created a few Halloween Bows with Retro Halloween Digital Paper. The digital paper is from (Click names to connect to store) Taylorcardmade4u, 9 Retro Digital Images &  Halloween Retro set 2 both of these are so awesome if you like the vintage Halloween images from the past. I also used some bag topper metal dies and Bow metal dies to create the bows, both of these dies are so easy to use. 

In creating these bows I used an old Halloween paper from Authentique for the bag toppers, bows and the background paper of the bows.  I decreased the size of Retro Halloween images so I could place them in the middle of each bow and fussy cut them. I them used glossy accents on top of each image to make it shiny. These were a give away prize for one lucky winner from my Halloween YouTube Hop I participated in a few weeks ago.


Challenges Entered:

Products Used:

Esculpido Bag Handle Dies 


6pcs/packs Bow metal cutting dies


Thank you for joining me today. I hope you get a chance to play along with for our fun Halloween Challenge at International Art & Soul. 

Happy Crafting
~Deb