Are you looking for a quick project? Well look no farther I share a quick way to create these beautiful notepads by using up your paper scraps. In today's step by step tutorial, I'm showing you how to create these adorable DIY Pocket Notepads! Whether you want to tuck them into a junk journal, use them as travel notes or give them as handmade gifts, these 'Simplicity' themed notepads are as functional as they are pretty. In the step-by-step tutorial below I will walk you through the process of constructing the fold-over notepad base with built-in flap and simple assembly techniques for the inner lined paper.
2026 March Scrapbook Kit
Notepad #1
Cut 1 piece of cardstock @ 5 1/2 x 11; Score 1 inch, 4 3/4 inch on the 5 1/2 inch across the top of the scoreboard; turn to the 11 inch across the scoreboard, score @ 1, 1 1/8, 1 1/4 inches, score @ 7 3/4, 7 7/8, 8 inches
Chipboard piece cut at 3 3/4 x 6 1/2 inches
Cut 2 pieces of cardstock at 3 5/8 x 6 1/2 inches
Lined notebook paper - 3 1/4 x 6 inches
After you score, cut the two end corner on the right and left side near the one inch flap. Then at the bottom cut the left and right side corners and you will have a long flap.
Next cut a chipboard piece at 3 3/4 x 6 1/2 inches. Adhere the chipboard piece in the middle and adhere the two long side flaps.
Cover the chipboard using one of the 3 5/8 x 6 1/2 inch pieces.
Use the second 3 5/8 x 6 1/2 inch piece, adhere to the bottom long flap.
For the notepad, use the lined notebook paper, place the sheet all together and clip them, as shown below. Then use adhesive glue to the top of the sheets. Let dry for a bit, then add another coat on top let dry. While the lined paper is drying, cover the outside and inside of the notepad base.
Then you can add the papers to the inside of the paper pad base along the top of the score-line. (see video tutorial for more details) Clip these together to let dry.
Here is the finished notepad showing the cover of the notepad and the inside.
(for more details view Video Tutorial)
Notepad #2
To start the 2nd notepad, cut the lined notebook paper at 3 1/4 x 4 1/2 inches. Before you clip the papers together place some glue along the top, clip and let dry. Then place a second coat, and let dry again.
Then cut or use a scrap pattern paper that measures 4 1/2 x 12 inches;
Score at 3 , 3 1/4 inches and Score at 6 5/8, 6 7/8 inches. This notepad is going to close inward. You will need some magnets or you can use velcro for your closure.
Add double back tape to the center of the score lines on the left side of the base cover. Then once the papers are dry, unclip and remove the backing from the double back tape. Place the papers inside against the taped area and burnish. (for more details view Video Tutorial)
Now the flap on the left side may be a little long so fold in the over hand inside to create a little pocket. Placing glue on the top and bottom of the fold, fold inward.
Here is the little pocket.
Here is the finished notepad. This one is my favorite as it's super easy to create just by using the long scraps from your stash. (for more details view Video Tutorial)
Notepad #3
For the last notepad I used a notepad that had adhesive on the top of it but needed a sturdy back. So I cut piece of chipboard and used double back tape that I placed along the top edge with a bit of over hang to adhere the chipboard to it.
Once the chipboard is adhered I cut a piece of pattern paper from the March Scrapbook Kit and folded it over the top, and it is adhered to the top edge. (for more details view Video Tutorial)
Next you can now cover the back.
This one is now done. I did decorate the front with some of the metal hearts from the 2026 February Mixed Media Kit. This photo shows the front cover and inside of the finished notepad.
I hope you found some inspiration from today's project. These notepads were so easy to create using the scraps from the 2026 March Scrapbook Kit along with the February Mixed Media Kit metal hearts.
I invite you to check out the 2026 March Kits over at Tres Jolie Kit Club. These kits are amazing and will get your creativity flowing.
Thanks for joining me and Happy Crafting!
I invite you to please stop by ourFacebookpage to see what new items our design team has created using our monthly kits.
You can always post your projects on Tres Jolie FB page - Tres Jolie Club Cafe.
Don't forget to post your project on our Facebook Group Page, link is down below.
We would love to see what you create.
For more details you can always view the video tutorial process, which is at the top of the page.
Thanks again for joining me, I have all the links listed for you throughout the post so just click on the words and you will be taken directly to the store.
Enjoy and Happy Crafting.
Don’t forget to follow us on all our social media:
I am back this month with a nice fun little canvas you can create using the both the May 2025 Mixed Media Kit along with the May 2025 Card, Tag and More Kit. This canvas is so fun to create and I like that you are utilizing both kits to create a beautiful canvas that canvas to hang on a wall. I have a step by step down below and a video tutorial with more details. I also have the links down below for you to check out both of these fabulous kits.
To start out you will need to paint a color on top of the 5x7 inch canvas. I chose to use Buttercream acrylic paint. Let this dry for about 15 minutes.
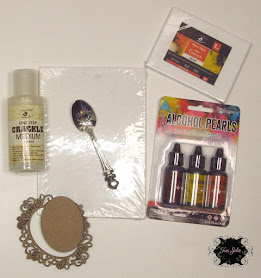
After the paint dries, apply the Crackle Medium on top and let the Crackle dry for about 10 minutes just to make sure its dried thoroughly.
Next grab your small canvas from the mixed media kit, flip it over and we will use this as a frame. Use the Alcohol Pearl Intense to stain the wood around the outside and inside of the canvas. Cut a small piece of design paper and adhere down inside the canvas.
***You can view the video tutorial for more details**********
Next I used the pretty Double Door ephemera image from the Card Kit. You will score only next to the pillars on the side of each door. This way your doors will open up once we cut the top and midsection.
Next use an xacto knife to cut around the arches only to the top of the pillars where you scored down. And cut down the middle of the doors.
This is how is should look once your done scoring and cutting.
Next I grabbed some flower moss and adhered down inside the frame.
*******You can view the video tutorial for more details**********
To cover the back side of the doors slide the door over the design paper and trace and cut out.
Cut out 4 of these covers for the door. This will make the sturdy.
Adhere once set of the cut out covers to the doors, next add brads to top of the door to look like door knobs and then adhere the 2nd set of covers over the backside of the brads. Adhere on the door ephemera piece to the frame. Decorate the inside with mushrooms and flowers and feathers from the card kit. *******You can view the video tutorial for more details**********
Now the canvas should be dried and I mixed my buttercream paint with the Intense Alcohol Pearl and it made this really pretty mauve color. Take your paint brush and dab the paint on.
*******You can view the video tutorial for more details**********
Let dry for a little bit. Adhere the frame on top of the canvas. Get creative and just let your mind wonder to how you want to create this beautiful canvas. There are ton of ephemera pieces and don't forget the alphabet cards and the playing cards you can cut out from the paper pad.
Here is my finished canvas. I cut out the bunny, cogs and flower from the large hat that the bunny was sitting in. I also cut two of the playing cards from the paper pad. You can see where I added the brads to the front of the doors. To finish it off I did splatter some of the sparks acrylic paint over the canvas.
I hope you enjoyed today's step by step tutorial. I enjoyed created this wonderful canvas for you all. I really like how this turned out and it's just brings a smile to my face. I can't wait to see what you design using both of these kits together to see what you can come with. You can always post your projects on Tres Jolie FB page - Tres Jolie Club Cafe.
Don't forget to post your project on our Facebook Group Page, link is down below. We would love to see what you create.
For more details you can always view the video tutorial process, which is at the top of the page.
Thanks again for joining me, I have all the links listed for you throughout the post so just click on the words and you will be taken directly to the store.
Enjoy and Happy Crafting.
Don’t forget to follow us on all our social media:
Today I am sharing this beautiful little mini album I created using the March Tres Jolie Card, Tags and More Kit. This is a quick little mini album that can a few photos or snapshots of any special occasion, fantastic as a little brag book for holding those special photos.
Here is the video tutorial that also gives a step by step with more details.
To get started on this we need to fold all the cards from the Card Kit and place adhesive on the back of each one except the last card.
I added glue on top of the double back tape and then grab the next card and adhere the front of the card to the adhesive side. Make sure to burnish down each time you adhere your card.
Here is a photo of 3 of the cards adhered together.
Next place a ribbon or seam binding around the mini album as this will be your closure. And cut you mats for the inside of the mini album. I cut mine at 4 1/8 x 5 3/8 inches.
Here is a photo of the inside after all the cards are adhered and I placed one of the mats down.
For a couple of the mats I decided to cut the inside with an xacto knife to create a little pocket.
Next place the adhesive around the edges of the mat and add adhesive to the back of the wooden panel side only.
Next place down on your page.
For this mat I used my xacto knife to cut around the flowers to create a nice little pocket. This turned out so pretty. Just follow the same instructions. Place your adhesive around the edges of the backside of the mat and add adhesive to the upper right hand side. (see video tutorial for more details)
Here is the finished page.
Here are a few photos of the mini album after I finished decorating the inside.
I hope you enjoyed today's step by step tutorial you can always see more details on the video tutorial just go back to the top and click on the video. I do have links throughout the tutorial for you so you can head to Tres Jolie to check out all these beautiful Card, Tag and More Kits, Scrapbooking Kits, and Mixed Media Kit in the store.
Thanks so much for joining me. Have a great day and Happy Crafting.
Don’t forget to follow us on all our social media:


.jpg)


.jpg)
.jpg)


.jpg)




.jpg)
.jpg)


