Followers

Showing posts with label spring cards. Show all posts

Friday, August 7, 2026

Enchanted Garden Greeting Cards for Tres Jolie using 2026 August Card Kit

 Welcome Back Crafty Friends!

Set your eyes on these beautiful handmade greeting cards using the 2026 August Card, Tag and More Kit from Tres Jolie. These card designs are a vintage-inspired aesthetic featuring soft pastel hues of lavender, pinks, sage green and warm cream colors with rich texture and dimension in each card. Come craft with me and follow my fun tutorial sharing how to layer and accent each card to fit your style. Let's keep Curating Memories together! Enjoy ~Deb


Card #1

To begin we are going to use the cards that come inside the Card Kit. I went ahead and fussy cut out some of the elements I will be using on the cards. I also cut out the light blue mat and pattern paper mat for the front of the card. 
***********View Video for more details*************


This card comes together very easy as we layer our elements on top and add a beautiful large pink flower with a fairy that is fussy cut out of the paper pack from Ciao Bella "The Sound Of Spring".
***********View Video for more details*************


Here is the finished card using the sentiment from the Mixed Media Stickers we received inside the Card Kit. I really how the little fairy is tucked inside the flower. 
***********View Video for more details*************


Card #2

For card #2 I matted the front of my A2 card using purple cardstock. Then I cut a piece of pattern paper and tore it to place on the front of the card with another piece of pattern paper cut down to fit on top of the card. 
***********View Video for more details*************


Below is the pattern paper I cut and matted on the front of the card. 


Next I adhered down the torn piece after I inked it using distress ink.


Next I took one of the Chipboard Dragonflies placed some clear gesso on top let dry for a bit. Came back to add some watercolor on top of it. I just love the lavender look with a hint of pink shimmer on it. 
***********View Video for more details*************


Here is the card all finished. I used the lady silhouette and traced around her and my sentiment using a black felt tip sharpie, this is so they would stand out a bit more as they were blending in with the background. I also used the beautiful flowers from the Ciao Bella paper and adhered them around the card including the little rabbit.
***********View Video for more details*************


Card #3
For the last card cut one card in half, this will give you two card fronts. I also cut my mats for the front of the card using a yellow cardstock and then a pattern paper. 


You will need one piece of cardstock cut at 9x4 inches, scored at 3 and 6. 


Then fold the score lines as shown below. 
Next cover the back end of the card and also we create a pocket for a gift card. I cut a little notch in the one shown below but my card (green part) was showing so covered it up. You can measure the panels and cover with a pattern paper of your choice. 
***********View Video for more details*************


Below you see I cover the notch with a heart I cut out from the Mixed Media Sticker set inside the Card Kit. 


Here is the inside of the little gift holder all finished. I added one of the beautiful butterflies from the Butterfly Pack we received and place a sentiment in the front of the card. 


Here is the finished card front. I also adhered a small butterfly I fussy cut from the paper collection and adhered on top of the larger butterfly image on the paper. 

I hope you enjoyed today's tutorial, as we created beautiful handmade cards using the 2026 August Card, Tag and More Kit. We added in the dimensional die-cuts along with the heartwarming sentiments and added a look of Spring with the paper from Ciao Bella "Sounds of Spring". Thanks so much for joining me today.

 For more details on this and all project you can always view the video tutorial process, which is at the top of the page. 
Thanks again for joining me, I have all the links listed for you throughout the post so just click on the words and you will be taken directly to the store. 

Until next time, keep curating those beautiful memories. ~Deb


Please stop by our Facebook page to see what new items our design team has created using our monthly kits.
You can always post your projects on Tres Jolie FB page - Tres Jolie Club Cafe.  


Monday, March 18, 2024

Hello Peeps Easter Cards

 Hi Peeps 

I hope you all are doing well. Easter is on it's way can you believe it. So with that being said I have some fun Easter Cards you can create for Easter using Clear Scraps 5x9 Flowers Layering Stencil, Bunnies Chipboard Embellishments and the 4 x6 Hello Peeps Stencil. 

I hope you enjoy the step by step tutorial below. Down below I have the products I used along with the name & links, just click on the name and you'll be directed to the store. 

Here's a photo of the finished cards. 


Bunnies Chipboard Embellishments                                 5x9 Flowers Layering Stencil


Card #1

To start create a regular card base measuring 4 1/4 x 5 1/2 inches. I place a piece of removable tape diagonal, as shown below. 

Next take the  5x9 Flowers Layering Stencil place it a little above the tape and stencil your first flower, after you have the first scoot the stencil over and ink the next flower down and keep going all over the white space. 


Once you have finished the top of the card move the tape a little bit down so you have about a 2 inch diagonal space between the top and bottom flowers you're stenciling. 


Next I decided to use brown flock for the Bunnies Chipboard Embellishments. You can either use double back tape as shown below or use your glue. I do prefer the glue over the tape I feel it's just easier. After your done applying the adhesive you can place the chipboard piece in the flock and cover it all over. 


Here is the end result. One bunny I used glue and the other bunny I used double back tape. But you can decorate your Bunnies Chipboard Embellishments however you'd like, even paint them. 


Next I covered the midsection with yellow glitter paper and layered with pink cardstock. I added flap back enamel dots from my stash. I also used a Happy Easter metal die from my stash for the sentiment. 
Now the card is finished. 


Card #2

For card #2 we used the 4 x6 Hello Peeps Stencil . This stencil is so cute. I laid it down and just applied my ink as shown below. The size of this card is 4 1/4 x 5 1/2 inches.

Here is what the front of the card looks like after I was done inking with the stencil. I did the cute bunnies in different colors and the words to match. Now you can decorate it. 


I thought it would be nice to use the  5x9 Flowers Layering Stencil and then fussy cut these out to decorate around the card. For the centers of the flowers I used Nuvo flower pollen, but you can use enamel dots or what ever you have in your stash. 


Here is where I place a thin piece of green glitter paper and pattern paper on the top and bottom of the card just to give a little bit of nice border to the card. Below you can see I fussy cut some of the flowers.


Here's the finished card. Super easy peasy right? I added a few enamel dots on the left side and a pink butterfly from my stash to the card. This card is so cute I just love the 4 x6 Hello Peeps Stencil inked with fun bright colors, so full of Spring and Easter. 


Card #3

The size of this card is 4 1/4 x 5 1/2 inches. The yellow glitter cardstock mat is 5 1/4 x 4 inches, the blue polka dot mat measures 4 7/8 x 3 3/4 inches. After you cut the mats  you can glue together. 


For this card I created my own picket fence out of the wooden pattern paper I had in my stash. I cut 4 pickets at 1 x 3 inches and snipped of the top portion to form the picket fence. 


The slat that goes across the pickets measures 1 x 5 inches. I inked each piece with ink to make them a little dark around the edges. I did add foam tape to the back of each picket fence and then laid the long slat piece on top (there is no foam tape on this piece).


Adhere the mat to the card base and decorate the front as you would like. I added the second little Bunnies Chipboard Embellishments on top of the fence along with the remaining stenciled flowers I fussy cut. I found the carrots and grass in my stash and added them. This turned out so adorable. 


I hope you liked today's step by step tutorial. I like that these cards were so easy to create and you can create the flowers from the stencils cut them out and use them to decorate your card, tags or layouts. Just another way you can use this fun 5x9 Flowers Layering Stencil along with the Bunnies Chipboard Embellishments Embellishments and the 4 x6 Hello Peeps Stencil. 
I wish you all a Happy Easter and Happy Crafting. 


Spring has Sprung Slimline Window Card and Butterfly Tag

 Good Morning Everyone, 

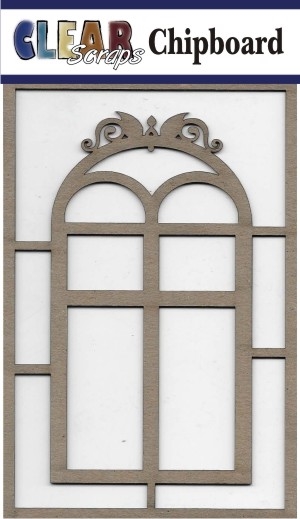
Are you ready for Spring yet? I am so ready for Spring. I love everything about Spring, especially seeing the flowers blooming and butterflies fluttering around. Today I have two beautiful projects that you can create using the Clear Scraps Fancy Window Chipboard Embellishment and the Fancy Butterflies Chipboard Embellishment. 

Here are the chipboard pieces we will be using. I did use some paper flowers from my stash, ribbons and design papers. 


Project #1 - Spring Window Card

First thing I did was paint the Fancy Window Chipboard piece white. 


Next I used a sponge and a gray ink pad to add a little bit of ink streaking it downward to give a whitewashed worn look. 


Next I added some foam tape to the back edges of the window. 


I decided to create a slimline card so I cut my case card and the mats. 
Base is 8cx 8 3/4 inches scored at 4 inches. The mats are all cut at 3 3/4 x 8 1/2 inches. I did use my scalloped edge slimline die for the top mat of my card.


Next I added a scene to the back of the window and adhered down on top of the card. 


I started adding my flowers around the window. 


Here is finished Spring Window card. I added a sentiment and fussy cut out a butterfly. 
I just love how this card came out. it's so full of Spring goodness with the window scenery. 


Project #2 - Spring Butterfly Tag

To begin the Spring Butterfly Tag I painted the Fancy Butterfly Chipboard pieces with white paint. 


Next I pulled out my gelatos and colored them. I used yellow, pink, lavender, blue and some other colors to coordinate with the colors of my pattern paper. 


In order to get a smooth and blended look on the chipboard butterflies simply take a sponge or a paper towel and smooth out in small circles and you can blend the colors together.


Next I cut out my tag and did some fussy cutting. Adhered on the sentiment with some foam tape behind it, as well as the flowers and paper butterfly. 


I adhered my chipboard butterflies and added some ribbon on the top of the tag. I also added a few little flat back pearls to around the tag. 


Thank you all for joining me today. I hope this gave you some spring inspiration and how you can use these Fancy Butterflies chipboard pieces along with the Fancy Window Chipboard piece on your upcoming projects. I have the links throughout this blog post for you, simply click on the product name and you will be taken right over to the store. 
Have a wonderful day and Happy Crafting.