Followers

Showing posts with label prima marketing. Show all posts

Thursday, July 17, 2025

Build Your Wings Mixed Media Canvas for Tres Jolie

 Good Morning Crafty Friends, 

I have a fun and simple canvas design for you today. We are using the July 2025 Mixed Media Kit. Creating this canvas was so relaxing, definitely had fun playing around with the mixed media products. I have a step by step down below as well as the video tutorial which has some bonus tips inside. Have fun and enjoy. Links are down below. 


July 2025 Mixed Media Kit
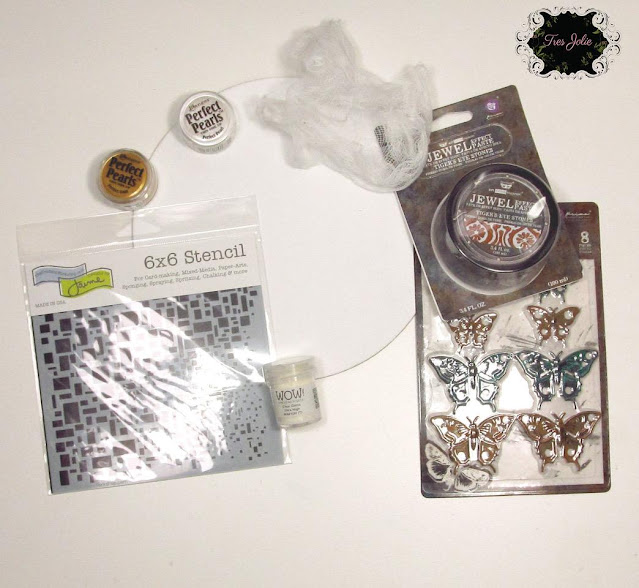


To get started I used a paint brush to place down my mod Podge only on half of the canvas at a time. Be sure to burnish down once you have one side done and then the other side. 


After adhering on the rice paper place a little bit of water on the edges of the excess to tear off the rice paper. **view video tutorial**


Next add some clear gesso down on the rice paper to prepare for the Jewel effect paste from the Mixed Media Kit. 


So to add a bit of fun I cut a little piece of cheesecloth and placed it in a small cut with a bit of gold perfect pearls and water. Mix a little and set aside for 1-2 minutes. 


Next take out the cheesecloth and airdry or you can use your heat tool to dry quickly. 


Next I adhered down the cheesecloth around the edges and up onto the canvas area. 
**view video tutorial for more details**


After adhering down the cheesecloth I then used the stencil and Tiger's eye stones Jewel Effect Paste to add a bit of texture to the canvas. 


I decided use the torn off portion from the rice paper and adhere to a paper frame from May 2025 Scrapbook Kit. These frames are amazing. 


Here is the finished canvas I added the mechanical Butterflies from the MM Kit and I used some flowers along with some sentiments from the Finnabair Sentiment Booklet from a previous kit. 


I hope you enjoyed today's step by step tutorial and are inspired to create a Mixed Media Canvas from the July 2025 Mixed Media Kit. I like the spent playing with the kits as you can be as creative as you want to be. I would love to see what you create with this Mixed Media Kit or anything you have created. 
I invite you to please stop by our Facebook page to see what new items our design team has created using our monthly kits.
You can always post your projects on Tres Jolie FB page - Tres Jolie Club Cafe. 

 Don't forget to post your project on our Facebook Group Page, link is down below. 
We would love to see what you create. 
 For more details you can always view the video tutorial process, which is at the top of the page. 
Thanks again for joining me, I have all the links listed for you throughout the post so just click on the words and you will be taken directly to the store. 

Enjoy and Happy Crafting. 


Don’t forget to follow us on all our social media:

Facebook: https://www.facebook.com/groups/121919621993809/

Instagram: https://www.instagram.com/tresjoliekits/


Tres Jolie website: https://tresjoliekits.com/

Tres Jolie subscriptions: https://tresjoliekits.com/services/

Thursday, March 27, 2025

Simple Spring Folio


Good Morning My Crafty Friends,

Today I have an easy project you can create using the March 2025 Scrapbook Kit. With this Scrapbook Kit I created a Simple Spring Folio that you can create within a few hours. You will love the simplicity of this folio and it can hold a few photos or more (at least 20). I hope you enjoy creating this, I have all the links below along with the step by step tutorial and the video tutorial which holds a lot more details for you. 


March 2025 Scrapbook Kit


To start the folio cut 2 pieces at 81/2x9 inches, Score at 1inch with the 8 1/2 inch along the top of the scoreboard. 

Cut 2 pieces of cardstock 7 3/8x9 inches, Score 1/2 inch with the 7 3/8 inches along the top of the scoreboard. 


Next adhere the 1 inch pieces together, this will be your spine. 
Then adhere the 1/2 inch pieces to the inside of the spine. Place the first one down with the 1/2 inch piece facing to the left, then adhere the second page behind the first page.


Here is what the folio should like once you have everything adhered. 
For more details you can watch the video tutorial. 


After creating the folio, I used pink cardstock on top so there is a small border. 
For the front cover of the folio I used this beautiful window image. I cut it out and cut open the window and folded back the window pieces to create flaps. I adhered a piece of pattern paper behind the window for a nice scene.


This small flap will be adhered on the first page on the edge. 


This flap is adhered to the front of page 2. 


Here's a photo of the inside cover and the front of page 1. 
For the inside cover I created a double pocket for more details you can view the video tutorial. 
For the front of page 1 I adhered the little flap (view above). I also created a small inside pocket which is shown in the video tutorial.  


The back of page 1 I used the pattern pink brick paper and then I adhered a piece of scrap pattern paper with gluing only the side edges and one long edge and placed it down to create a side pocket. I also added one of the chipboard windows and one of the small sentiment cards on top. 
Page 2, I created a pocket using the pattern paper and adhered lace to the edge of the pocket. And adhered this to the large flap I listed above. 
(For more details you can view the video tutorial)

For the back of the large flap I created a belly band using some scrap pattern pieces. 
Page 2 I used one of the pattern papers that has the pretty gate. I fussy cut some flowers and adhered them down as a tuck spot. Only place glue to the bottom edges. 
(For more details you can view the video tutorial)

Back of Page 2 I adhered the large doily to the back of page 2. I adhered one of the sentiment cards to the top only placing glue at the top edge. 
The back inside cover I adhered down the pattern paper that has the notebook page image. I just love this page, and it's great for writing down details about your folio. 


Here is a finished picture of the front. 
For the top of the cover I used the circle window to create a little clock. I painted it with white gesso then added the clock stick on top from the sticker sheet. I also added in a couple of the sticker butterflies. I fussy cut the white butterfly. I adhered down the little doily edges on the edge of the windows. Then I added in the sentiment card in the middle, and adhered on the flowers that came in the scrapbook kit. (For more details you can view the video tutorial)


I hope you enjoyed today's step by step tutorial. I loved the simplicity of this folio, it's so simple and elegant. It can easily hold up to 20 photos or you can also use it as journal. 

 Don't forget to post your project on our Facebook Group Page, link is down below. We would love to see what you create. 
 For more details you can always view the video tutorial process, which is at the top of the page. 
Thanks again for joining me, I have all the links listed for you throughout the post so just click on the words and you will be taken directly to the store. 

Wishing you all a great day and Happy Crafting. 


Don’t forget to follow us on all our social media:

Facebook: https://www.facebook.com/groups/121919621993809/

Instagram: https://www.instagram.com/tresjoliekits/


Tres Jolie website: https://tresjoliekits.com/

Tres Jolie subscriptions: https://tresjoliekits.com/services/


Thursday, March 20, 2025

Decorative Note Pad Holder

 Hello Crafty Peeps,

I am so excited to share a fun project using the March 2025 Mixed Media Kit along with the Card, Tag and More Kit. Mixing both of these kits together for this fun Decorative Not Pad Holder just came together perfectly. I have a step by step tutorial below along with the video tutorial that gives a bit more details. Links are throughout the blog post and I have photos of the kits just click on the links to be directed to the Tres Jolie Shop. 


March 2025 Mixed Media Kit                                 March 2025 Card, Tag, and More Kit


To start our project open the clay package and the mould. Roll out the clay and place inside the mould. Be sure to make your edges flat against the sides of mould. 


While the clay dries and forms lets add our paper to the large door tag/hanger. I used the 3D Gel from January Mixed Media Kit. This 3D Gel is like an adhesive, so I tore my scraps, laid them down over lapping them a bit and gluing them down.


Here is what the finished door hanger looks like after I adhered all the papers down. I also covered the back. To get the edges smooth you can use a nail file around the edges and inside the hole. 


Next I used the blue shimmer powder, add a bit of water and mix. I then brushed on the blue shimmer over the areas where the torn edges meet on top of one another. After applying the water color you can dry using the heat gun. I also used the Gold paint from the Mixed Media Kit to paint the edges of the door hanger. 


Once the clay was a bit dry I took out the images and painted using both the blue shimmer paint and the gold. 


Next I cut the frame in half and adhered part of the frame to top of the tag, as shown below. Adhere it using wet adhesive. I used the 3D Gel. I adhered the other half of the frame down below, including the tea cup, bow and the small little medallion. 
Next I added the little strap that wraps around the front to the back. (see video for more details). 
Slip in the back part of your note pad. 


Here's what the bottom looks like with the other half of the frame. 


Here is the finished Decorative Not Pad Holder. I added magnets to the back so I could place on my refrigerator. You will need strong magnets so it will not slide down the frig. You can use a small note pad as shown below or you can use a small spiral note pad as well. 


I hope you enjoyed today's step by step tutorial. I loved how this project turned out and it only took an hour to create it. Definitely a quick and easy project. You can give this as gift or use it for yourself.

 Don't forget to post your project on our Facebook Group Page, link is down below. We would love to see what you create. 
 For more details you can always view the video tutorial process, which is at the top of the page. 
Thanks again for joining me, I have all the links listed for you throughout the post so just click on the words and you will be taken directly to the store. 

Wishing you all a great day and Happy Crafting. 


Don’t forget to follow us on all our social media:

Facebook: https://www.facebook.com/groups/121919621993809/

Instagram: https://www.instagram.com/tresjoliekits/


Tres Jolie website: https://tresjoliekits.com/

Tres Jolie subscriptions: https://tresjoliekits.com/services/


Thursday, December 26, 2024

Tres Jolie - Vintage Journal - Be Yourself

 Hi Crafty Friends, 

Today I wanted to share a really nice tiny journal you an create using the December Card, Tag and More Kit by Tres Jolie. I love how this turned out. It's definitely got some spaces for journaling, adding small photos and other memorabilia. I hope you enjoy today's tutorial below I have a step by step for you to start the tiny journal but I have more details with my video tutorial. 


December Card, Tag and More Kit


To start off I used the tiny journal from the April Card Kit. I inked all outside and inked the edges of all the pages using vintage photo ink. 


Next I tore my pattern paper into strips and distressed the edges and inked them. Then adhered them on. I thought this was a unique way to add some creativity to the outside cove to our journal. 


I both the front and back of the journal like this. 


Next I cut all my pattern papers at 4x4 inches there are 14 pieces in all and ink the edges. 


Next I started adding the Stamperia chipboard pieces onto the pages. Please view the video tutorial for more details in how I decorated each page. 


With this bookcases piece I added foam tape to the back so it actually becomes a pocket. 


Here is the finished Vintage Journal. Down below I have photos of how I decorated each page. And don't forget the video tutorial has more details. 


The booklet that is in the chipboard pocket is created with a 8 x 3 1/2 inch pattern paper and has lined paper inside that is sewn together. I adhered the lace for a closure. 

This booklet measures 7 x 3 1/2 inches has the lace adhered for a closure and I painted the metal leaf with bronze stain and added the white flower with leaves from the December Scrapbook Kit,  I also added one of the embossed stickers that comes in the kit. I attached this booklet to the page and inside it has a sticky note pad. 

This pocket is created using the post card paper and I cut a straight line across leaving a 1/4 inch on each side. Decorated with a gold embossed leaf from the project before, a chipboard lock piece and the embossed stickers from the kit. 
This pocket is a torn on the edge and inked. It measures 5 x 3 inches and scored 1/2 inch on the right and left side of the 5 inch side and 1/2 inch down the 3 inch side, fold under and adhere the flaps down to the page to create a pocket. 

I hope you received some inspiration from this Vintage Journal. I like that it has lots of areas for journaling and you can add in more flaps or extras if you'd like. You can journal, keep memorabilia inside and display photos inside as well. 
Thank you all for joining me today. For more details you can view the video tutorial. 
 Don't forget to post your project on our Facebook Group Page, link is down below.
 For more details you can always view the video tutorial process, which is at the top of the page. 
Thanks again for joining me, I have all the links listed for you throughout the post so just click on the words and you will be taken directly to the store. 

Wishing you all a great day and Happy Crafting.