I can't believe it's almost the end of October, boy time sure goes by fast. With Fall getting in full swing I created a Large Tag Mini Album that you can create using the October Scrapbook Kit. This Fall album is chalk full of all the laser cut embellishments, all the pattern paper I only have a few scraps left. With this Tag Album you can use it as a journal as well, by adding pages and other items to keep your fun Fall memories for this year. I have the video tutorial for you below which gives you more details and I have a step by step for you below as well the links for you to head to the Tres Jolie Shop to grab this kit that features 49 and Market Vintage Orchard Collection.
October Scrapbook Kit
To begin out Album cut two pieces of chipboard and pattern papers at 6x7 3/8. Cut 5 more pattern papers at 5 7/8 x 7 1/4 inches these will be your pages. .
I distressed the edges of all the pages and inked with vintage photo ink. Once you cut the angles to form your tag punch with your planner disc punch or a hole punch to use metal rings.
Adhere pattern paper papers to the front and back of your chipboard pieces.
Next you can place in your planner disc's.
Next we will be creating a waterfall cut out 6 pieces of pattern paper at 4x5, and use your scraps to cut 1 inch pieces, score at 1/2 inch. These will be the hinges of our waterfall.
Adhere the one side of the hinge to the back of your waterfall piece with the fold at the top edge of your mat.
Next adhere the the mat down by placing adhesive to the flap
Place the flap down on your page.
Next adhere the second mat right underneath the flap you just glued down. And do this for the others as well. You will 3 mats on the left page and 3 mats on the right side page.
For the closure you will need 8 magnets all together, 4 on each side.
Down below on the left side you see 2 magnets on the bottom.
Next place two magnets over those magnets on top.
Next use one of the cut-a-part cards and adhere those on top by pressing the card down on your magnets to they adhere to the correct spot. This will be your closure for both sides of your waterfall.
This is finished waterfall.
Here are some photos of the decorated pages inside the book. For more details you can check out the video tutorial that shares how I used all the laser cut embellishments from the Scrapbook Kit.
I really enjoyed creating this Vintage Large Fall Album with the 49 and Market Vintage Orchard Paper Collection along with the Laser Cuts, it is perfect for keeping all your Fall memories, places your visit, thought and more. I hope you found some inspiration and head on over to the shop to grab your kit before they are gone.
Don't forget to post your project on our Facebook Group Page, link is down below.
For more details you can always view the video tutorial process, which is at the top of the page.
Thanks again for joining me, I have all the links listed for you throughout the post so just click on the words and you will be taken directly to the store.
Wishing you all a great day and Happy Crafting.
Don’t forget to follow us on all our social media:
I am so happy to be here with y'all again. Today I am sharing a few amazing techniques you can use with October Mixed Media Kit from Tres Jolie, along with using some of the Laser Cut Elements from the October Scrapbook Kit. I did a beautiful Fall Wreath last week and this week we are creating some fun cards using these Little Birdie Alcohol Inks. I have a step by step tutorial below along with a video tutorial and the links for your to grab your Mixed Media Kit before they are gone.
I will be sharing two card on here but if you would like to see the video tutorial I do share how to create a third card using a technique that is similar to this stencil technique.
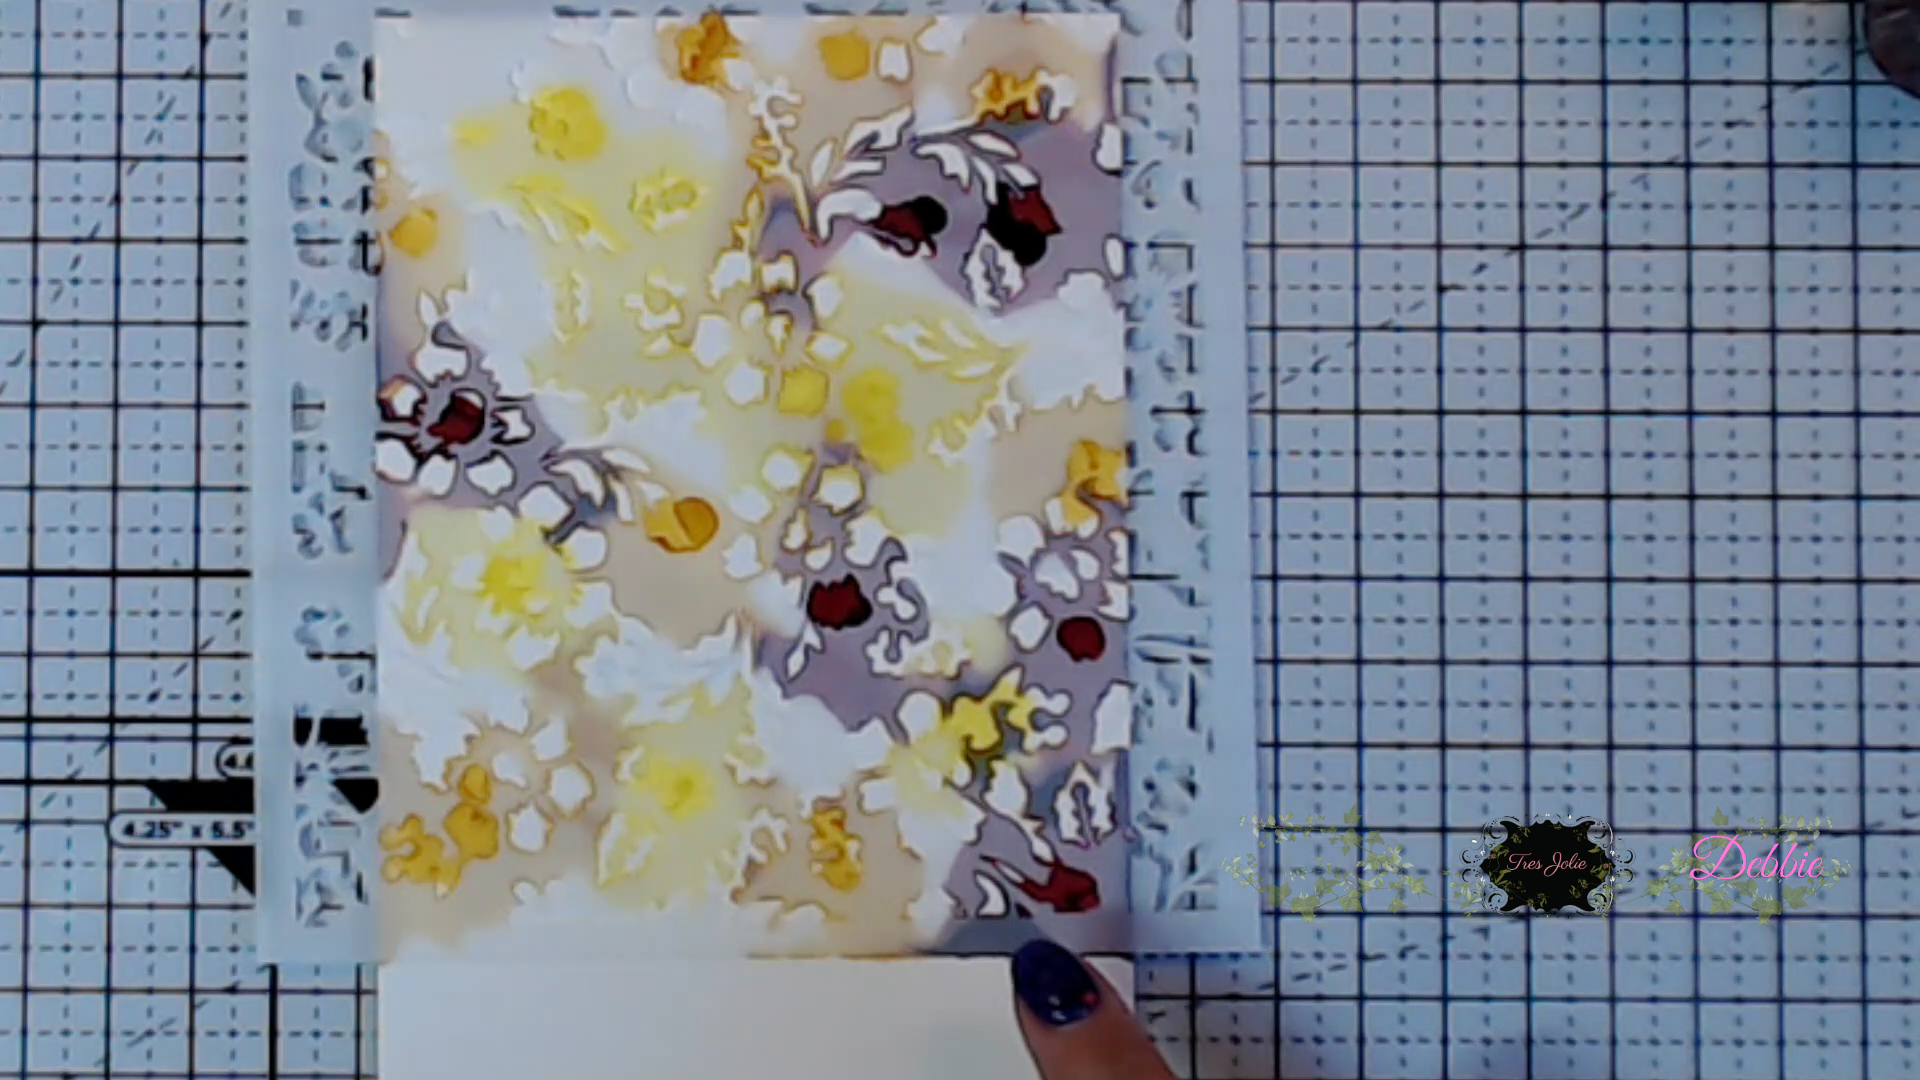
To start this stencil technique place a stencil on your photo paper or you can use yupo paper. You need a paper that is non-porous. I use a paper that I've had in my stash for a long time, that I acquired from stamp'in up. It just like photo paper.
Next place your alcohol ink colors in various areas around your stencil. The alcohol ink will run underneath the stencil but that is okay, that is what we want. Here you can see the yellow alcohol ink running underneath the stencil leaving the open space of the stencil opened. It's basically giving us the negative of the stencil print.
Here is what is looks like after I added some other colors of alcohol inks. Now let this dry for about 30-45 minutes, or you can dry with your heat tool but be careful not to over heat.
Here is what mine looked like with I was finished. You can see some of the leaves and flowers. This is a wonderful way to get a use out of those stencils from Mixed Media Kits from Tres Jolie.
And the backgrounds for your cards will look amazing.
Next we are going to do another fun technique using a straw. I placed some color down on my paper and then added some drops of the blue velvet color down.
Next I used my straw to blow outward away from me to create these fun splatter effects and look one on the left side looks like a butterfly. lol
I thought this would be a fun way to create some great backgrounds for your cards. You can get many different patterns by using this fun straw technique and when turning the card around you can add more inks and use the straw.
Look how fun this splatter background looks.
Here is the stencil technique card all done and decorated using the Vintage Orchard Laser Cut Elements. I just love how this background looks. I will definitely be making more of these using many of my other stencils.
Here is the straw technique card all decorated using some of the Laser Cut Elements as well, along with some of the flowers from the Scrapbook Kit. I just love how this turned out.
I hope you enjoyed today's step by step tutorial, remember I have the video tutorial for your convenience.
These cards turned out fantastic using some really fun techniques that are quick and easy to do and you can create cards fast. Remember your inks are fast drying so you don't have to wait very long for them to dry if using by themselves like with the straw technique, with the stencil technique you can cut out papers and do other things while you are waiting for the inks to dry under the stencil but it doesn't take long. I hope you got some great ideas and inspiration from today's crafty post.
Don't forget to post your project on our Facebook Group Page, link is down below.
For more details you can always view the video tutorial process, which is at the top of the page.
Thanks again for joining me, I have all the links listed for you throughout the post so just click on the words and you will be taken directly to the store.
Wishing you all a great day and Happy Crafting.
Don’t forget to follow us on all our social media:
I hope you all are having a great weekend. This week we introduced the New Tres Jolie Kits for October 2024. So with that being said I have a fun project for you using the October Mixed Media Kit and some of the Laser Cut Elements from the Scrapbook Kit. You are going to love this fun Fall Wreath Project that takes no time at all. Both Kits are listed below along with my video tutorial and the step by step below.
October Mixed Media Kit October Scrapbook Kit
To start with you will need any type of wreath you would like to use, I am using a grapevine wreath. We will be decorating this at the end.
First we will stain the truck with our Little Birdie alcohol inks. I used the Marine Blue. Dab some on your surface and use a cotton ball to swipe up the ink and glide this along the truck area. To get into small areas the cotton ball is hard to read use a tooth pick or wooden skewer with a bit of cotton wrapped around the top, dip in your ink and color in the small colors.
I do this process for pumpkin, squash and gnome using different colors of the alcohol inks from the Mixed Media Kit.
Next for the leaves I used the Paint Couture paint amazon from a previous kit , August Mixed Media Kit.
Here is the finished truck. For the little mustache on the gnome I used a white gel pen. I traced around the image of the gnome with a black sharpie pen. Then I added some glossy accents to the word Fall, and the pumpkins and squash. The tires are colored black using the black gesso from the Mixed Media Kit.
So this Fall Tres Jolie has some super cute chipboard pieces, here is the mushroom chipboard. For this one I colored in the acorns and the stem of the mushroom with a brown marker. for the leaves and the top of the mushroom I used the Perfect Pearls that came in the July Mixed Media Kit.
First you want to place some water down on your mat, just a a drop or two, then place a little bit of perfect pearls down on the mat. Dampen the chipboard just a little with your paint brush using water, don' t get the chipboard very wet or it will get mushy. Next place some perfect pearls on your paint brush and brush onto the damp chipboard area and this will color your chipboard. I used Perfect Pearl colors spring green brilliant yellow, and pumpkin orange.
Here is the cute little gnome that is new to the shop as well. I used my orange marker for hat, red marker for the apple and I used the paint couture amazon paint for the leaves. For the white beard I used white flock from my stash.
Here is the finished wreath. For the foliage on top of the wreath tucked under the bow I used the Laser Cut Elements from the Scrapbook Kit which features 49 and Market Vintage Orchard Collection.
Then I hot glued the truck down below, and added some leaves and flowers from my stash, lastly I glued on the chipboard mushroom and the little gnome. I did a couple of more laser cuts on top of the colorful leaves below.
I hope you enjoyed today's step by step tutorial, remember I have the video tutorial for your convenience. I really enjoyed creating this Fall Wreath using the cute wooden truck and the new mushroom and gnome that are added to the shop. I hope you got some inspiration from today's project and head over to the shop to check out the New Mixed Media Kit with the Fall Truck, you can do so many things with this truck for a really nice Fall Decor. Place the truck in a picture frame or on a canvas how lovely would that be to decorate a mantle, a wall, or hang on a door.
Don't forget to post your project on our Facebook Group Page, link is down below.
For more details you can always view the video tutorial process, which is at the top of the page.
Thanks again for joining me, I have all the links listed for you throughout the post so just click on the words and you will be taken directly to the store.
Wishing you all a great day and Happy Crafting.
Don’t forget to follow us on all our social media:


.png)
.png)


.png)
.png)