Followers

Showing posts with label lace. Show all posts

Thursday, October 13, 2016

Christmas Time

Hi Everyone!!
Please join us today for the Really Reasonable Blog Hop!!

Time To Celebrate!!
IT"S BLOG HOP DAY!!


If you are here you just came on over from Kathy's Blog and are on the right track. If not, why not head back to the RRR Blog and start from the beginning so you don't miss any of the terrific projects from my teamies.
Really Reasonable Ribbon we are kicking of this months Blog Hop showing you October Ribbon Club Assortment - Traditional Christmas Mix. 
Aren't these ribbons just beautiful for Christmas!! Although I am not ready for Christmas yet, these beautiful ribbons sure do get you in the mood for making your Christmas cards.
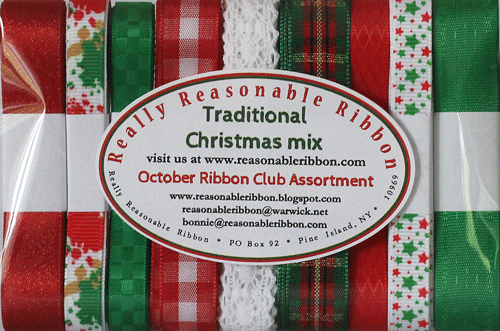
Monthly Ribbon Club, Domestic


For my project I used the beautiful 3/8 Checkerboard Satin and 5/8 crochet lace.
Just beautiful ribbons that go with this wonderful paper collection from Graphic 45.
Here is a close up of the crochet lace sitting on top of the Checkerboard satin ribbon, isn't that
green just amazing?! I love it!!

For my card I used Graphic 45 Twas The Night Before Christmas. I used fussy cut the holly leaves, santa with the toy sack, the little stamp image showing the child sleeping and the Merry Christmas sentiment. I used stickels around my holly leaves and Santa's toy sack and on top of the Santa looking over and used 3D adhesive to pop up my images.


Thank you all for stopping by today. If you would like to purchase these Traditional Christmas Ribbon please head to  Really Reasonable Ribbon store.
Also join us for our fun Halloween Challenge that is going on right now.
Next you will want to head over to Cherry's Blog to see her wonderful project.
Have a great time 
and
Hugs, 
Deborah xxx

Sunday, September 4, 2016

When a Bell Rings....

Happy Sunday Morning!

I hope you all are doing well. Things are going good here. I have a new card to share with you all this wonderful morning. One Stitch At A Time New Challenge 270 Anything Goes with Lace and/or Pearls. I invite you to join us for this wonderful challenge showing us some of those beautiful laces and pearls you got in your stash.

For this card I used the sweet image created by Digi Blessings - Angel Bells.
Isn't this image just so sweet? Cute little mouse ringing a bell, and the 
sentiment is just perfect. I used Spellbinders Fancy Tags for the sentiment 
with stickles mercury glass and a couple of pearls. 
 To create the frame around the image is Spellbinders Majestic Labels 25.
I used a little gold cord to tie up the bell, so the mouse looks like he is 
pulling the ribbon to ring the bell. I also used stickles crystals for the bell, 
mouse wings, and halo. To color the mouse I used my spectrum nior colored pencils. 
The paper is the beautiful Authentique Classic Christmas. (I showed this paper
in one of my DT Haul Youtube videos)
For the embellishments I created a lace rosette and a lace border using pearls
that are placed along the top of the lace. 

Our Sponsor is StitchyBear Digit Outlet with a
$10 coupon to use at the store

Supplies:
Ink: Spectrum Nior colored pencils
Accessories: Pearls, red button from stash; stickles crystals, mercury glass; Spellbinders Majestic Labels 25; Spellbinders Fancy Tags; Gold cord; White Flat Scallop Crochet Lace from CountryCraftCreations

Challenges entered:

Thank you all for stopping by today and Thank you for all the wonderful comments I really appreciate it. Please head over to the One Stitch At A Time to join this new challenge 270 Anything Goes with Lace or Pearls, we'd love to have you. Also you will find some great inspiration from my teamies. 
Thank you again,
Hugs, 
Deborah xxx

Thursday, July 28, 2016

Vintage Floral Doll

Good Day All,

Today showing you a tag I created using a few ribbons from the Really Reasonable Ribbon Store.   I used Cotton Blend Vintage Pink Floral , used two different seam binding colors Vivid Pink & Moss, used one of the pink ribbons from the Diamond Satin Assortment Pretty Pink, and Arianna Natural Crochet Lace.  I also used Wild Orchid Craft Trellis Roses Mixed Pink Tones. 

Well here is the 1st step I did, I took my Julie Nutting Stamp using tuxedo black momento ink and stamped it on the Cotton Blend Vintage Pink Floral. Then I fussy cut the dress out from the ribbon.

Here is a close up of the JN Doll with the Cotton Blend Vintage Pink Floral
I glued it down to the JN Doll, added some tiny pearls to the dress and to the doll's 
neckline for a necklace and colored the bottom of the dress, and used glossy accents
on the hairband and the bottom of the dress. 

Here is the Tag. I really had fun creating this tag and using so many assorted ribbons 
from the Really Reasonable Ribbon Store. I also created a little tag on the very bottom 
using one of the pink ribbons from the Diamond Satin Assortment Pretty Pink. I used a brad 
to attach it to the small tag and I created the little envelope for it to fit into so it pulls out. 
I used the Arianna Natural Crochet Lace at the top of tag and layered it up at the bottom.
The seam binding Vivid Pink & Moss are tied together at the very top, I really like how 
the pink and moss look together it's just so pretty. 

Here is a close up of the beautiful Trellis Roses I used, I just love these roses. 
Aren't they just stunning, especially used with the Arianna Lace. I created the rosettes 
first using a needle and thread, then glued my roses on top of them. I thought it
was a great addition to the vintage look I was going for using the Graphic 45 paper. 

 Here are two more flower rosettes using the beautiful Arianna lace rosettes I created.
And I glued the roses on top of the rosettes.  You can also see how doubled the lace up
on the bottom, below the roses. 

Supplies:
Paper: Graphic 45 - Mon Amour
Inks: copic markers and spectrum nior colored pencils
Accessories: Prima gems; from stash pearls; glossy accents; brad

Challenges entered: 


I thank you all for stopping by and I hope you are inspired to give the stamping technique a try using the Cotton Blend Ribbons. Also try using that beautiful Arianna Lace to make rosettes which is another lovely way to enhance your projects. 
You can find all the items at Really Reasonable Ribbons.
Wishing you all great day, 
Hugs, 
Deborah xxx

Monday, April 25, 2016

Roses with A Cup Of Tea

Good Morning ya'all, 

Hope you had a fabulous weekend. Today I am sharing an ATC that is a shabby chic look over at the Crafty Card Gallery. Hope you all like it as our them this Month is "Flowers", which is perfectly fitting with spring in the air, right?

ATC's are Artist Trading Cards which measure 2 1/2 by 3 1/2. I making these little cards as they do not take a lot of time and there is not a lot of room. So they are something quick and easy to create when you want to craft but don't have a lot of time. 

Here is what I did to accomplish this ATC - 


I used Blue Fern paper collection - Blush cut my base down to 2 1/2 by 3 1/2, fussy cut the teacup, bird & flower and heart with the little message inside the teacup. I added glossy accents to the heart and teacup. Crystal stickles to the fussy cut rose. Liquid pearls white to to the metal key and Say it with Pearls by Want 2 Scrap - white pearls in the corner and left side. I adhered lace in the middle of the card and placed the Prima Rose along with the gold heart button and fussy cut heart, teachp and other items ontop of the Lace from Reneabouquets, and the glitter glass is adhered on the background and placed my Reneabouquet butterfly to finish it off. I did distress the edges of the paper and used TH distress inks broken china & spun sugar around the card.


Here is a close up of the little letter. 
You can read what it says, it's so sweet. 
"A feast of flowers here behold 
A thing of joy to see, 
But ah! to me 'tis/'lis sweeter far
To feast mine eyes on thee!"


here I added liquid pearls to the center of the key. 


 In this pic. you can see a little bit of the 
Chunky Glitter Glass I used for the background.

Supplies:
Paper - Blue Fern - Blush
Inks - TH distress inks - broken china & spun sugar
Accessories- Want 2 Scrap - say it with pearls; Buttons Galore - gold heart button; Glossy Accents; Stickles - crystals; Liquid Pearls - white; Renea Bouquets - lace, metal key, butterfly, glitter glass; Prima Marketing - pink rose

Challenges Entered:


Thank you all for stopping by and hope you were inspired by my project today. Please leave some love here and visit some of my teamies posts over at the Crafty Card Gallery and leave some love for them too. They are all so talented. 

Wishing you a fantastic week and
Stay Crafty! 
Deborah xxx

Thursday, March 31, 2016

Julie Nutting Doll In Lace, Glitter and Bling


Good Day All,

Posting another creation I made for Crafty Card Gallery to go with our theme - female birthday.

I know it's a bit late but before I posted had to make sure that my swap partner received it as I had joined Scraps Of Darkness and Scrap Of Elegance facebook page Doll Tag Swap.
I always wondered why everyone loved using these Dolls and so I thought, "I gotta see what all the excitement is about them".  And I have to say, I thoroughly enjoyed coloring and embellishing this doll. There is so much versatility in using these Doll Stamps. This one was an image that was previously given to me by a friend but I did go out and purchase one from Hobby Lobby. (heheheheeee)

So here is my doll tag and supplies -
Stamp - Julie Nutting Doll stamp (I don't know the name)
Paper - Authentique - Classique Pretty and Tags
Ink - TH Distress - black soot, spun sugar; colored with Copics
Accessories - ribbon - pink; seam binding - dyed using black soot; Lace used on Doll - from Country Craft Creations (I won as a prize); Prima Marketing - Gold flower center, Say it in Crystals;
Stickles - ice glade; Stampendous - Frantage embossing powder used Shabby pink (for the background)
**Stash - flowers


***Close Up - you can see the Frantage spread around the 
tag and image. 


***To get her dress to look poofy I folded up a piece of paper 
like a skirt gluing that down first and then added the Lace
on top of the paper. 

Challenges entered: 

I hope you were inspired. Please stop by Crafty Card Gallery we appreciate visitors and love to read your comments. :D  
Hope you have a great day and stay Crafty!! 
Hugs,
Deborah xxxx

Saturday, March 28, 2015

Spring Flowers for Easter

Good Morning All, 

Here this morning to bring you some Spring and Easter Inspiration today for the Crafty Sentiments Inspirational Blog. 

I used an embossing folder and glitter to achieve my glittery paper look. 
First I started with my embossing folder - Rub vera mark on the flat side of the emboss design, then run through your embossing machine, spread a heat 'n stick powder on top of the versa mark, heat the heat 'n stick powder til it is melted on the card, last add your glitter and then heat til melted into the card. 

I stamped my image onto white cardstock, used the same embossing folder with my image then I cut out the middle part to fit in the middle of my embossed glitter cardstock (so used the embossing folder twice, one on the colored cardstock and the other on the white cardstock with my image); using pop dots on the back of the image to raise it a little. You can achieve this technique with any type of embossing folders. 

The image I used is Rosie Spring Flowers, its just such a lovely image for Spring and Easter. 
You can find the image at Crafty Sentiments Designs Shop. She's so sweet. 


 ***Close Up***

Supplies:
Stamp: Crafty Sentiments Designs Shop - Rosie Spring Flowers; Inky Antics Stamp - Happy Easter
Paper: Neenha white cs for copics; Recollections - pink paper
Ink: Copics for my image; Momento - Angel Pink
Accessories: Liquid Pearls - baby blue; SU heat 'n stick & Iridescent Ice; Hot Off The Press embossing folder - Swirl Frame; pink silk ribbon flowers & Lace; sm.scallop punch, sm. crystal ribbon

Challenges entered:

Hope you get to pop on over to visit Crafty Sentiments Designs Inspirational Blog. 

Thank you for visiting.  :D 
Hugs, 
Deborah 

Wednesday, February 4, 2015

Valentine's Sweet Treat Box

Good Day All,

Today I am here to share a little Tutorial that I did on Crafty Sentiments Inspirational Blog. So hope you get inspired and create one or two.

The instructions for this Valentine's Day Treat Box I received many years ago (7-9 years) from a Stamp'in Up gathering I went too. It's a little box that is just so cute to place little chocolate's inside for your sweeties'. :D  And with Valentine's Day approaching why not make a couple for your kids, grandkids, family members, office co-workers, or friends.

The box is really simple and only takes a few supplies, unless your like me and love embellishments.

Here is what you need:

  • Cardstock - 2 sheets of any color you want
  • Stamp - Crafty Sentiments Stamps
Optional Accessories:

  • Embossing folder - you choice
  • Punches - your choice
  • and any other little accessories/embellishments you want to add
Instructions with pictures:
How to Make the Box Bottom


How to Make the Top/Sleeve


My Finished Treat Box
Isn't she just cute I just love this little stamp
(click the name if you want to go to the CS Shop)


Supplies I Used:
Ink - TH Distress Markers & Copics
Stickles - Cottom Candy, Crystals, Xmas Red
Embossing folder for Sleeve - Flower Vine by Sizzix
Sm scalloped heart punch
Sm. heart punch
Heart Dazzles from - Stamp On It
From Stash - lace, part of a doily, pink ribbon and heart brad

Challenges Entered:

Well I hope you liked my little Valentine's Sweet Treat Box. I really had fun making this for you all. Please go by the Crafty Sentiments Inspirational Blog and leave me some love there too. : ) ( I like getting comments from you all) Also don't forget to join Crafty Sentiments New Challenge "Include A Heart" and please leave my Teamie Sisters some LOVE. 
Thanks for stopping by and have a great crafty week.
Hugs ~ 
Deborah xxx

Sunday, January 25, 2015

Glitter Me Happy

Hi all my crafty buddies,

It's raining this morning and I am just wanting to stay in bed and hibernate for the day. Oh, just a dreary day. (Big Yawn)

So today I am sharing a card I made using the Card Sketch by DCWV. They have a Sketch Challenge using Layout Sketch or Card Sketch. I like using sketches when making a card, makes it easier, I know exactly where to put stuff. lol  For this card I knew exactly what I wanted to use but wasn't sure how this was going to turn out.
Went shopping with a crafty buddy this week and found the Mariposa DCWC papers in a mini stack and OMGosh!!! they are Gorgeous! I just loved using this stack may have to go get another one or see if I can find it 12x12.  lol
I don't know about you but I just love  DCWV papers, such great quality and the designs are just beautifully done. I also have used a stamp by DCWV, too. I bought last year so still new (cause I am a hoarder), so unwrapped and used on this card.

Well here is my card - (I will list what I used at the bottom)
***I like this embossing folders detailed pattern***


Items Used:


Supplies:
Stamps: DCWV stamp - Vintage Collector
Paper: DCWV - The Mariposa Mini Stack; The Burlap Paper Stack; MultiMedia Paper; SU-Blush
Ink: Memento - ; TH Distress Ink - Tea Ink; Gold ink - inked across embossed image
Accessories: Stickles - Champaign; Embossing Folder - Textile Texture
From Stash: Ribbon, Lace

Entering DCWV Sketch Challenge
DCWV Diary: 1st Stack-a-holic Challenge 2015


Other Challenges entering my card in:
digidesignchallengeblog: Add Sparkle Challenge!!
Paper Creator's Crafts: Challenge #34
Fussy and Fancy Friday Challenges: Fussy and Fancy Challenge 131 -Things with Wings
Sister Act Card Challenge: Challenge #90
As You Like It Challenge: Favorite Embossing Folder and Why?
Aud Sentiments Challenge Blog: Challenge 123 - Anything Goes & DT Call
Chocolate Baroque Challenge Blog:Challenge 7

Thank you for stopping by my blog today. I hope you found some inspiration from my card.
Please leave me a comment as I love reading them.
Wishing you a great day and happy crafting,
Deborah xxx