Followers

Showing posts with label Happy Easter. Show all posts

Thursday, April 16, 2026

Blooms & Butterflies Easter Layout for Tres Jolie

Hi Everybody,

Join me as I document a beautiful family Easter filled with sunshine and smiles! In today's layout, I'm working with the 2026 Scrapbook Kit from Tres Jolie. I'm using a soft, vintage garden palette to frame our favorite egg hunt moments. I've focused on creating a whimsical "shabby chic " atmosphere by layering large floral ephemera, delicate, butterflies, and rustic wooden-style frames. I used a circular butterfly wreath to anchor the family portraits on the first page, and a playful garden fence detail to ground the action shots of the kids on the second. I hope you get some great inspiration from today's project.
I have the video tutorial below for your convenience and the step-by-step tutorial below.

2026 Scrapbook Kit


To get started I pulled out one of chipboard fences from the kit and inked with Walnut stain.


Next I did the same with the butterfly wreath. I left the back chipboard piece plain.


Next adhere the back and front piece together. 
I then used my liquid pearls from my stash and started applying the liquid pearls inside each area of the butterflies. Let dry for a bit. It may have some cracking but just fill again and do the process over until the the cracking stops. Let the liquid pearls stand just a little bit in between applications. 
***view video tutorial for more details***


Here is what the butterfly looks like once finished. I did the same for the other butterfly above.


I adhered the wreath down onto one of the pattern papers from the April Scrapbook Kit. I also adhered some of the paper flowers down as well. I am loving the look of the butterfly wreath.


Next I used the two wooden paper frames left over from the kit (as the others were used in a previous layout). Added my photos from this years family Easter gathering. I did apply foam tape (double it) behind the photos. ***view video tutorial for more details***


For the second layout. I added the chipboard fence below and then added some paper eggs around the fence from my stash. 


I then arranged my photos how I wanted them to look. I like my photos a little wonky, (lol).


Here is a photo of the first layout we did using the chipboard wreath decorated with the liquid pearls. I finished it off with fussy cutting some of the leaves, flowers inside the wreath and the bird house. On the bottom I used the flower planter as a holder for my sentiment. The little easter eggs are from my stash.


Here is the second layout. I used some of the remaining paper flowers and leaves. Arranged the photos and adhered my sentiment in the middle along with some ephemera from my stash. I love the wooden chipboard fence I think it adds a nice touch to the backyard vibe of the kids hunting for eggs. 

 I hope you found some inspiration from today's project. Try out the new technique I shared using liquid pearls inside the chipboard area of the butterfly wreath I know you'll love it.
Wishing you all a great Crafty Day.

I invite you to check out the 2026 April Kits over at Tres Jolie Kit Club. 
These kits are amazing and will get your creativity flowing. 
Thanks for joining me and Happy Crafting!

I invite you to please stop by our Facebook page to see what new items our design team has created using our monthly kits.
You can always post your projects on Tres Jolie FB page - Tres Jolie Club Cafe.  

Don't forget to post your project on our Facebook Group Page, link is down below. 
We would love to see what you create. 
 For more details you can always view the video tutorial process, which is at the top of the page. 
Thanks again for joining me, I have all the links listed for you throughout the post so just click on the words and you will be taken directly to the store. 

Enjoy and Happy Crafting. 


Monday, March 18, 2024

Hello Peeps Easter Cards

 Hi Peeps 

I hope you all are doing well. Easter is on it's way can you believe it. So with that being said I have some fun Easter Cards you can create for Easter using Clear Scraps 5x9 Flowers Layering Stencil, Bunnies Chipboard Embellishments and the 4 x6 Hello Peeps Stencil. 

I hope you enjoy the step by step tutorial below. Down below I have the products I used along with the name & links, just click on the name and you'll be directed to the store. 

Here's a photo of the finished cards. 


Bunnies Chipboard Embellishments                                 5x9 Flowers Layering Stencil


Card #1

To start create a regular card base measuring 4 1/4 x 5 1/2 inches. I place a piece of removable tape diagonal, as shown below. 

Next take the  5x9 Flowers Layering Stencil place it a little above the tape and stencil your first flower, after you have the first scoot the stencil over and ink the next flower down and keep going all over the white space. 


Once you have finished the top of the card move the tape a little bit down so you have about a 2 inch diagonal space between the top and bottom flowers you're stenciling. 


Next I decided to use brown flock for the Bunnies Chipboard Embellishments. You can either use double back tape as shown below or use your glue. I do prefer the glue over the tape I feel it's just easier. After your done applying the adhesive you can place the chipboard piece in the flock and cover it all over. 


Here is the end result. One bunny I used glue and the other bunny I used double back tape. But you can decorate your Bunnies Chipboard Embellishments however you'd like, even paint them. 


Next I covered the midsection with yellow glitter paper and layered with pink cardstock. I added flap back enamel dots from my stash. I also used a Happy Easter metal die from my stash for the sentiment. 
Now the card is finished. 


Card #2

For card #2 we used the 4 x6 Hello Peeps Stencil . This stencil is so cute. I laid it down and just applied my ink as shown below. The size of this card is 4 1/4 x 5 1/2 inches.

Here is what the front of the card looks like after I was done inking with the stencil. I did the cute bunnies in different colors and the words to match. Now you can decorate it. 


I thought it would be nice to use the  5x9 Flowers Layering Stencil and then fussy cut these out to decorate around the card. For the centers of the flowers I used Nuvo flower pollen, but you can use enamel dots or what ever you have in your stash. 


Here is where I place a thin piece of green glitter paper and pattern paper on the top and bottom of the card just to give a little bit of nice border to the card. Below you can see I fussy cut some of the flowers.


Here's the finished card. Super easy peasy right? I added a few enamel dots on the left side and a pink butterfly from my stash to the card. This card is so cute I just love the 4 x6 Hello Peeps Stencil inked with fun bright colors, so full of Spring and Easter. 


Card #3

The size of this card is 4 1/4 x 5 1/2 inches. The yellow glitter cardstock mat is 5 1/4 x 4 inches, the blue polka dot mat measures 4 7/8 x 3 3/4 inches. After you cut the mats  you can glue together. 


For this card I created my own picket fence out of the wooden pattern paper I had in my stash. I cut 4 pickets at 1 x 3 inches and snipped of the top portion to form the picket fence. 


The slat that goes across the pickets measures 1 x 5 inches. I inked each piece with ink to make them a little dark around the edges. I did add foam tape to the back of each picket fence and then laid the long slat piece on top (there is no foam tape on this piece).


Adhere the mat to the card base and decorate the front as you would like. I added the second little Bunnies Chipboard Embellishments on top of the fence along with the remaining stenciled flowers I fussy cut. I found the carrots and grass in my stash and added them. This turned out so adorable. 


I hope you liked today's step by step tutorial. I like that these cards were so easy to create and you can create the flowers from the stencils cut them out and use them to decorate your card, tags or layouts. Just another way you can use this fun 5x9 Flowers Layering Stencil along with the Bunnies Chipboard Embellishments Embellishments and the 4 x6 Hello Peeps Stencil. 
I wish you all a Happy Easter and Happy Crafting. 


Wednesday, March 16, 2022

Easter Card


 Good Day Everybody,

Hope you all are doing well. Today I am sharing my Easter card I created for International Art & Soul  challenge #129 Easter Chick and Rabbits.


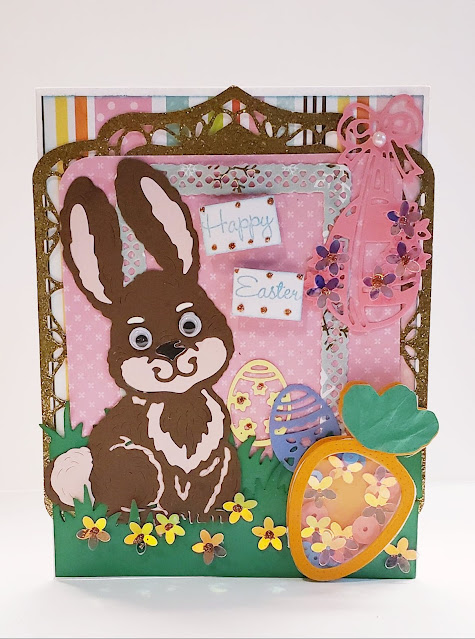
To create this card I used a cute little Rabbit cutting die that came with a carrot shaker. I adhered googly eyes to the rabbit to make it more fun. I used a Happy Easter stamp from my stash. 


Thanks for stopping by. Head over to  International Art & Soul to check out the teamies to see what they created and join in the fun Easter challenge chicks or rabbits. #129. 

Wishing you all a great day!

Debbie 


Monday, March 15, 2021

Bunny Card for Inaas Ch. #104

 Hi everyone,

Can you believe March is almost over? I am amazed how fast time is going by, before we know it summer will be here. I know some of you are still getting snow, but here in N. Texas its sunny and in the 70's. Yay! However, I know rain will be upon us soon, and I am okay with that. lol

Well today over at International Art and Soul we have a new Challenge, it's the Bunny Ch. #104. I created a cute little bunny card using the Stamp Of Life Bunny Fold It Die. I just thought this was so cute and perfect for this challenge. 

I plan on creating a video on my youtube channel to share I made this little card. I would like to send this to my great niece Sophia, I think she would get a kick out of it. lol 

Here is a little bit of information on how I created this card, is I cut out the base and then cut out the bunny die several times using different color glitter papers and paper pieced them together.  Then I added the little bouquet of flowers for him to hold in his hands but the flowers are covering them up. lol  

Once I finish up the video I will post the link here for you in case you are interested. here is what die look like 


And here is my little bunny card.  I just love how it turned out. I like how the glitter paper sparkles and really adds a nice layered look to the cracked egg. lol  For the ears & his little tail I used pink felt paper I had in my stash .

Challenges I joined:

Festive Fridays Challenge 5th - 18th March


I hope you swing by the International Art & Soul and take a peek at what my teamies created lots of great inspiration for you and please join us for this challenge, click here inaas ch. Bunny #104

Wishing you all a great day 
& 
Happy Crafting!
Debbie 💗

Monday, July 18, 2016

Mason Jar Mini Album Quick & Easy

Hi everyone!!

Today I am sharing my Design Team Project using this super cute idea you make in one day. Do you get the kits from Country Craft Creations?? Well if you do, you can use those cute little chipboard mason jars you got in July's Kit and the BoBunny Secret Garden paper collection to make this little mini album.
In my last video about 2 weeks ago I showed you how to use the BoBunny Gesso as a paste with your stencil to make a pattern on the front of your chipboard then you can add the BoBunny pearlescents on top of the stenciled pattern to create a really lovely mixed media cover. You can also use the pearlescents to create a unique look to your metal embellishments and resins.
Hope you are inspired to give this a try.
Check out the CountryCraftCreations Store for everything you see here.

Thanks for tuning in, See ya next time! :D 
Deborah xxxx

Tuesday, March 29, 2016

Happy Easter in a Tussie Mussie

Hi all,

I hope you all had a wonderful Easter Holiday. I tried to get this post out sooner but I ran out of time. And for Easter Sunday I took the day off with no crafting or blogging or facebook. I know I'm a little late but I wanted to wish you all a Happy Easter with all your family and friends no matter what you are doing or what you did.

This year my daughter had us over to her house for Easter, which was a treat cause I usually host all the holidays but now I think that torch is being handed over. lol   I think that is how that goes. Right?

Well for this wonderful holiday I made  a Tussie Mussie, my very first time doing this project and I have to say I enjoyed it. I received the idea from fattypaddyscrapper on youtube, here is the link - https://www.youtube.com/watch?v=_GNkbwFs59Q
I have been chiming into a facebook group Scrapbookers of Country Crafts and that's how I came upon learning how to make a Tussie Mussie. Since I've not done one before I thought it would be fun and I am so glad I did cause they are just so fun. You can really use anything to you want to decorate them and set anything inside of them. (flowers, candy, a small gift)

For my Tussie Mussie I used some paper that I've had in my stash for over 10 years, lol  Ummm, anyone else have papers that old in their stash??? I bought it from Oriental Trading but I don't remember the name of the paper. I also used some plastic flower filler around the bottom to give some greenery. I used hot glue to stick everything inside securely.


I made the little windmills from pre-cute triangles. 
Also used liquid pearls on the bunny ears, nose and on the Easter Eggs. 

Supplies:
Most all supplies were from my stash
Paper - Oriental Trading - Easter paper
Accessories - pink ribbon, white and white flower ribbon and other ribbons from stash; Liquid pearls - petal pink, yellow, baby blue on eggs, chick and bunny; crystal effects on eyes, beak of bunny and chick; used Stickles on belly of bunny. 
How I made the windmills - 
windmills are made from Lillibet - mini bunting pieces (folded in half and brad is stick through the middle) I hot glued the decorative straws to the back of the windmill. 

Challenges entered:
Where The HeART is...Challenge #7
Not Just Cards Challenges: # 30 March Challenge
Out Crafty Corner: Challenge 7
Crafty Boots Challenges: Spring is in the Air
Craft your passion challenges: Challenge 305 - always anything goes
Crafting From The Heart: Challenge 105
A Gem of A Challenge: Challenge #165 Easter
Crafty Friends Challenge Blog:Challenge 28
Sunny Day Crafting: Challenge #3 - Spring/Easter
Hiding in My Craft Room: HIMCR #244 - Any Holiday
A Bit More Time To Craft Challenge:  #16 - Anything Goes
Crafting Musketeers: Challenge #35 - Use 3 Ribbons
Paper Creator's Crafts: Challenge #45  Spring Colours
Just Keep on Creating: March 2016 - Anything Goes Link up


I hope you had a wonderful Easter holiday and hope you were inspired to create a Tussie Mussie in case you haven't done one before. They really are a treat. thank you for stopping by.

Hugs, 
Deborah xxx

Sunday, March 29, 2015

Bright & Cheery Bunny Cupcake

Hi Everyone,

Please excuse the late post. I haven't felt very well lately.

Today a New Challenge over at Quirky Crafts Ch #7 with a Sketch with our challenge this time along with a Hat Theme. So that means join in using the sketch below and using an image with a Hat, bandanna, cap, beret or bonnet.

I used Meljen's image - Bunny Cupcake. For the Hat Theme - I printed the bunny out again and fussy cut the frosting part and did the shave cream technique using Stamp 'in Up ink refill inks; then used Smooch pearlized accents - Shabby Pink. I applied the shabby pink about 3-4 times over the black swirly lines after that dried then I applied the Glossy Accents over the my hat 3 times, then added pop-ups for the hat look.

Here is the sketch and below is my card -


Here is my card -


Close Up of my Frosted Hat 

Close Up of my Image

Supplies:
stamp - Meljen's Bunny Cupcake; Inky Antics - Happy Easter
Paper - Coordinations - lt. green; 
From Stash - Patterned paper 
Ink - Copics, Smooch pearlized accents - shabby pink; SU ink refills - rose red, baroque burgundy & Adirondack ink refill - wild plum
Accessories - Glossy Accents; Stckles - cotton candy & mercury glass; Candy Dots; crystal gems;

Challenges:

Our Sponsors  -
First sponsor is 
will be giving away some MDF shapes & frames along with wooden letters - 
Ooohhhh, the stuff you can make with these is awesome!!!
                                         

2nd Sponsor and 2nd Prize - 4 Images used by the DT :D

3rd Sponsor and 3rd Prize - 3 Images from Ditzie Designs 
(part of That Craft Place)


Oh, WOW!! What a bunch of GREAT Prizes!! Right?  Please come by and play along in the New Challenge #7- Sketch & Hat Theme. 
And please go by Quirky Crafts Challenge Blog and check out the wonderful creations by my teamies' they whipped up some create cards with the sweet images by our sponsors and leave them some love, too. :D 
Thanks for stopping by and stay crafty, 
Deborah xxx

Monday, March 23, 2015

Bunny In Bucket for Easter

Good Morning all,

I know you are probably like whaaaattt? Three in a row, what gives.

Well Crafty Sentiments is having a New Release of Easter stamps on the Inspirational Blog.

Yesterday was Day 1 of the New Release 
Today is Day 2. 
New Easter Release

Isn't she just adorable, holding that little bunny in the bucket! He is so cute, too!!


Supplies:
Stamps: Crafty Sentiments Designs -  New Release Stamp - Isobel - Bunny in bucket; Easter stamp from stash
Paper: Recollection - yellow & white cs; Patterned paper floral, yellow and green from stash.
Ink: Copics and Momento ink Bamboo Green (sentiment)
Accessories: Paper bow made with WRMK envelope maker; MS butterfly punch; Spellbinders dies; SU - leave punch; Yellow beads from stash and Flowers by Nataliya; Used yellow liquid pearls on butterfly and white liquid pearls on her sleeves; Yellow & Pink Stickles

Challenges:
Simply Create Too: Challenge #81 - "Easter or Bunnies"
Sisterhood of Snarky Stampers: SOSS30 -- E is for Easter
Retro Sketches: a Challenge: retro sketch #157
Alphabet Challenge Blog: *C for Cute and Cuddly
QKR Stampede: QKR Stampede Challenge #131 - Think Spring

Please pop on over to the Crafty Sentiments Designs Inspiration Blog to see the other wonderful New Release Stamp Sets. The Design Team has made some amazing creations with all these Newly Released Stamps. You will be so inspired, I promise you. :D

Wishing you a great day
&
Stay Crafty,
 Deborah xxx