Let's capture the seasons with these three beautiful and delicate shabby chic and cottage-core vibe cards and tag using the 2026 May Scrapbook Kit. We welcome in the delicate bird's nest with the shimmering blue butterflies, along with the lush pumpkin resting on a stack of ages books with shimmering autumn leaves and let's get nostalgic with the winter wonderland featuring the stunning pair of skates surrounded by frosted poinsettias and glittery snowflakes. Come along with me as I share some wonderful techniques how to blend vintage charm and layered textures into these seasonal creations.
To start out I used two of the arc cards that were left over from the 2026 April Card Kit. So I used one of the pattern papers from the 2026 May Scrapbook Kit. I then traced the flaps and arc on the pattern paper, then cut out all of the pieces.
After cutting out all the pieces glue then to inside and outside flaps.
Next I cut out a long 1 inch strip piece of paper. I wrapped it around the card and glued the where the pieces met in the middle, then cut off the excess piece. This creates a belly band, which is a closure for the card.
Here is the inside of the card. I fussy cut the lantern as an accent for the inside.
Here is the front of the card. I added flowers and added some stickels to the snowflakes but the photo doesn't show it.
Card #2
For card #2 we did the same steps by tracing the card and flaps onto the pattern paper, then cutting out the pieces. Adhere them to the front and inside of the card.
Here is what the inside of the card looks like. For this card I used a fall pattern paper from the Scrapbook Kit.
Next I used a few of the Perfect Pearls and Pearl Ex powders from previous kit on the leaf chipboard piece. ***for details view Video Tutorial***
After I was done with the blending the colors I used crystal glaze over the leaf. Once it was dry I adhered on top of the card.
Here is the finished card. I did use gold stickels over the images so they would stand out more. I love these beautiful vintage boarders that go with the Blue Fern paper collection.
Large Tag
Last I did a large chipboard tag. I traced the tag on the pattern paper, cut out the paper and then adhered it on top of the chipboard tag.
Next I painted the beautiful chipboard border that came in the May Scrapbook Kit.
After the paint dried I sprayed on a little bit of the Aquamarine spray from the May Mixed Media Kit.
Once it dried I adhered the border onto the tag.
I then cut off the excess chipboard piece. I adhered on a few butterflies I fussy cut, I added some flowers and a silver corner metal piece from the Mixed Media Kit.
Here is the finished tag. I just love how this tag turned out. The beautiful aquamarine colors with the pinks are just stunning. I love the pink mixed with the cream background from the pattern paper. I did add some gold stickels around the butterflies.
I hope you found some inspiration from today's project. With this 2026 May Scrapbook Kit we created a couple of seasonal cards you can save for future use and the beautiful shabby chic tag is perfect for birthdays or any upcoming occasion you can give on a gift.
Thank you so much for stopping by and crafting along with me today.
Until next time, keep curating those beautiful memories. ~Deb
I invite you to check out the 2026 May Tres Jolie Kits.
These kits are amazing and will get your creativity flowing.
Thanks for joining me and Happy Crafting!
I invite you to please stop by ourFacebookpage to see what new items our design team has created using our monthly kits.
You can always post your projects on Tres Jolie FB page - Tres Jolie Club Cafe.
Don't forget to post your project on our Facebook Group Page, link is down below.
We would love to see what you create.
For more details you can always view the video tutorial process, which is at the top of the page.
Thanks again for joining me, I have all the links listed for you throughout the post so just click on the words and you will be taken directly to the store.
Enjoy and Happy Crafting.
Don’t forget to follow us on all our social media:
I have a Design Team project I created for Really Ribbon Ribbons today. A little trinket box I created using some great ribbons, beautiful wild orchid flowers and some fun little trinkets that are new at the Really Reasonable Ribbon Store.
I do have an announcement before I get started, this is my second to last post I will be doing for the Really Reasonable Ribbon Design Team. I am really sad that I am leaving the team they are such a great team to work with and Bonnie Garby is just amazing. I just want to say Thank You to Bonnie for having me on your team it has been a pleasure and I've had a great time using your beautiful ribbons and wild orchid flowers. Thank you Bonnie.
Here is my project -
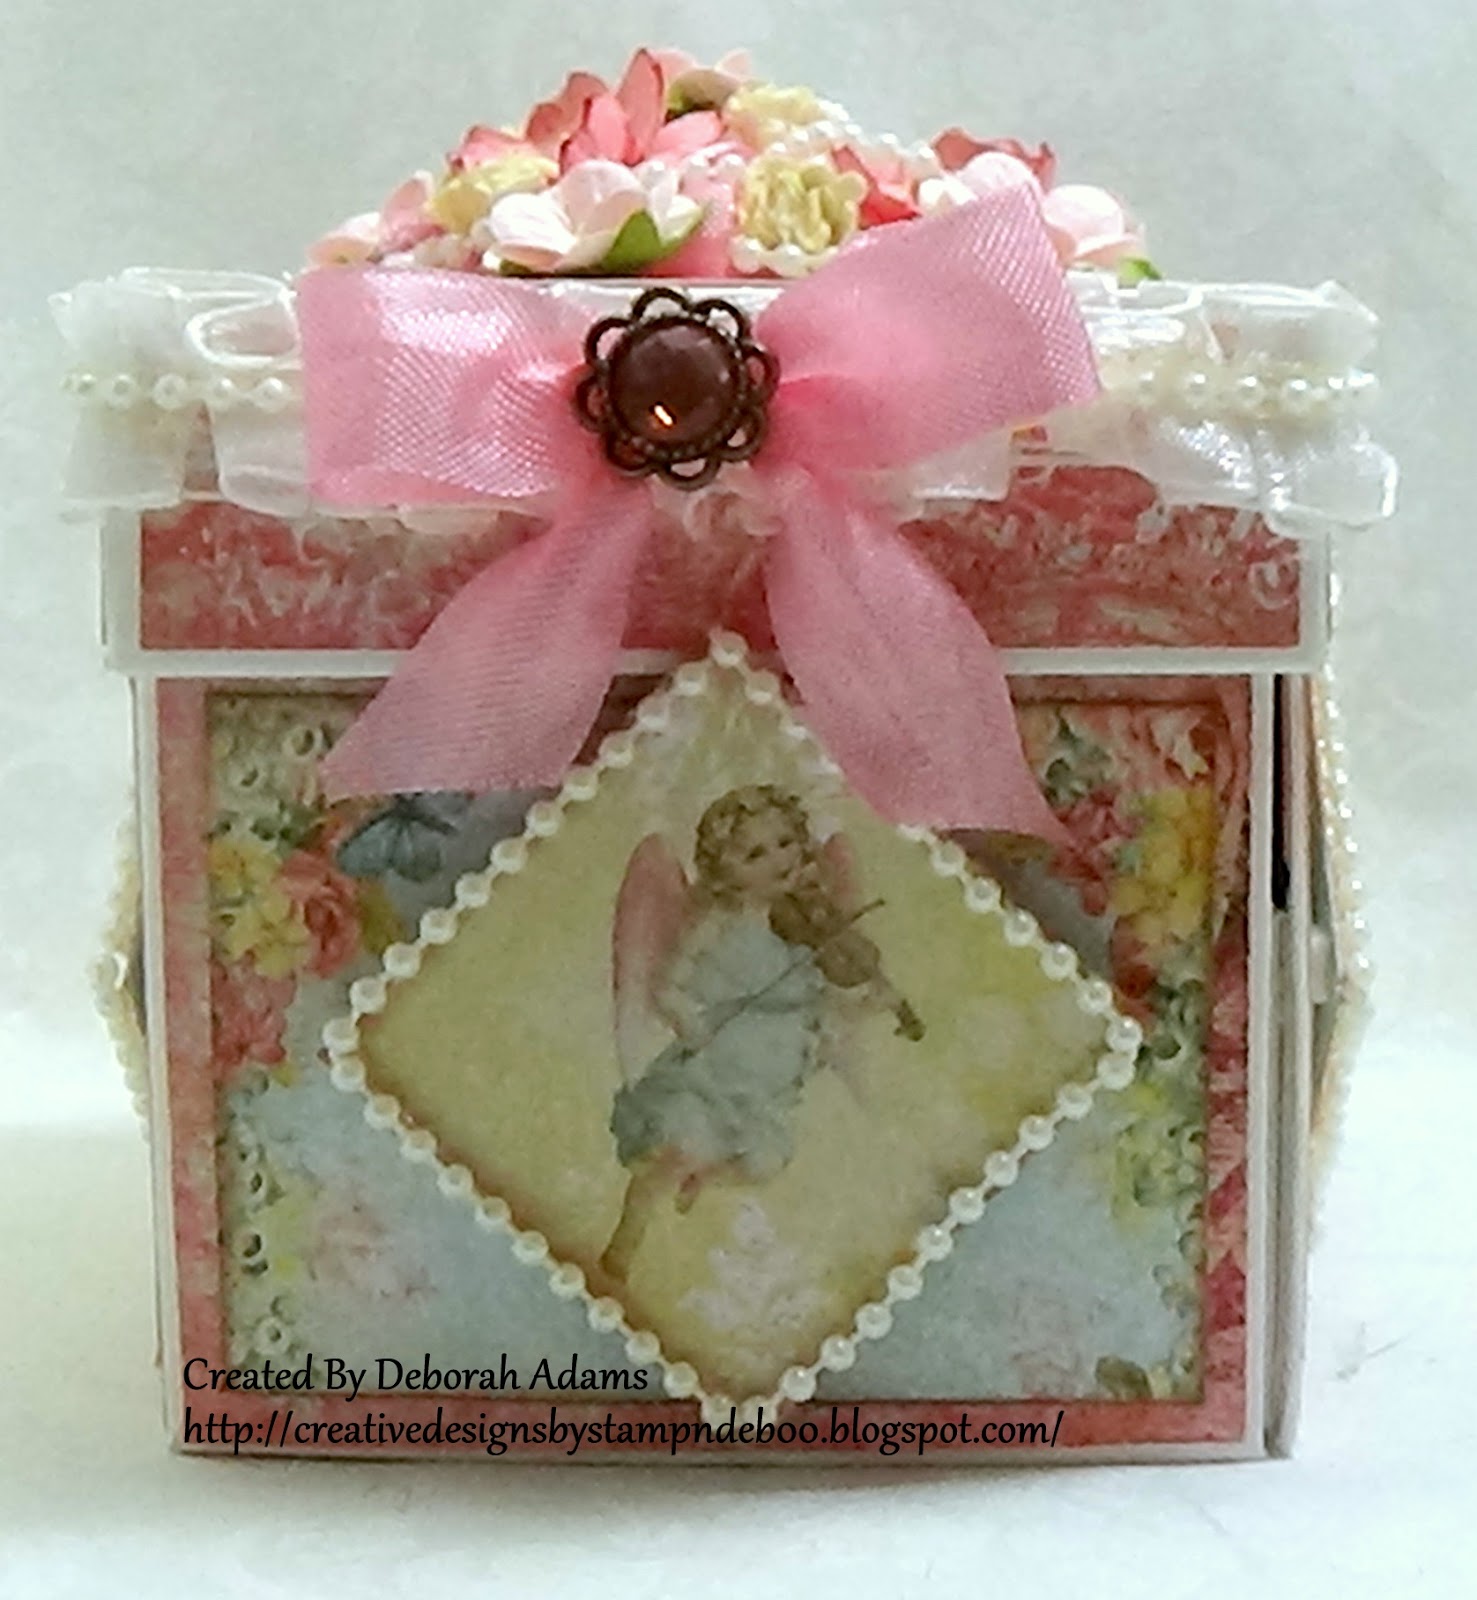
So here is my new Trinket Box. Yep, I made myself something for once. lol
I am so excited I just love it, I used the beautiful Blue Fern paper collection - Blush.
I am putting my charms and little trinkets inside.
Here is a great shot of the sheer box pleats white ribbon I used around my edge of my lid.
I used some tiny strands of white pearls I had in my stash, I bought from JoAnns a while back.
Here are a couple of photos showing the top of my box. I actually placed the seam binding bow down first and then laid my flowers around it, added my tiny pearl
strands around the flowers. Then I added more flowers around the top.
I just love these little flowers they are just darling.
Just so you know I have used this Sheer Box Pleated ribbon a few times and I just love it.
I have to say it's probably one of my favorite ribbons from the store as it's so versatile.
Thank you all so much for stopping by today I so appreciate it. I hope you are inspired to use some of these items. I just love using the ribbons from Really Reasonable Ribbons they are just gorgeous, and the flowers are just beautiful. Check out the items I used plus other wonderful items at the Really Reasonable Ribbon Store. Please leave me a comment as I love reading them.
For my project I created a card using some these beautiful flowers from Reasonable Ribbon Store they are the Chrysanthemums Mixed Blue/Aqua/White. today is the New If you watched my video a few weeks back you would have seen these beauties They are just lovely and the blues are so vivid in color. Here is the link to my video showing these beautiful chrysanthemums and much more!! https://www.youtube.com/watch?v=JCWsN_Vaiyc
Here is my card -
For my card I used the Blue Fern - Frolic collection for the matte around
my little stamped kitten. I cut a circle in the design paper and fussy cut
around the leaf, butterfly and flowers that are printed on the paper.
Thank you all for stopping by today. I invite you to hop on over to the Really Reasonable Ribbon Blog and take a look at what my teamies had created, you will be inspired to join our fun new challenge at Really Reasonable Ribbon - Summer Flowers. Hope to see you there.
Hope you had a fabulous weekend. Today I
am sharing an ATC that is a shabby chic look over at the Crafty Card Gallery. Hope you all like it as our them
this Month is "Flowers", which is perfectly fitting with spring in
the air, right?
ATC's are Artist Trading Cards which
measure 2 1/2 by 3 1/2. I making these little cards as they do not take a lot
of time and there is not a lot of room. So they are something quick and easy to
create when you want to craft but don't have a lot of time.
Here is what I did to accomplish this ATC
-
I used Blue Fern paper collection - Blush
cut my base down to 2 1/2 by 3 1/2, fussy cut the teacup, bird & flower and
heart with the little message inside the teacup. I added glossy accents to the
heart and teacup. Crystal stickles to the fussy cut rose. Liquid pearls white
to to the metal key and Say it with Pearls by Want 2 Scrap - white pearls in
the corner and left side. I adhered lace in the middle of the card and placed
the Prima Rose along with the gold heart button and fussy cut heart, teachp and
other items ontop of the Lace from Reneabouquets, and the glitter glass is
adhered on the background and placed my Reneabouquet butterfly to finish it
off. I did distress the edges of the paper and used TH distress inks broken
china & spun sugar around the card.
Here is a close up of the little letter.
You can read what it says, it's so sweet.
"A feast of flowers here behold
A thing of joy to see,
But ah! to me 'tis/'lis sweeter far
To feast mine eyes on thee!"
here I added liquid pearls to the center of the key.
Thank you all for stopping by and hope you
were inspired by my project today. Please leave some love here and visit some
of my teamies posts over at the Crafty Card Gallery and leave some love for them too. They are all so
talented.
So here is my take on the theme. I used an image from the Stitchy Bear Stamps Shop, by Stitchy Bear - Love . I also used some of the items I received from Scraps Of Elegance January Kit. I just love their kits, they are so fun and filled with beautiful paper and goodies.
I cut out the frame first with Spellbinders die - majestic labels twenty-five, leaving a
little tab that is folded down behind the frame. I cut out the design paper to the fit the
size of my card/frame and adhered the design paper on the back of the tab.
This is what gave me framed look of the around my image.
I fussy cut the hanging hearts from the paper and used stickles around the hearts and envelope.
The little blue flowers are from Heartfelt Creations - Stripped Sun Kiss colored with
light blue gelatos and filled with white prills.
For my image I layered it twice. I printed off on regular white cardstock and then
I printed it off on the pink patterned paper.
The design paper I used is from Blue Fern - Blush paper collection, the two sheets
I used to make this card is Enamored & Sweetheart.
Once I cut and colored everything I layed out my image and used pop dots
to give it a 3D effect.
Here I colored with my copic markers. I used white flower soft