Today I have an easy project you can create using the March 2025 Scrapbook Kit. With this Scrapbook Kit I created a Simple Spring Folio that you can create within a few hours. You will love the simplicity of this folio and it can hold a few photos or more (at least 20). I hope you enjoy creating this, I have all the links below along with the step by step tutorial and the video tutorial which holds a lot more details for you.
March 2025 Scrapbook Kit
To start the folio cut 2 pieces at 81/2x9 inches, Score at 1inch with the 8 1/2 inch along the top of the scoreboard.
Cut 2 pieces of cardstock 7 3/8x9 inches, Score 1/2 inch with the 7 3/8 inches along the top of the scoreboard.
Next adhere the 1 inch pieces together, this will be your spine.
Then adhere the 1/2 inch pieces to the inside of the spine. Place the first one down with the 1/2 inch piece facing to the left, then adhere the second page behind the first page.
Here is what the folio should like once you have everything adhered.
For more details you can watch the video tutorial.
After creating the folio, I used pink cardstock on top so there is a small border.
For the front cover of the folio I used this beautiful window image. I cut it out and cut open the window and folded back the window pieces to create flaps. I adhered a piece of pattern paper behind the window for a nice scene.
This small flap will be adhered on the first page on the edge.
This flap is adhered to the front of page 2.
Here's a photo of the inside cover and the front of page 1.
For the inside cover I created a double pocket for more details you can view the video tutorial.
For the front of page 1 I adhered the little flap (view above). I also created a small inside pocket which is shown in the video tutorial.
The back of page 1 I used the pattern pink brick paper and then I adhered a piece of scrap pattern paper with gluing only the side edges and one long edge and placed it down to create a side pocket. I also added one of the chipboard windows and one of the small sentiment cards on top.
Page 2, I created a pocket using the pattern paper and adhered lace to the edge of the pocket. And adhered this to the large flap I listed above.
(For more details you can view the video tutorial)
For the back of the large flap I created a belly band using some scrap pattern pieces.
Page 2 I used one of the pattern papers that has the pretty gate. I fussy cut some flowers and adhered them down as a tuck spot. Only place glue to the bottom edges.
(For more details you can view the video tutorial)
Back of Page 2 I adhered the large doily to the back of page 2. I adhered one of the sentiment cards to the top only placing glue at the top edge.
The back inside cover I adhered down the pattern paper that has the notebook page image. I just love this page, and it's great for writing down details about your folio.
Here is a finished picture of the front.
For the top of the cover I used the circle window to create a little clock. I painted it with white gesso then added the clock stick on top from the sticker sheet. I also added in a couple of the sticker butterflies. I fussy cut the white butterfly. I adhered down the little doily edges on the edge of the windows. Then I added in the sentiment card in the middle, and adhered on the flowers that came in the scrapbook kit. (For more details you can view the video tutorial)
I hope you enjoyed today's step by step tutorial. I loved the simplicity of this folio, it's so simple and elegant. It can easily hold up to 20 photos or you can also use it as journal.
Don't forget to post your project on our Facebook Group Page, link is down below. We would love to see what you create.
For more details you can always view the video tutorial process, which is at the top of the page.
Thanks again for joining me, I have all the links listed for you throughout the post so just click on the words and you will be taken directly to the store.
Wishing you all a great day and Happy Crafting.
Don’t forget to follow us on all our social media:
It's Deb here sharing a really easy project using the Tres Jolie July Card Tag and More Kit. I also brought a a few items from the Scrapbooking Kit. I hope you enjoy today's project. I have the step by step tutorial down below as well the video tutorial for you. I have the links and photos below for you to check out both kits, just click the link and it take you directly to the Tres Jolie Shop.
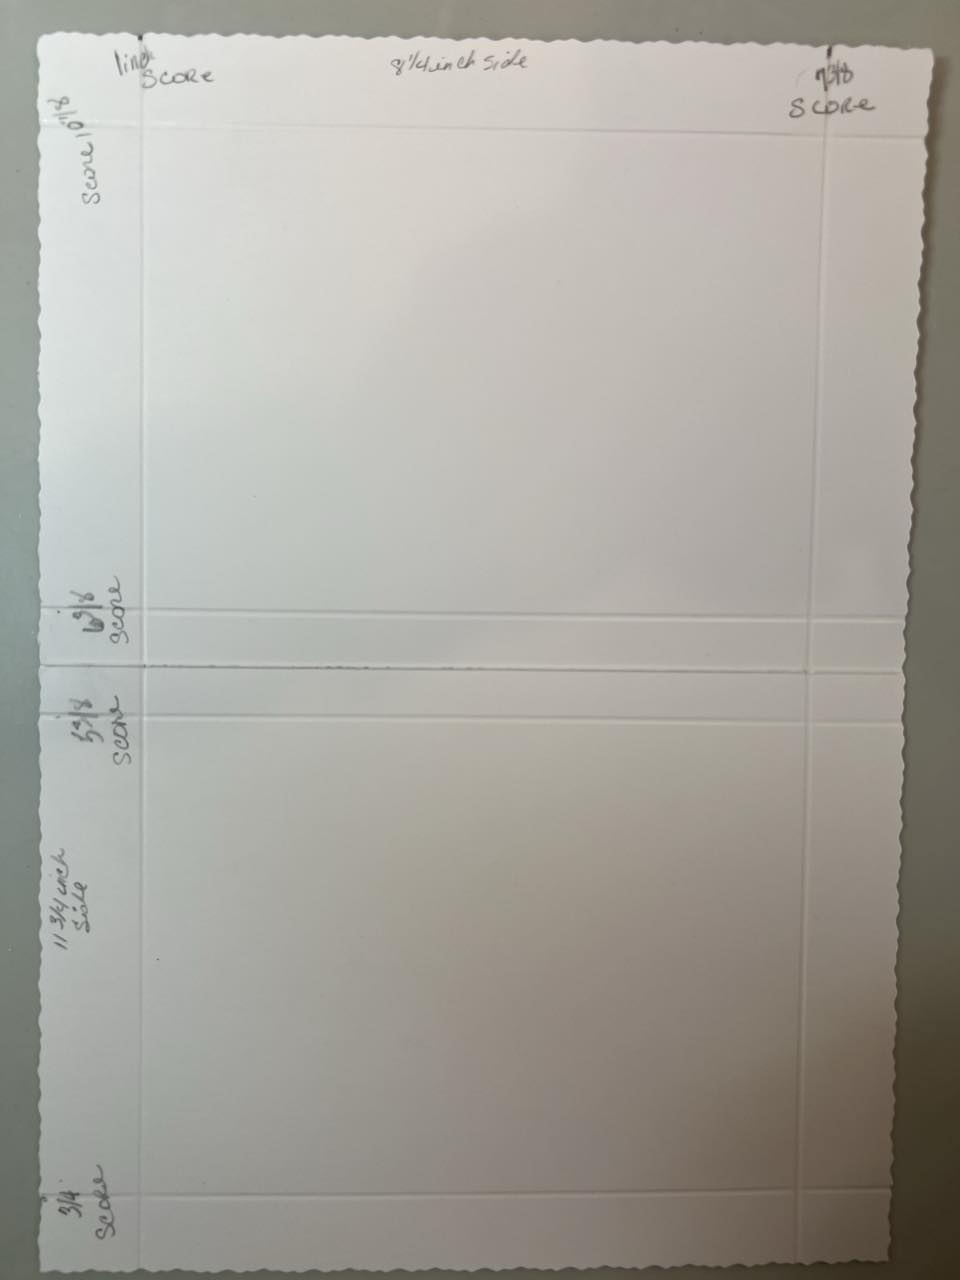
To start out you will use the largest card in the card kit. With the 11 3/4 inch card across the scoreboard Score at 3/4, 5 3/8, 6 3/8 and 10 7/8 inches.
Turn to the 8 1/4 inch side across the scoreboard, score at 1 and 7 3/8 inches.
Next fold the 5 3/8 inch score line and fold it back towards the flap, do this for all 4 areas.
See below as the folded part folds on to the same side towards the same scored line.
You should have a little fold as shown below.
Down below is how all 4 areas should look. You can see video tutorial to follow along.
Next adhere down the flaps. Only the middle section, do not place adhesive past the first score line on the right or left side as this closure area and it will not close if adhered.
Next punch one of the top flaps with rounded corners. Only one side as that side will fit into the rectangular flap.
For the chipboard leaf vines I used a lt. green and dark green gelato to color them and inked a bit of the grape fruit around them. I added glossy accents to them, set aside to dry.
I did use the Bee Honey comb wreath using my gelatos to color around it and added glossy accents to them, set aside to dry.
Here I wanted share with you how the metal dies work. These are so neat as you can place a card that tucks underneath the border.
I adhered the pretty polka dot pattern paper with an area for my sentiment inside the card.
Look how wonderful these all turned out. I just love the card box holder. I like that this paper gives you space to stamp a sentiment on it. And I like how everything coordinates well together. One think I would like to say is to not add a lot of bulk to your cards as you will not be able to get many inside and the box may not close very tight.
I hope you enjoyed today's step by step tutorial, remember I have the video tutorial for your convenience. I had a great time using the Card, Tag and More Kit along with the Chipboard Bee Honey Comb Wreath and a few of the white flowers from the Scrapbook Kit.
For more details you can always view the video tutorial process, which is at the top of the page.
Thanks again for joining me, I have all the links listed for you throughout the post so just click on the words and you will be taken directly to the store.
Wishing you all a great day and Happy Crafting.
Don’t forget to follow us on all our social media:
So good to be here with y'all again. Today I have a really fun and quick project for you using the March 2024 Mixed Media Kit from Tres Jolie. This canvas was so quick to create and so fun. I love using the mixed media kit along with other items from the Card, Tag and More Kit and Scrapbooking Kit. I know you are going to love this fun quick project.
As always I have a step by step tutorial for you sharing the video process along with some photos below for your convenience.
Make sure the stencil butter is dry as it will smear, just a tip as mine smeared a bit. Next I applied the LindysGang Magical bayou boogie gold around the canvas and wiping it around. Set aside to dry
I cut out the one of the clocks from the rice paper and adhered to chipboard circle to place inside the pocket watch.
I then cut another clock from the rice paper and adhered on top of the previous clock and placed the clock inside.
For this part use the chipboard frame from the Card, Tag and More Kit and place glue to the oval which is the center of the frame. Then place behind the lady and burnish down.
Grab the frame and place over the oval until it fits.
Next turn over and add a bit of water to a towel and rub some water around the rice paper and tear off.
Take the frame off and add glue to the inside center of the frame and place frame back on the oval piece. This will keep the frame on the rice paper.
Next I took the Glamour Gel and brushed over the frame and key.
I used the Magical bayou boogie gold powder put some down and added a bit of water, just a drop of two as you want it little dark. I then brushed on the frame in certain areas and some over the image to create a rust look on the edges. I did the same with the chipboard key from the scrapbook kit.
I added everything together on the canvas. I did back up the words with chipboard, you can view the video tutorial as it will show all whole process from beginning to end.
Thank you all for joining me today I hope you liked today's mixed media project. It was so fun to create this canvas and play around with the items inside this Mixed Media Kit.
I have links throughout the post here and above showing the kits.
Have a great day and Happy Crafting.
Don’t forget to follow us on all our social media:
Today I am sharing this beautiful little mini album I created using the March Tres Jolie Card, Tags and More Kit. This is a quick little mini album that can a few photos or snapshots of any special occasion, fantastic as a little brag book for holding those special photos.
Here is the video tutorial that also gives a step by step with more details.
To get started on this we need to fold all the cards from the Card Kit and place adhesive on the back of each one except the last card.
I added glue on top of the double back tape and then grab the next card and adhere the front of the card to the adhesive side. Make sure to burnish down each time you adhere your card.
Here is a photo of 3 of the cards adhered together.
Next place a ribbon or seam binding around the mini album as this will be your closure. And cut you mats for the inside of the mini album. I cut mine at 4 1/8 x 5 3/8 inches.
Here is a photo of the inside after all the cards are adhered and I placed one of the mats down.
For a couple of the mats I decided to cut the inside with an xacto knife to create a little pocket.
Next place the adhesive around the edges of the mat and add adhesive to the back of the wooden panel side only.
Next place down on your page.
For this mat I used my xacto knife to cut around the flowers to create a nice little pocket. This turned out so pretty. Just follow the same instructions. Place your adhesive around the edges of the backside of the mat and add adhesive to the upper right hand side. (see video tutorial for more details)
Here is the finished page.
Here are a few photos of the mini album after I finished decorating the inside.
I hope you enjoyed today's step by step tutorial you can always see more details on the video tutorial just go back to the top and click on the video. I do have links throughout the tutorial for you so you can head to Tres Jolie to check out all these beautiful Card, Tag and More Kits, Scrapbooking Kits, and Mixed Media Kit in the store.
Thanks so much for joining me. Have a great day and Happy Crafting.
Don’t forget to follow us on all our social media:




.png)


