I can't believe it's the end of August, and here comes Fall right around the corner. For my project share today I used the August Scrapbook Kit. I created an Easel card that sits on top of a box with a pull out drawer to hold a small journal, notebook, cards or whatever you would like to place inside. I have a video tutorial for you as well as the step by step down below. I hope you enjoy today's project.
August Scrapbook Kit
To start off you will need 2 pieces of 8 1/2 x 11 cardstock. Cut one down to 8 x 81/2. Next place adhesive on the right side end of the 8 x 8 1/2 lining up the 8 1/2 x 11 piece up to the edge of the adhesive and burnish down.
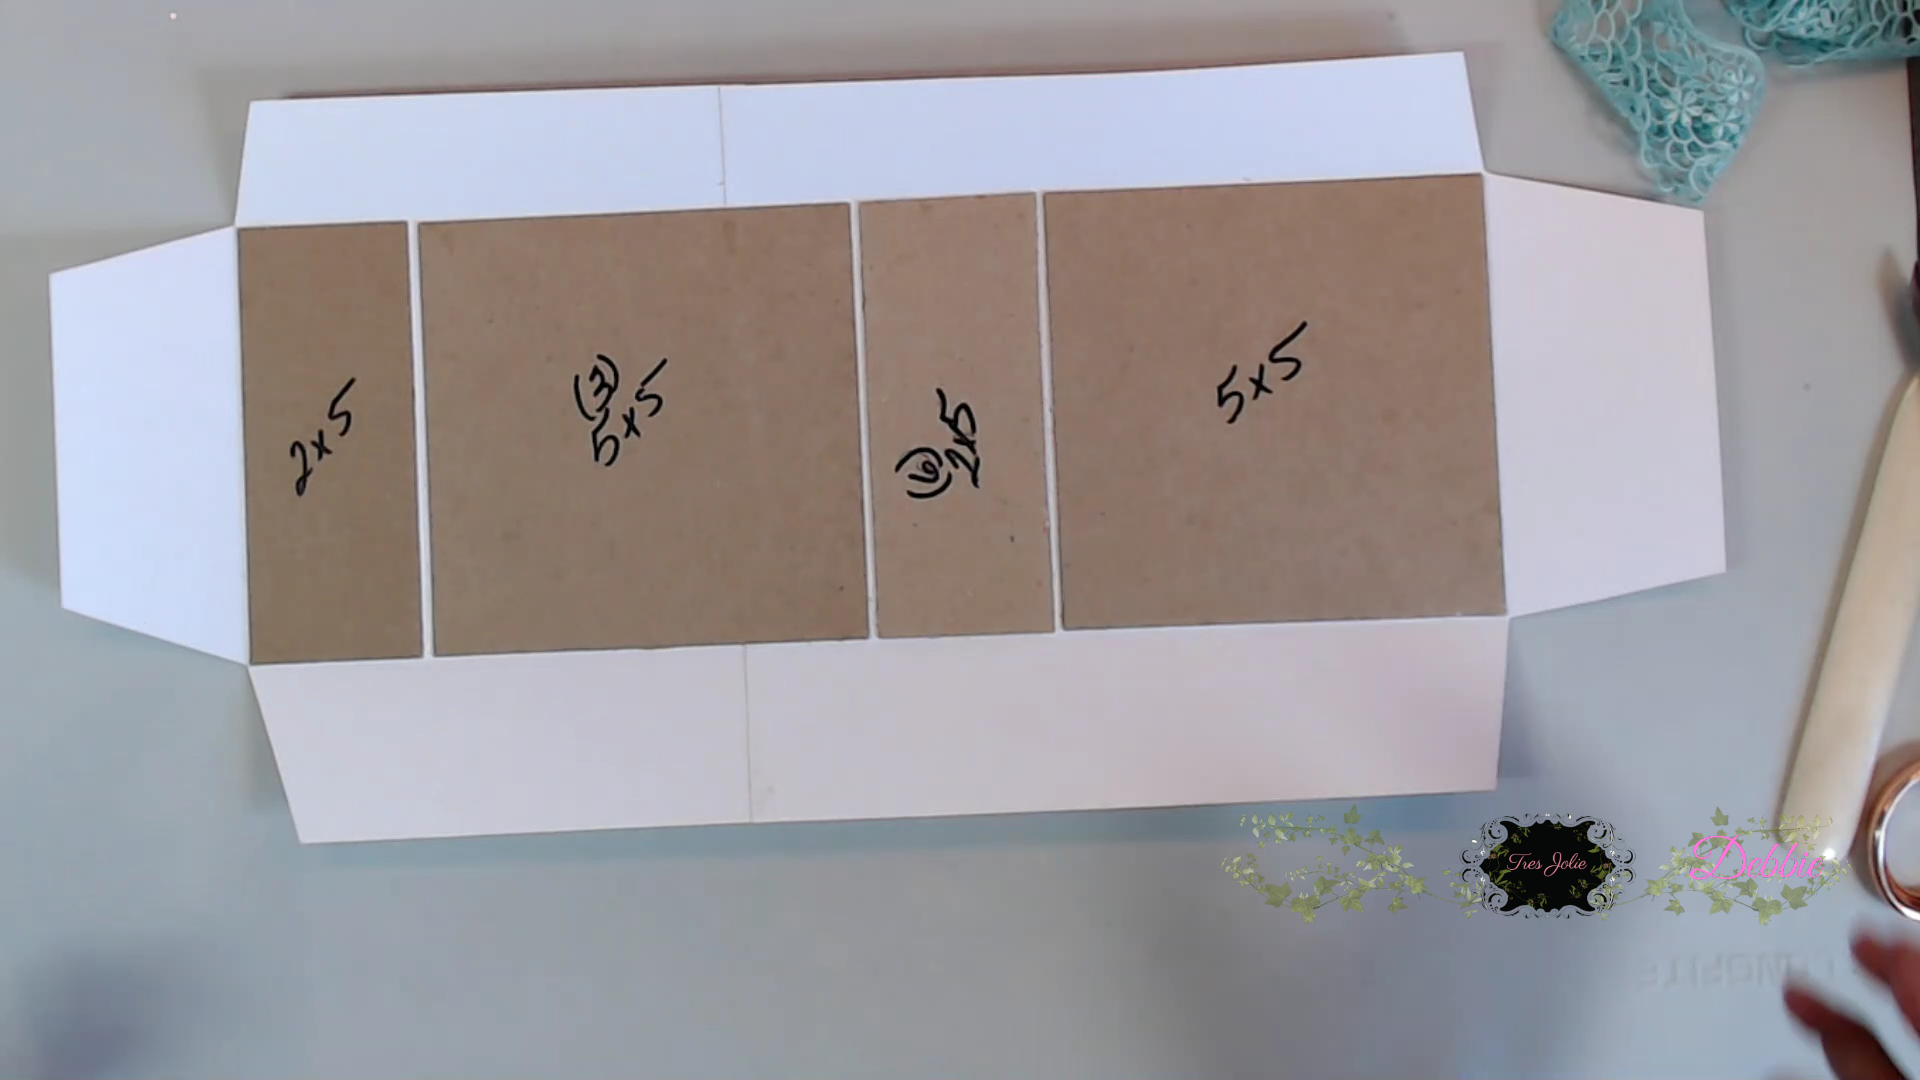
Next cut 2 pieces of chipboard 2x5 and 2 at 5x5 line them along the cardstock piece leaving a 1/8 inch between each piece (shown below). Next go around the chipboard with a bonefolder, as you would if you were creating a mini album, (see video for more details). Next cut the corners off and bevel the corners as shown below. Fold your flaps over to make sure the edges of the paper are flush against the chipboard pieces. Next cut out pieces of cardstock to line up and adhere down on top of the chipboard pieces to the inside is covered.
Next adhere down the top, bottom and right side flaps, then crease in between each chipboard piece with a bone folder. Do Not adhere the left flap down yet.
After you cover the inside fold the box in. Take the left flap and adhere down to the outside of the last chipboard piece to create a square.
Next we create the drawer just like the box. You will cut 2 pieces of cardstock 3 1/2 x 11 inches and adhere them down the same way attaching the ends together.
Cut 4 chipboard pieces at 1 7/8 x 4 7/8 inches and adhere them down leaving 1/8 inch spacing between each piece of chipboard. Again use the bonefolder to make creases around the chipboard. Fold the chipboard pieces in to create a score line and fold in the flaps so the paper is flush with the chipboard with folded over. You should have a line between each piece of chipboard as we folded the chipboard pieces in, cut on either side of that line to create a little arrow or beveled cut between each line as shown below, cut the corner as well. So you should have little flaps now. Place adhesive on the flaps, Do not adhere the Bottom Flaps or the Left Side Flap.
Once you have the top flaps adhered down and the left flap is adhered down to the last piece of chipboard you have the bottom flaps that will fold in as shown below.
Cut a piece of 4 3/4 x 4 3/4 inch chipboard piece, if it doesn't fit cut it down to fit inside your small box, this is the bottom of the drawer. Adhere this square piece to flaps on the bottom inside of the box.
Now slide your drawer inside the box.
For the easel card cut one piece of cardstock at 4 1/2 x 4 1/2 inches and another cardstock at 4 1/2 x 9. Fold the 4 1/2 x 9 in half and then fold the top of piece of the 4 1/2 x 9 in half again
This is what you should have once your fold in the top piece of the card. Next adhere the 4 1/2 x 4 1/2 to the bottom half that is folded. This creates your easel card.
Here is a photo of how the easel should be adhered to bottom half of the card. I have already placed my pattern on the backside of the card.
After you decorate your easel card and the box, place adhesive on the back of the easel card and adhere to the top of your box. Inside the easel card you want to be sure to mount a little sentiment of something with foam tape on the bottom so the top of the card can rest on that pop up piece with foam tape. (As shown below) I added a sentiment with some flowers and my card will rest on the flower to be sure it stays standing up.
Here is the finished picture of what the Easel Card and Box look like. I covered a small notepad with the paper collection, using the beautiful crystal embellishments, and fussy cut out some flower images from the paper collection. I also added a small pencil to the pad and placed that inside.
I hope you enjoyed today's step by step tutorial, remember I have the video tutorial for your convenience. I had a great time using this months August Scrapbook Kit, you really get a ton of fun crafty stuff inside. I am really pleased on how this easel card and journal box turned out. I hope you felt inspired to create this Easel Card and Journal Box using this month August Scrapbook Kit.
Don't forget to post your project on our Facebook Group Page, link is down below.
For more details you can always view the video tutorial process, which is at the top of the page.
Thanks again for joining me, I have all the links listed for you throughout the post so just click on the words and you will be taken directly to the store.
Wishing you all a great day and Happy Crafting.
Don’t forget to follow us on all our social media:


.png)

Absolutely beautiful Debbie and fabulous instructions, I really need to have a go, love the paper kit too, it is beautiful..
ReplyDeleteLuv CHRISSYxx