Welcome back everyone,
It's Debbie here with you today. I hope you all had a wonderful holiday season with your loved ones. I have some wonderful that happened over the holiday season....I have a grandson. As some of you know I have 5 granddaughters, well now we get to enjoy our first grandson and first boy into our family, since I have no sons, only daughters. lol We are just thrilled beyond words.
Since holidays are over it is now time to get back to work and back into the crafty mojo. To start off the new year I have this wonderful project using Clear Scrap's 6" Hight DIY Wood Box, which holds memory dex cards, cards or any other items. I decided to call this my Friendship Box to keep 4x4 cards I created to send out to my friends, I am planning on creating a few other DIY Boxes in other themes such as birthdays, Father's Day, Mother's Day and other occasions. This will help me keep my cards a little more organized. lol Below are a couple of photos of how I decorated my DIY Friendship Box. I hope you enjoy the step by step tutorial below.
Placed 3x3 and 4x4 cards inside. You can definitely use this for MDC as well.
To start off I used the
6 inch High Back DIY Wood Box from Clear Scraps. From your stash you can either use paint or your pattern paper. I used both, along with additional embellishments.
***Quick Note - these pieces fit together so easy, its just like putting together a puzzle.
To start off I painted all my wooden panels white.
Here are the panels after I finished painting them all.
First we are going to adhere the back panel on, so I placed glue on the underside edge as shown below.
Next fit this in just like a puzzle piece, to the edge of the large panel, which is the bottom of your DIY Box.
Next while I was holding the back piece for a bit I added glue to one of the sides of the bottom panel. I placed glue along the bottom as shown below and add glue to side of the back piece I'm holding in place.
Next grab the side piece with high slope connecting to the back piece.

Turn the box with the open end towards you and now adhere and place in the second side piece, with the sloped end adhered to the back piece.

Put into place. I just love how easy this box came together.
Next adhere and connect the front piece in place.
Now it's all finished. I did paint the top edges white all around and I painted the brown little pieces on the sides and bottom.
Here is a photo that shows the top edges all painted white along with the MDC pieces all painted white.
So if you are going to adhere pattern paper on the inside and outside of your box you can definitely trace and cut out the items prior to putting the box together. However, I didn't think about it until afterwards, it still worked. You can do it either way.
After everything dried I took the side of my box and laid it down on the pattern paper and traced around it, I only did this for side panels as the rest of the panels you can just measure with your ruler.
After tracing I cut both side out and will adhere to the right and left panels.
Here is what the sides look like inside and outside after adhering the pattern paper on the panels.
The photo below shows the covered inside along with the how you turn it into a MDC holder.
I decided to add some little legs to the bottom of the box. I just used some wooden beads from my stash and hot glued them into place.
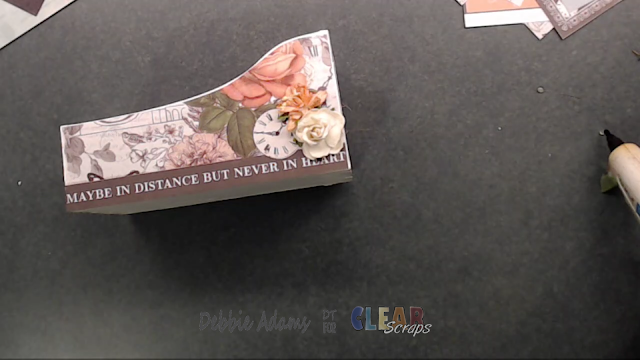
Here is the left side decorated. I used a border sticker to line the bottom and a couple of flowers from my stash.
Here is the right side decorated. I used the other half of the border sticker to line the bottom and a couple of flowers from my stash.
Here is what the front looks like after I decorated it.
I really like how this looks, so full of spring vibe, which I am totally ready for spring.
I hope you enjoyed today's decorative DIY Friendship Box, and gave you some inspiration to try creating one for yourself or a friend. I think these
DIY Wooden Boxes have so much versatility for any type of decoration or gift giving.
As always, take care and Happy Crafting.


No comments:
Post a Comment