Followers

Showing posts with label chipboarad. Show all posts

Tuesday, October 29, 2024

Simple Christmas Cards

Hi everyone, 

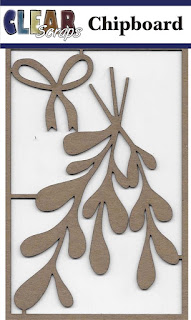
Today I'm sharing my first Christmas Cards I created for the Christmas season. I used the Mistletoe Chipboard Embellishment and Ornate Lock Chipboard Embellishment. I created some really simple cards and have a step by step tutorial below for you and I have the links with photos below for your convenience. 

Mistletoe Chipboard Embellishment                 Ornate Lock Chipboard Embellishment


CARD 1

To start off I used premade card pack. Pick out two cards for this card.

Pick one of the cards out and cut in half. 


Fold the front of the card in half, as shown below. 


Next add glue to bottom folded portion and adhere the card piece you cut in half. 


Next I embossed the ornate lock chipboard embellishment piece in gold. 
I did two layers on the chipboard piece 


Here is the front of the card. I adhered down the ornate piece added the sentiment "Joy" on the top and the some ribbon. Such a simple card, looks great with the ornate lock chipboard piece. 


CARD 2

For the second card use the third card and fold the front of the card over, as shown below. This will be a Z Fold Card. We will be placing the Mistletoe and bow on top.

To start off I placed glue around the chipboard bow and then sprinkled the red glitter on top of the bow. Set aside to dry. 


Next I painted the mistletoe green.


After the mistletoe dries I adhere down on top of the folded piece.


Adhere the red ribbon on top with a little flat back pearl and added the "Merry Christmas" sentiment. 


Below I photos of both Christmas Card finished. I really like how the ornate lock looks embossed in gold it looks so regal. I also really like the mistletoe with bow looks so good on the Z Fold card. Both are perfect for Christmas cards.


I  hope you enjoyed today's step by step tutorial and found some inspiration from today's Christmas Cards. 

Thanks for joining me today.
Happy Crafting my Friends, 


Saturday, June 15, 2024

Fun Summer Purses Mem Dex Cards

 Hi everyone,

Hope you all are doing well today. Today I am bringing you some fun Memory Dex Cards (MDC) for summer. I have a few techniques you can use to create a stunning and fun mem-dex card for your craft swaps with your crafty friends or maybe something decorative for your rolodex. 


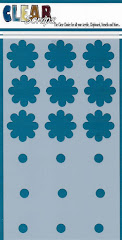
Here are the items I used from Clear Scraps. I am loving this 5x9 flower stencil. 

Purses Chipboard Dividers 3 pk.                             5x9 Flowers Layering Stencil


MDC 1 - 

For the first one trace just the purse portion of the mem dex divider and then adhere to the chipboard purse divider. 

Next I used some gold embossing powder to emboss the handle of the purse. I next placed some stickers from my stash to decorate the Mem Dex Card Divider. I used these cute stickers a Summer dress, sunglasses with some cute shoes and perfume are perfect for a cute summer look, and I added some beautiful flowers to finish it off.


MDC 2 - 

MDC 2 -

For the little clasp purse I placed gesso on top first. I used some clear gesso and let dry for few hours or you can dry with a heat tool.

For this one I painted with a lovely turquoise blue. Once this was dried I placed my stencil on and used a sponge applicator to apply versa mark on for embossing. 


I embossed with gold embossing powder and also embossed the two little round clasps. 


Here is the finished "So Chic" Mem dex divider. I just love how this one turned out. I really like the flowers stencil so versatile and fun to use. 
 

MDC 3 - 

For the last mem dex card divider I traced onto embossed paper, cut and adhered on to the chipboard purse. I did emboss the handle with gold first and then went over it in black embossing powder. 


Here is the 3rd chipboard mem dex purse finished. I used some chipboard flower pieces from my stash. 


Here are all three mem dex dividers finished. I just love how each one turned out.

I hope you enjoyed today's step by step tutorial sharing how to use some fun stencils to create these beautiful and fun Purses Chipboard Dividers using some of Clear Scraps products. I just had so much fun creating these. 
As always Thank You for joining me today. 
Happy Crafting my Friends,