I think Fall is here, at least I hope. It has been a little cooler in the mornings for sure and not super hot during the days, like it was in the summer. Today in Texas we may even get some rain. :D
Well now that Fall seems to be upon us and it's October I have a fun little Trick or Treat Tag Flip Book for you using Tres Jolie's Card/Tag and More Kit. This little book turned out super cute. I also have a video for you to view with further instructions.
Here are the supplies you will need.
To begin I took a chipboard January frame from the store that did not come in the kit. I framed an image and traces the outer edge of the frame cut out the image.
Next I placed glue on my tag. I suggest to do this for all the tags, front and back, as it's much easier to just cut around them.
Adhered my paper and cut around the tag. Do this for all tags.
Next I used placed gesso around the chipboard. I did use clear gesso.
Next I used the three Distress Mica Stains that came in the Mixed Media Kit, phantom mist, specimen, ominous twilight. I love these three colors together they really give your chipboard a cool Halloween vibe. After you spray let the chipboard dry.
Once your chipboard dries, adhere the image we cut out to the back of the chipboard. I added a idea-ology plaque "Curious Things" along with the skull cross bones and the beautiful flowers from this months scrapbooking kit. These flowers are just gorgeous.
I really liked this house and so I placed one of the pattern papers on the tag and fussy cut the house out from the other pattern paper that matched it. This we will create a tuck area for a photo mat or small booklet.
Place foam tape on the back of the house, and we place it on top of the house that is on the tag.
Here is what it will look like. It will be popped up with foam tape and look 3 D.
The next thing I created some pockets out of this wooden pattern paper. I took this pattern paper and turned it over and added some ahesive.
So on the back of the tag add the adhesive around the edges and across the top portion to create a rectangle,
Cut straight along the dark brown strip. Before cutting leave a 1/4 inch from the right and left side edge of the tag as you begin to cut down the paper.
Once you are done cutting place a small piece of adhesive above the cut line, which is the bottom pocket.
Adhere to the tag.
Here is the finished tag. I lined the pockets with a spider web die cut I had in my stash. Added a few small tags with some black tulle stapled on top of each tag.
For this tag I took a scrap piece of paper, adhered to the tag and cut the excess off.
I cut out another piece measuring 4x3 1/2 inches from the same paper pattern so it would match up.
Next you want to stretch the square piece we just cut. So you will gently pull around the paper on all four sides. This may cause the paper to curl that is okay. Just do this a few times and adhere down on top of the tag.
This is my favorite thing to do with images I don't want to fussy cut out and like to keep the paper as a whole pice. Grab the xacto knife and cut around the image, leave a 1/4 inch border on the edge of the paper and down at the paper if you cut down that far.
Next I added a small scrap piece on top of the tag in the middle which will show behind our cut away piece, as this will be a tuck spot. Add glue or adhesive.
Next adhere you full piece of pattern paper to the tag.
Cut the excess paper aways from the tag.
Now our little tag is finished. This little gal is just adorable.
Here are some close ups of the finished tags using all the items from the Card/Tag and More Kit.
I used all the black chipboard pieces with the cemetery and pumpkins and I only have a few scraps left from the paper collection. I really like how this Trick or Treat Flip Book turned out.
This photo shows the front of each tag. The left tag is the front cover of our flip book, the middle tag is the house we fussy cut from the paper collection and I added a small fold out booklet that you can add 3x3 inch photos inside it is placed right behind the house, I also added the chipboard cemetery. The tag on right I added the TH idea-ology cross bones and the bone collector word plaques also with chipboard cemetery.
This photo is the back of the three tags shown above. I added photo mats, chipboard pieces from the kit and fussy cut out the cut-a-parts from the paper collection.
Here are two more of the tags. These tags show the front, which have tuck spots and nice photo mats along with the cute chipboard pieces. I did add a spider web die cut to various spots of the tags and pockets. I just love that little cat and pumpkin those 2 are in the cut-a-part page. The left tag with girl and moon is a tuck spot and the photo mat comes out and you can place it right back inside.
These two are the back of the two tags shown above. The one on the left is back of last tag in our flip book. The tag on the right is the one we did together that has a pocket and I inserted a small booklet that slides inside the pocket. The size of the booklet is 6 x 5 inches folded in half gives you a measurement of 3 x 5 inches for photos or journaling.
I hope you enjoyed today's Trick or Treat Tag Flip Book project. For more detailed instructions you can check out the video shown above. I have links below here for you to check out all the products I used on this project.
All the designers will be revealing their projects on the Tres Jolie blog all month long. Make sure you join us for tons of inspiration, including video and photo tutorials. Also make sure you check out our newest chipboard designs that were just added to the store.
I hope you all are doing well today. This month is when we celebrate those who have graduated from High School, or Colleges. So at International Art & Soul our theme is - Graduation.
I choose this theme cause I know lots of people will be creating graduation projects for family, friends and others who will be graduating this month and next month. Congratulations to all of those who worked hard and earned their diploma's and Degrees. Wishing you all much success.
For my projects I created a tag to place on a gift bag and a small box for a necklace for my daughter when she graduates.
I have a little tag to share with you today. I created this tag using a little Tag Kit I received Margaret Halldorson who is over on FB Group A&M Creative Exploring Paper Crafts in the group they do lots of fun things. In the group once a month you receive a kit from someone when you join up to create a tag using everything you received, you can add your own stuff but the requirement is you must use everything in the kit.
I used everything and then used my Spellbinders die to cut out the tag and that's it. I like how it turned out so festive and ready to be placed on a card or gift.
Here is the Tag up close.
I just love that little squirrel image, he's adorable.
So the challenge #71 themed UK Myths & Legends was a challenge but I loved it as it, it's definitely why we all participate in challenges, right??
So I went to Google, lol, I just wasn't sure what to do, I know I wanted something different. So I found a place located in Scotland that is known for inhabiting mythical Fairies, Hobbits and other little creatures in that realm.
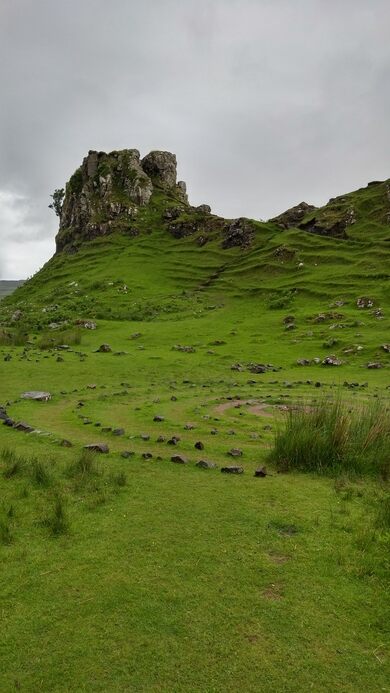
The place I am talking about is known as Fairy Glen, Isle of Skye. This place is a fun location where you can visit and walk through the lush green acres of this land with hills, waterfalls, and ponds that are just breathtaking. From the images I've seen within the many articles I read I would believe that fairies do live here, it so peaceful and quaint. There is also a peak which is known as Castle Ewan, from the article I read it is a little bit of a rocky climb but when you reach the top you are amazed at the beautiful view that surrounds you, and you might be able to spot a fairy or two
.
Here are a few photos of the Fairy Glen, Isle of Skye, along with my artistic insight on this magical place I would love to visit one day.
Photos are from - (Fairy Glen-Isle of Sky, Scotland; atlasobscura.com)
(Fairy Glen-Isle of Sky, Scotland; atlasobscura.com)
(Fairy Glen-Isle of Sky, Scotland; atlasobscura.com)
This photo is from The Guardian, (theguardian.com)
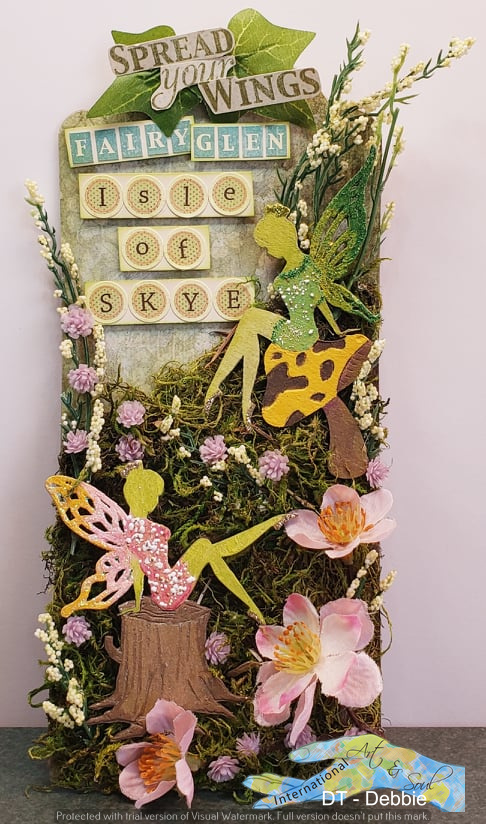
Here is my project I created for this super fun challenge - Everything I used I had in my stash already. I used G45 Once Upon a Springtime Collection, Creative Embellishment chipboards I bought last year, and the flowers were in my flower bin from years past I've been accumulating. LOL
To create my fairies I first applied gesso, and then added some TH distress paints, after they dried I applied glitter and stickles around the wings to make the sparkle. I also used Stampendous Fran-tage Embossing on their lil'outfits to make them sparkly.


.jpg)
.jpg)
.jpg)