Followers

Showing posts with label Easter. Show all posts

Monday, March 18, 2024

Hello Peeps Easter Cards

 Hi Peeps 

I hope you all are doing well. Easter is on it's way can you believe it. So with that being said I have some fun Easter Cards you can create for Easter using Clear Scraps 5x9 Flowers Layering Stencil, Bunnies Chipboard Embellishments and the 4 x6 Hello Peeps Stencil

I hope you enjoy the step by step tutorial below. Down below I have the products I used along with the name & links, just click on the name and you'll be directed to the store. 

Here's a photo of the finished cards. 


Bunnies Chipboard Embellishments                                 5x9 Flowers Layering Stencil
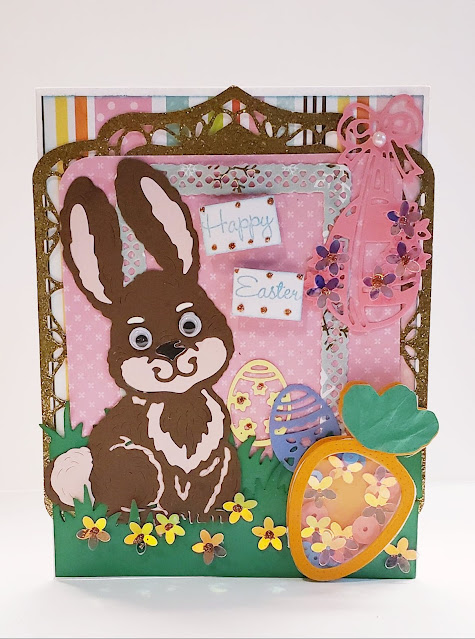


Card #1

To start create a regular card base measuring 4 1/4 x 5 1/2 inches. I place a piece of removable tape diagonal, as shown below. 

Next take the  5x9 Flowers Layering Stencil place it a little above the tape and stencil your first flower, after you have the first scoot the stencil over and ink the next flower down and keep going all over the white space. 


Once you have finished the top of the card move the tape a little bit down so you have about a 2 inch diagonal space between the top and bottom flowers you're stenciling. 


Next I decided to use brown flock for the Bunnies Chipboard Embellishments. You can either use double back tape as shown below or use your glue. I do prefer the glue over the tape I feel it's just easier. After your done applying the adhesive you can place the chipboard piece in the flock and cover it all over. 


Here is the end result. One bunny I used glue and the other bunny I used double back tape. But you can decorate your Bunnies Chipboard Embellishments however you'd like, even paint them. 


Next I covered the midsection with yellow glitter paper and layered with pink cardstock. I added flap back enamel dots from my stash. I also used a Happy Easter metal die from my stash for the sentiment. 
Now the card is finished. 


Card #2

For card #2 we used the 4 x6 Hello Peeps Stencil . This stencil is so cute. I laid it down and just applied my ink as shown below. The size of this card is 4 1/4 x 5 1/2 inches.

Here is what the front of the card looks like after I was done inking with the stencil. I did the cute bunnies in different colors and the words to match. Now you can decorate it. 


I thought it would be nice to use the  5x9 Flowers Layering Stencil and then fussy cut these out to decorate around the card. For the centers of the flowers I used Nuvo flower pollen, but you can use enamel dots or what ever you have in your stash. 


Here is where I place a thin piece of green glitter paper and pattern paper on the top and bottom of the card just to give a little bit of nice border to the card. Below you can see I fussy cut some of the flowers.


Here's the finished card. Super easy peasy right? I added a few enamel dots on the left side and a pink butterfly from my stash to the card. This card is so cute I just love the 4 x6 Hello Peeps Stencil inked with fun bright colors, so full of Spring and Easter. 


Card #3

The size of this card is 4 1/4 x 5 1/2 inches. The yellow glitter cardstock mat is 5 1/4 x 4 inches, the blue polka dot mat measures 4 7/8 x 3 3/4 inches. After you cut the mats  you can glue together. 


For this card I created my own picket fence out of the wooden pattern paper I had in my stash. I cut 4 pickets at 1 x 3 inches and snipped of the top portion to form the picket fence. 


The slat that goes across the pickets measures 1 x 5 inches. I inked each piece with ink to make them a little dark around the edges. I did add foam tape to the back of each picket fence and then laid the long slat piece on top (there is no foam tape on this piece).


Adhere the mat to the card base and decorate the front as you would like. I added the second little Bunnies Chipboard Embellishments on top of the fence along with the remaining stenciled flowers I fussy cut. I found the carrots and grass in my stash and added them. This turned out so adorable. 


I hope you liked today's step by step tutorial. I like that these cards were so easy to create and you can create the flowers from the stencils cut them out and use them to decorate your card, tags or layouts. Just another way you can use this fun 5x9 Flowers Layering Stencil along with the Bunnies Chipboard Embellishments Embellishments and the 4 x6 Hello Peeps Stencil
I wish you all a Happy Easter and Happy Crafting. 


Wednesday, March 16, 2022

Easter Card


 Good Day Everybody,

Hope you all are doing well. Today I am sharing my Easter card I created for International Art & Soul  challenge #129 Easter Chick and Rabbits.


To create this card I used a cute little Rabbit cutting die that came with a carrot shaker. I adhered googly eyes to the rabbit to make it more fun. I used a Happy Easter stamp from my stash. 


Thanks for stopping by. Head over to  International Art & Soul to check out the teamies to see what they created and join in the fun Easter challenge chicks or rabbits. #129. 

Wishing you all a great day!

Debbie 


Monday, July 18, 2016

Mason Jar Mini Album Quick & Easy

Hi everyone!!

Today I am sharing my Design Team Project using this super cute idea you make in one day. Do you get the kits from Country Craft Creations?? Well if you do, you can use those cute little chipboard mason jars you got in July's Kit and the BoBunny Secret Garden paper collection to make this little mini album.
In my last video about 2 weeks ago I showed you how to use the BoBunny Gesso as a paste with your stencil to make a pattern on the front of your chipboard then you can add the BoBunny pearlescents on top of the stenciled pattern to create a really lovely mixed media cover. You can also use the pearlescents to create a unique look to your metal embellishments and resins.
Hope you are inspired to give this a try.
Check out the CountryCraftCreations Store for everything you see here.

Thanks for tuning in, See ya next time! :D 
Deborah xxxx

Sunday, March 6, 2016

Flip Floppy Easter

WOW!! It's Sunday, this weekend went by fast. I just can't believe it and we're already heading into the second week of March. Before you know it Easter will be here then Summer!! Yeahhh!!

Well today starts a new challenge at One Stitch At A Time. I am just amazed at the beautiful cards and creations that my teamies created for this challenge...It's a Good One!!
In this Challenge you can create anything with FANCY BORDERS. How fun is that!! So get those fancy dies, pretty border stickers, cuts from you machines, fancy scissors or other borders that are FANCY and Join us. 

Here is my creation for this fun challenge.
List of Dies - I used Couture die - The Enchanted Escapes Collection - Flip Flop Die and Spellbinders Flourished Trim - Foliage


Here you can see the pink Fun Flock on the ears and I placed 
white Fun Flock on the eyes, tail and tummy. 
I also paper pieced the little arm and carrot and the ears and
popped up with pop dots. 
I added the little foliage on top of the carrot.


Our Sponsor is SitchyBear 
THE PRIZE A $10 GIFT CERTIFICATE
TO THE STORE!!! 


Supplies:
Stamp - StitchyBear Stamp - Bunny with Carrot by BearyDust (I apologize for the inconvenience but this stamp is no longer in our store.) ; Easter stamp from stash; Little chicks from Inky Antics
Dies - Couture die - The Enchanted Escapes Collection - Flip Flop Die; Spellbinders Flourished Trim and Spellbiinders - Foliage (used as carrot topper)
Paper - Neenah - white cardstock; Create & Craft - mirror board and glitter board; K-1 memories - floral paper
Inks - copics; poweder puff inks (on flowers)
Accessories - Fun Flock - pink (on ears) & white (bunny tail, tummy and eyes); Liquid Pearls - pink; Stamp in Up - flower punch

I am entering the following challenges: 

I hope you come join us for this fun challenge #257 - AG with Fancy Borders At One Stitch At A Time. We would love to see your beautiful creations & projects. And don't forget about the StitchyBear Stamps Monthly FB Challenge. 
Wishing you a great day and fab week!!
Deborah 

Saturday, March 28, 2015

Spring Flowers for Easter

Good Morning All, 

Here this morning to bring you some Spring and Easter Inspiration today for the Crafty Sentiments Inspirational Blog. 

I used an embossing folder and glitter to achieve my glittery paper look. 
First I started with my embossing folder - Rub vera mark on the flat side of the emboss design, then run through your embossing machine, spread a heat 'n stick powder on top of the versa mark, heat the heat 'n stick powder til it is melted on the card, last add your glitter and then heat til melted into the card. 

I stamped my image onto white cardstock, used the same embossing folder with my image then I cut out the middle part to fit in the middle of my embossed glitter cardstock (so used the embossing folder twice, one on the colored cardstock and the other on the white cardstock with my image); using pop dots on the back of the image to raise it a little. You can achieve this technique with any type of embossing folders. 

The image I used is Rosie Spring Flowers, its just such a lovely image for Spring and Easter. 
You can find the image at Crafty Sentiments Designs Shop. She's so sweet. 


 ***Close Up***

Supplies:
Stamp: Crafty Sentiments Designs Shop - Rosie Spring Flowers; Inky Antics Stamp - Happy Easter
Paper: Neenha white cs for copics; Recollections - pink paper
Ink: Copics for my image; Momento - Angel Pink
Accessories: Liquid Pearls - baby blue; SU heat 'n stick & Iridescent Ice; Hot Off The Press embossing folder - Swirl Frame; pink silk ribbon flowers & Lace; sm.scallop punch, sm. crystal ribbon

Challenges entered:

Hope you get to pop on over to visit Crafty Sentiments Designs Inspirational Blog. 

Thank you for visiting.  :D 
Hugs, 
Deborah 

Sunday, March 22, 2015

All Dressed Up For Easter

Good Day All,

It's the Mid-Post Reminder for the QuirkyCrafts Challenge #6 - Let's Play Quirky Dress Up. So get those creative juices flowing, and join in the challenge with those Dressed kids or pets you got and Add some Ribbon.
Our sponsors are -
  & 

Join in the FUN and you'll have a chance to win some prizes from here!! :D 

For the challenge I created a fun Easter Card. I just couldn't resist using these two awesome digi's From Buggaboo Stamps -  Bobblehead Kids Bunny &  Easter eggs

Here is my card - 

I colored her face a litte darker on the edges to create her middle face lighter
like a rabbits. I used my favorite DCWV paper - Sunday Afternoon for the back and
the Happy Easter Cake Sticks.  Of course had use add butterflies. (love) :D

I just loved created this card reminded me of when I was little. My cousins & I would hunt for Easter Eggs. :D 

Supplies:
Stamps - Buggaboo Stamps -  Bobblehead Kids Bunny &  Easter eggs
Paper - DCWV - Sunday Afternoon Paper Stack; SU - White cs
Inks - Bic Markers
Accessories - Wilton Cake Stick - Happy Easter; Stickles - yellow, pink; 
From Stash - pink corner pieces from a past Spellbinders die frame cut apart - Majestic Labels Twenty Five; grass from cricut; Blue Butterflies


Challenges entered:
Cute Card Thursday: Challenge 365 - Spring Fever
Simply Create Too: Challenge #81 - "Easter or Bunnies"
Sisterhood of the Snarky Stampers: SOSS 30 -- E is for Easter
Challenge up your life: Challenge #11 - Easter
Catch The Bug Challenge Blog: March Bingo Challenge: I chose Diagonal: 
 Spring/Easter - Player choice(butterflies) - Die Cut - Spellbinders die frame cut as corners (Majestic Labels Twenty Five)
Bugaboo


Thanks for popping in and hope you get a chance to stop by Quirky Crafts to see what the Design Teamies created, such great inspiration. :D

Hugs,
Deborah