Followers

Showing posts with label Box Card. Show all posts

Saturday, June 11, 2016

Father's Day Box Card

Hi all,

Are you ready for Father's Day? It's right around the corner, next weekend. For my Dt project I wanted share with you a Father's Day Box Card I created using Authentique's Explore paper collection. I received from Tamra at Country Craft CreationsStore. It's a fantastic paper collection for Father's Day or masculine cards, mini albums to hold vacation photos or any type of craft project for any occasion. I did do a video on this Authentique Explore Collection - https://www.youtube.com/watch?v=ffhmFRAj8dI

I will give a brief explanation of what I did to each photo but I did a video/tutorial on how I made this card. I tried to make it very easy and brief  as there are 3 parts to the tutorials.

Here is the Box card I created with this awesome Explore collection from Authentique. I did a lot of fussy cutting from one of the 12x12 collage sheets and used one of the Pocket Cards from the 3x4 set, too. I cut small pieces of acetate to hold up my images.

Here is a close up of all the items I fussy cut.

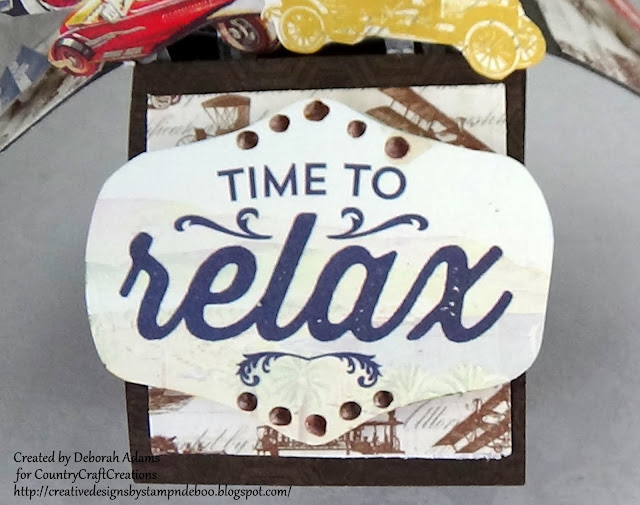
Here is a close Up of front of the flap. I used the BoBunny Chocolate pearlescents to make my pearls.

Here is a side flap showing the plane I fussy cut from the 12x12 collage sheet. I used 3D popup dots for the 3D effect.

Here is another side flap showing the plane I fussy cut from the 12x12 collage sheet. I used 3D popup dots for the 3D effect.

Supplies:
Paper:  Authentique's Explore paper collection.
Accessories: BoBunny - Chocolate pearlescents; Acetate stripes; 3D pop dots;

Here are Challenges I am entering:
CRAFT ROCKET CHALLENGES:  Challenge #17 For A Man or Boy
Calendar Girls Crafty Challenges: Challenge #1 - Father's Day
Simon Says:Father's Day/For A Guy/ Simon Says Wednesday Challenge Blog
Crazy 4 Challenges: Crazy 4 Challenges C4C340
Sisterhood of Snarky Stampers: SoSS #61 V is for Vroom
Craft for the Craic: June Challenge - Something Maculine


Here is the first part of the 3 part YouTube Tutorial on how I made my Box Card.


I hope you were inspired to make a box card. And join us on FB and the Country Craft Creations Blog. there is tons of inspiration for you. :D
Thanks for stopping by and have a great weekend.
Hugs, 
Deborah xxx


Saturday, June 4, 2016

So Full Of Love Bouquet

Hi all, It's me again. lol 

This lovely day I am bringing to you a DT project a Box Card or some people also call it PopUp Box Card. I made this card using the beautiful paper from Tamra's store CountryCraftCreations - Carta Bella white card stock & BOBunny - Butterfly Kisses Collection. You can also see my video on this collection, it's so yummy. https://www.youtube.com/watch?v=35yPw8GI5rg 

For this card I used the 12x12 sticker sheet and one of the 6x6 sheets for the panels and I did a lot of fussy cutting from the beautiful 12x12 printed paper with the birds, butterflies and flowers. And there is a back panel to write or stamp you sentiments. 

As always I will list the steps or what I did for each photo. Well lots of pic's so sit back and enjoy. 

Here is one of the little mason jars from the 12x12 sticker sheet.
I also used the BoBunny Pearlescents - Island Mist on the flower center.
It's so pretty. I also popped these up using the 3D pop ups. 

Here is another sticker I used and I did the 3D pop ups behind it. 
I thought the bee would be a great touch for one of the side panels. 
I also used BoBunny Pearlescents - Island Mist in the corners. 

This is a butterfly sticker from the same sticker sheet. 
I again used a 3D pop up squares behind this sticker. 
I also used BoBunny Pearlescents - Island Mist in the corners. 
Such a beautiful green tone. 

A Close up showing y'all the whole bouquet in the box. 
The banner was fussy cut from the 12x12 sticker sheet as well. 
And everything is held up using the Acetate cut in stips from the BoBunny boxes I received the glimmer sprays in. 
Once you cut your strips you can use your adhesive (I used my craftology box glue)
and glue down the acetate strips to the back of the items you cut and let dry for a 
minute (it didn't take long at all to dry). Once dried you can start adhering them to the 
inside panels that are mounted inside the box. (see below for the tutorial)

Here is a Close Up of that beautiful hummingbird and butterflies.
Gosh, aren't they so pretty! :D 
You can see on the butterflies I used the BoBunny Pearlescents - Island Mist

Here is a CloseUp of the flowers and butterfly using the BOBunny 
pearlescents Island Mist in the middle of the flower and the
butterfly. Isn't it gorgeous!! :D 

Here I placed my mat down on the back panel, then I added the white card stock 
for my sentiments. It is best to stamp or write your sentiment before adhering
this white portion down. 

Supplies: 
Accessories: Acetate Strips 1/8 in; BOBunny pearlescents Island Mist

Challenges entered: 

Thank you for joining me today and I hope you all try one of these Box Cards. You will find lots of videos on YouTube for making these, seriously there are many to choose from and you can make them larger if you'd like. Here is the video I used.Sabrina Radeck -  https://www.youtube.com/watch?v=VYe1W1VecF4
She gives all the measurements for the A2 size and A7 size which is larger. 

Remember you can find this collection herehttp://countrycraftcreations.com/products/bobunny-butterfly-kisses-collection-2-sheets-with-sticker-sheet
http://countrycraftcreations.com/products/pearlescents-island-mist-matches-soiree

Thank you all again for stopping by and Stay Crafty!! :D 
Hugs
Deborah xxx

Saturday, February 21, 2015

A Fairy In Flowers Card Box

Hi All,

Yeah!!! New Release Day #2 at Crafty Sentiments Designs Inspirational Blog. :D  Pop on over to see all the beautiful creations the Design Team made using our New Crafty Sentiments Designs stamp sets. :D  One Word: GORGEOUS!!!!

Today I am sharing with you a box card I made with some silk flowers. I just love box cards can't believe I don't make more of these, they are so fun to make. If you would like to know how please let me know I will give instructions.

Here is my Creation using the New Stamp - Isobel Flower Fairy. Such a cutie!! :D


Supplies:
Stamp: Crafty Sentiments New Release Stamp - Isobel Flower Fairy
Ink/Chalks: Chalks for Dress & Flower-  SU - Pretty in Pink; Yoyo Yellow; Only Orange; Powder Puff Chalk Inks - Coral; Copics: E000, E00, E51, E53;Colored pencils for hair. 
Paper: Heartfelt Creations - Majestic Morning Collection
Accessories: Stickles - Glass Mercury & Crystal; Renea Bouquets White butterflies; White Flower Soft (around the trim of dress);
From Stash - Silk flowers, yellow ribbon, gr.eyelet

Challenges entered: Joining these wonderful Challenge sites- 


Thank you for stopping by hope you found some inspiration today, and please stop by Crafty Sentiments Design Inspirational Blog for more crafty inspiration. :D 
Have a great crafty weekend. 
Hugs, 
Deborah